
3 Tips for Importing Questions
Importing allows you to add multiple questions to ExamSoft at once, without having to enter each by hand into the system. You can import questions in an RTF (rich text format) file, which can be created from a Word document, or a CSV (comma separated values) file, which can be created from an Excel spreadsheet.
It is important to format questions properly before trying to import. If a question has improper formatting, it likely won’t import or won’t import correctly. Additionally, the formatting is what tells ExamSoft which answer choice is correct, as well as which type of question it is (such as true/false or multiple choice). Please follow the instructions here to format questions for import: https://customered.s3.amazonaws.com/QRGs/Questions/Q_QUE102_ImportingQuesionsRTF.pdf.
Tips:
Import Questions, Not an Exam – One of the biggest misconceptions about importing is that you’re importing “an exam.” This is not true. When you import a document with questions into ExamSoft, you’re importing individual questions in bulk. After you’ve imported the document with questions, you’ll need to build an exam in ExamSoft using these (and possibly other) questions. There is no way to import an exam; exams have to be created manually in ExamSoft.
Create an RTF file – RTF is one of the two file formats you can use to import questions. To create an RTF file from a Word document: In Word, click File, then click Save As, and then change the Save As Type menu at the bottom of the screen to Rich Text Format. Click Save.
Create a CSV file – CSV is one of the two file formats you can use to import questions. To create a CSV file from an Excel spreadsheet: In Excel, click File, then click Save As, and then change the Save As Type menu at the bottom of the screen to CSV (Comma Delimited). Click Save.
Import Questions as Drafts – When importing, click the “Import all questions as draft” checkbox so that you can edit the questions after importing. If you forget to check this box, you can still edit the questions after you import them; you’ll just have to create a new revision of the question to do so.
Formatting Help – When importing an RTF file, select the Clean MS Word Formatting filter from the Select the Filter menu. This gets rid of any extra formatting from Word and can reduce errors that prevent questions from importing.
How to Fix Errors – If you receive an error message that one or more of your questions couldn’t be imported, click the Download Error Report button to see which questions had the errors. Then, cancel this import, edit your original document to correct the errors, and try again to import.
The Point at Which Questions are Imported – Your questions won’t be imported until you click the Import Valid Questions button on the same screen that tells you if there are any importing errors.
Importing Doesn’t Overwrite – Importing the same questions twice will create two sets of questions. It will not overwrite any of the questions you already imported or created.
Question Folders – In your RTF or CSV file, you can designate which folder(s) the questions should be imported into. This is helpful if you want to import different questions into different folders in ExamSoft. However, if you want all of your questions to go into the same folder, you don’t need to designate the folder location within your RFT or CSV file; instead, you’ll select the folder when you import.
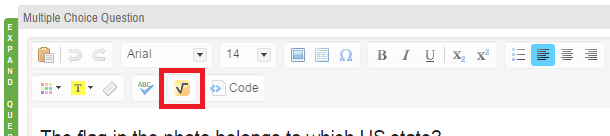
Special Characters – If your questions contain special characters, it may be easier for you to add the characters after your questions are imported into ExamSoft. When importing, check the “Import all questions as draft” checkbox to ensure that you can easily edit the questions. Then, open each question, click in the field where you want to insert the special character, and click the WIRIS editor button in the toolbar that appears (screenshot below). The WIRIS editor allows you to insert special characters and symbols in both the question stem and answer choices.
Import Category – All questions that are imported into ExamSoft (as opposed to being created manually in ExamSoft) will be tagged with an “Import category.” While there is usually no need to remove it, you can remove this category if you want. You can do this in bulk by selecting all of the questions after they’ve been imported and then selecting Change Category Assignments from the Questions Bulk Edit Options… drop-down menu under the list of questions.
Additional Help – If you have trouble importing your questions, please contact Erich Bauer at ejbauer@iu.edu or 317-274-8303.
How to Make Sure Groups of Questions Appear Together
Sometimes, you may want to group a few related questions together on an exam, while randomizing the order of the rest of the questions. For example, you may have three questions that are all about the same clinical scenario and may want them to appear together on the test. You can keep groups of questions from being split up when you randomize by following the instructions below.
Notes:
Grouped questions will remain in the same order and together, but the group itself may appear at any point on the exam, when you randomize the order of questions on the exam. The order of questions within the group is determined by the order in which you placed them when you created the exam.
Groups only work if you randomize the question order. If you do not randomize the order of questions on the exam, there is no reason to use groups. You will need to simply put all questions in order, and if you do not put the grouped questions together manually, Examplify will not do it for you if you don’t randomize.
Create or import the questions that you want to group. Here are some resources to help you with this: Quick reference guide for creating questions & Quick reference guide for importing questions.
Open one of the questions you want to group by navigating to the Questions tab, clicking on the folder where it is housed, and then clicking on the question title.
If the question has already been approved, click the Create New Revision/Edit button underneath the question. If the question has not yet been approved (i.e., is still in draft form), skip this step.
Enter a word or short phrase in the Group field. This will be the name for your group of questions. Any question with this group name will be grouped together, if you randomize the order of questions on your exam.
Click Save to save the question as a draft. If you’re ready to approve the question for use on an exam, you can click the Approve button.
Repeat #2 – 5 for the other questions in the group. Make sure to enter the same word or phrase in the Group field because this is what ExamSoft looks for to link the questions together. After you create the group name by adding it to one question, it will appear in a list as you type for other questions, and you can simply select it from the list to make sure that you have the same spelling.