
Introduction to HTML
On This Page
- Overview
- What Is HTML?
- Where is HTML Used?
- Common HTML Tags
- How to Tag Content in HTML
- Using Attributes
- Working with Text
- Working with Links
- Working with Images
- Working with Videos
- Working with Tables
Overview
Many accessibility fixes can be made using built-in tools provided by the various platforms available at IU. However, there are a number of fixes that can only be fixed with code. For these situations, HyperText Markup Language (HTML) is used.
This page is an introduction to accessible HTML. Concepts described on this page are expanded on in other sections of this guide, including the Basics section. Links are provided throughout this page to more information in this guide and in external resources.
By the end of this tutorial, you should be able to:
- Identify the purpose of common HTML tags
- Apply HTML tags to text, images, and tables
- Modify HTML tags present on text, images, and tables
What is HTML?
HTML is a formatting language that gives web pages their structure. This language tags (or “marks up”) the contents of the page to indicate the parts of the content. Your web browser (think Safari, Edge, Chrome, etc.) uses this information to display the page correctly.
You can think of these content parts as “building blocks”. Each type of HTML tag corresponds to a building block that you will commonly see in documents or web pages, such as:
- Paragraphs
- Tables
- Ordered (numbered) lists
- Unordered (bulleted) lists
- Images
- Videos
- Sections that are different than the text surrounding them
- And more!
Everything you see on a web page will have an associated tag. Each tag has a name or abbreviation that indicates its purpose, which helps your web browser (and you!) understand what the tag does.
Where is HTML Used?
HTML is the foundation the internet is built on, so all web pages are made with it. You have access to use it in many online services, including Canvas, Pressbooks, edX, Quick Checks, and more. Some online services give you more options to customize your HTML than others.
All of the content you create with these services is formatted with HTML (even if you use built-in tools to make them). Because of this, you can create things using the built-in tools and edit them later using HTML, and vice versa.
The HTML Editor
Most online services have a way to edit the page without touching the HTML. This editor, which usually lets you format the page like a document, is generally called the Rich Content Editor.
The HTML Editor is a way to edit the HTML directly. The visual elements of the page are converted to their HTML, and you can edit them by changing the tags and their details. HTML editors are usually found as an option near the Rich Content Editor once you’ve started editing the page.
For more information, see:
- Appendix: Accessing the HTML Editor in Canvas (COMING SOON)
Common HTML Tags
You will see many different tags when looking at your pages in HTML. Tags often use abbreviations instead of full names. Some of the most common tags you will encounter are shown in the table below.
You may not need to know how to use all of these tags, as many platforms can do a lot of formatting for you, but it can be useful to know what they are and what they do. See the next section, “How to Tag Text in HTML”, for an explanation of why most tags have two versions.
| Page Piece | HTML opening and closing tags | What the Piece Does |
|---|---|---|
| Paragraph | <p>, </p> | Most common page piece; organizes blocks of text into paragraphs. Each paragraph will have white space around it to distinguish it. |
| Headings | <h#>, </h#> | Creates a heading or subheading of a specific size. Sizes are 1 through 6, where 1 is the biggest and 6 is the smallest. |
| Bold text | <strong>, </strong> | Creates bold text to provide emphasis. Should be used only to highlight important ideas. |
| Italic text | <em>, </em> | Creates italic text to provide emphasis. Should be used only to highlight important ideas. |
| Table | <table>, </table> | Begins and ends a table. <table> tags will contain more tags for each piece of the table, listed below. |
| Table row | <tr>, </tr> | Begins and ends a horizontal table row, which can contain headers or cells. |
| Table header | <th>, </th> | Begins and ends a table header, which describes the contents of a row or column (like a title). |
| Table cell | <td>, </td> | Begins and ends a cell of data. |
| Division | <div>, </div> | A <div> is a large piece of the page that should be formatted differently than the pieces surrounding it. Often used to format pages and provide visual decoration. |
| Ordered lists | <ol>, </ol> | Begins and ends an “ordered” (usually numbered) list. Ordered lists contain list items (described below). |
| Unordered lists | <ul>, </ul> | Begins and ends an “unordered” (bulleted) list. Unordered lists contain list items (described below). |
| List item | <li>, </li> | Begins and ends an item in an ordered or unordered list. |
| Images | <img />, (no closing tag) | Indicates an image. You will see a lot of extra information in an <img> tag, especially text like this: <img alt=”alt text” /> |
| “span” | <span>, </span> | Begins and ends a short section of text that is different than the text surrounding it. Often used to format text or mark text in a different language. |
| Web link | <a>, </a> | A hyperlink to another web page or document, also called an anchor. |
| Video | <iframe>, </iframe> | This one is different because the <iframe> is a special case. Most videos in Canvas are from an outside site like Kaltura, and have to be handled differently than normal HTML, so they use the <iframe> tag. |
How to Tag Content in HTML
HTML tags consist of names or abbreviations enclosed in angle brackets, which are also called greater than or less than symbols (‘<’ and ‘>’). The brackets are required to distinguish the HTML tags from your text. All tags begin with a less than (‘<‘) bracket, and they all end with a greater than bracket (‘>’).
For example, to indicate that a paragraph should start, you would use a paragraph ‘p’ tag like this:
<p>
Most HTML tags have an opening tag and a matching closing tag. All of the content that you want to be considered “together” should be between the opening and closing tags. Closing tags are the same as the opening tags, but have a forward slash (‘/’) after the initial bracket. So a closing paragraph tag looks like this:
</p>
So, to indicate that the sentence “The quick brown fox jumps over the lazy dog” is a paragraph, you would write this:
<p>The quick brown fox jumps over the lazy dog.</p>
An exception to this rule are images, which have no closing tag and have a forward slash at the end instead:
<img href=”link_to_image” alt=”alternative text” />
Tags can be contained in other tags. For example, you might want to highlight some key words in a sentence by making them bold. So you would write:
<p><strong>This text is bold.</strong> This text isn’t bold.</p>
Tags should always be closed in the order that they’re opened. In other words, if you open tag 1, then tag 2, you should close tag 2 first and then tag 1.
When you create your opening tag, it’s a good idea to make your closing tag right away. If you forget your closing tag, many online platforms will try to put it in for you – but they won’t understand where the end tag is supposed to go, so the tag might not end up where you want it!
<strong><p>Notice that the opening tags here are in the wrong order.</strong> The opening tags are in reverse order compared to the closing tags. Also, paragraphs tags provide structure, so they should come first, while bold text just changes the text appearance, so it should come second.</p>
Using Attributes
HTML tags can be customized with features called attributes. Attributes are additional code added to the opening HTML tag that allow you to specify how the HTML tag is structured or formatted.
Attributes are most commonly used in one of three ways:
- To provide information for links
- To provide information for images
- To format page features with the
style=””attribute (described more in Advanced HTML (COMING SOON))
For more information about images and links, see Working with Links and Working with Images on this page.
Working with Text
Headings
Headings and subheadings label sections of your content. They allow you to organize your content and create subsections that are clearly distinguished from the rest of the content.
Headings are indicated with the <h#> and </h#> tags, where the number (#) is the heading level. Level 1 is the highest level of heading and should be used first where it is available. It should also only be used once. Levels 2 through 6 indicate subsections under level 1.
Headings are automatically formatted by the tool you’re using. You can usually apply custom formatting to them once they are created.
The following code shows how a heading 1 would be structured in HTML.
<h1>This is a heading 1.</h1>
The following code shows how a heading 3 would be structured.
<h3>This is a heading 3. It would be a subsection under a heading 2.</h3>
For more information about how to use headings, see Text Basics.
Paragraphs
Paragraph tags organize blocks of text. They provide visual separation between concepts by including white space between paragraphs, but also organize the information structurally. Paragraphs are used to group concepts together or show a change of topic. They are read as separate units by screen readers.
To create a paragraph, enclose your content between <p> and </p> tags. The following code is an example paragraph.
<p>This is an example paragraph. All of the sentences in this paragraph are relevant to each other, and should be interpreted separately from other paragraphs.</p>
Some online platforms will add paragraph tags automatically to many other tags, like images or videos. This is normal and no action is required.
Bold Text
Bold formatting provides emphasis to text. It should be used sparingly to highlight important information, ideas, or key words. Note that screen reader software does not announce when text is bolded, so if your content is especially important, consider separating it out into its own paragraph or section with a heading.
The following code shows how bold text can be applied to a sentence.
<p><strong>This text is bold.</strong> This text is not.</p>
The finished example would look like the following text.
This text is bold. This text is not.
Italic Text
Italic formatting also provides emphasis to text. It should be used sparingly to highlight important information, ideas, or key words. Like bold text, screen reader software does not announce when text is italicized, and large blocks of italic text can be difficult to read by people with dyslexia. If your content is especially important, consider separating it out into its own paragraph or section with a heading.
The following code shows how italic text can be applied to a sentence.
<p><em>This text is italic.</em> This text is not.</p>
The finished example would look like the following text.
This text is italic. This text is not.
Lists
This introduction will discuss two types of lists: ordered and unordered lists. (Some less common types of lists are described in the advanced parts of this guide.)
Most tools have built-in interface options to create ordered and unordered lists, so you will probably use the interface for most lists. However, it is helpful to know how to create a list in case you need to apply advanced modifications for some accessibility needs.
Ordered Lists
Ordered lists are a series of items that should be displayed and understood in a certain order. They are often used to list steps, sequences of events, and ranked items. Once you create the HTML, ordered lists are automatically numbered on the saved page.
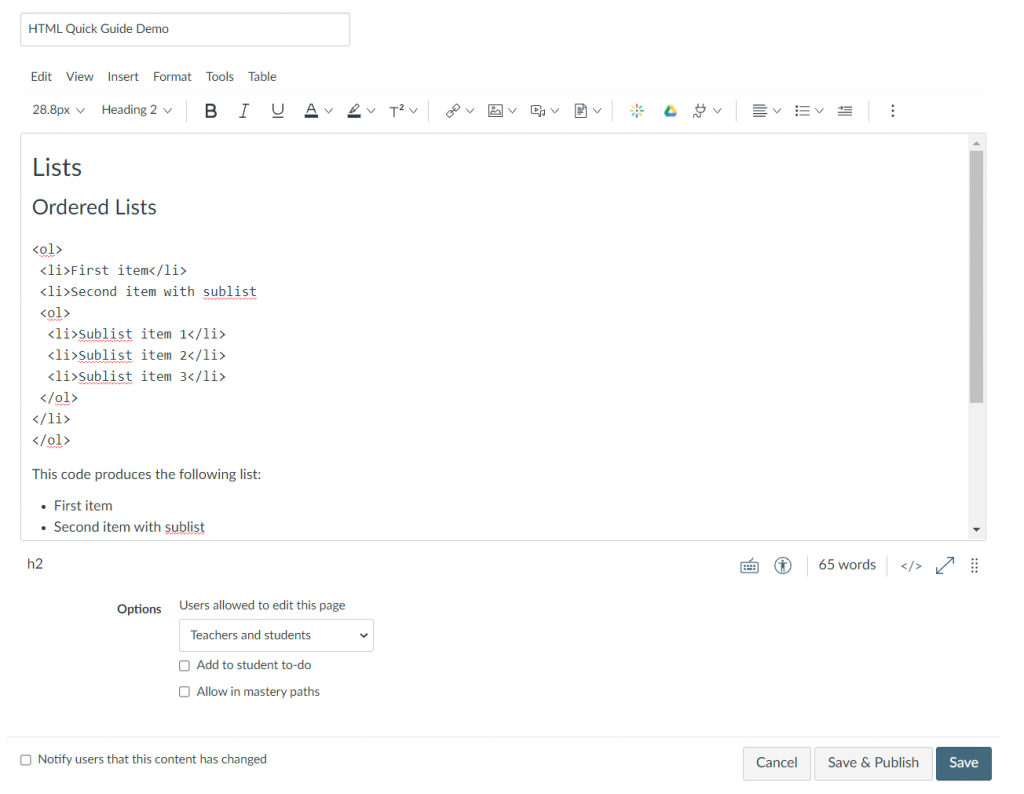
The following example shows a set of steps for opening the HTML editor in Canvas. Note that each step must be completed in a specific order, so the ordered list is a good choice in this situation.
- Navigate to the page you want to edit.
- Click the “Edit” button.
- Click the “HTML Editor” button below the editing window.
Ordered lists begin and end with the <ol> and </ol> tags. Each item in the list appears between these tags as a list item (between <li> and </li> tags). The list is automatically numbered from top to bottom.
The following code shows a simple ordered list.
<ol><li>First item</li>
<li>Second item</li>
<li>Third item</li>
<li>Fourth item</li>
</ol>
The example above would look like the following on the saved page.
- First item
- Second item
- Third item
- Fourth item
Unordered Lists
Unordered lists are a series of items that should be understood as having a relationship to one another, but are not in a specific order. They are often called bulleted lists because each item has a symbol or bullet next to it.
The following example shows a subset of birds endemic to Madagascar. Although the list items are related to each other, the list does not need to be read in a specific order. An unordered list is a good choice for this situation.
- Alaotra grebe
- Henst’s goshawk
- Giant coua
- Velvet asity
Unordered lists begin and end with the <ul> and </ul> tags. Each item in the list appears between these tags as a list item (between <li> and </li> tags). Each item is automatically given a bullet on the saved page.
The following code shows a simple unordered list.
<ul><li>First item</li>
<li>Second item</li>
<li>Third item</li>
<li>Fourth item</li>
</ul>
The example above would look like the following on the saved page.
- First item
- Second item
- Third item
- Fourth item
Working with Links
Links are connections from one webpage to another. They are also called anchors (which is why the HTML tags for links are <a> and </a>).
Image tags need two pieces of information to work correctly:
- the HREF (link destination) attribute, and
- descriptive link text.
The link destination is a unique string of letters, numbers, and symbols, often called a web link or uniform resource locator (URL). For example, the URL of this guide is iu.pressbooks.pub/edsaccessibility.
Descriptive link text is contained between the <a> and </a> tags and is shown on the completed page. Link text must be descriptive to tell users where the link will take them. It must also be unique, so screen reader users can distinguish between links on a page. For example, “click here” is neither descriptive nor unique, but “find out more about links on the IU Knowledge Base” is both descriptive and unique.
A basic link is formatted as follows:
<a href=”LINK_URL_HERE”>Descriptive link text</a>
Links in Canvas
Often, Canvas will create links for you if you use the Links option in the Rich Text Editor. This is preferred for links to other pages in your course, because they will update automatically if your content is copied to a new course run. Otherwise, manually created links will point back to your old course run, which may not be visible to your current students.
Links in edX
Links to your existing edX course pages can be found on their Studio page (the editable interface available to course staff). Like in Canvas, this link (found in the right-hand sidebar) automatically updates if your content is transferred to a new course run.
External Links
If you need to link to an external website, you can copy the URL directly from your web browser’s address bar. You can then create the external link using the interface in either Canvas or edX.

Optional: Target
Sometimes it may be desirable to require a link to open in a new browser tab or window. This should be used sparingly, because changing tabs can be confusing for screen reader users. However, sometimes it can be beneficial, because the link may be useful to reference without moving away from the original web page. Please note that Canvas already does this automatically for external website links, so no action is required.
Opening a link in a new tab is most commonly used when providing an image transcript on a different course page. This allows learners to access the transcript without moving away from the original content and allows them to reference it multiple times if needed. For more information about image transcripts, see Image Basics.
When opening a course link in a new tab, it’s best practice to indicate what will happen in the descriptive link text. Since this is an unusual way for a link to behave, providing this information helps learners to know what to expect before they click on the link. A good option is to add “(opens in new tab or window)” to the end of your descriptive text.
To require a link to open in a new tab, use the target=”_blank” attribute. Note the underscore (_) before the word blank; this must be written exactly as shown.
An example of a link using the target attribute is shown below.
<a href=”LINK_URL_HERE” target=”_blank”>Descriptive link text (opens in new tab or window)</a>
Working with Images
Images are slightly different from most tags. As mentioned before, they don’t have a closing tag. The basic code for an image is as follows:
<img src=”link_to_image” width=”100%” height=”” alt=”alternative text” />
An image tag needs information in all of the parts above to display correctly. The parts are:
- Src (the path and file name of the image where it is stored)
- Width
- Height
- Alt (alternative text)
The following sections describe each of these attributes in more detail.
Image Source
The SRC attribute is the link to the image where it lives on the web. If you are adding an image to a platform like Canvas, the image will live on the platform in its file structure. For example, in a Canvas course the image will live in the Files area, while in Pressbooks it will be found under Media.
In Canvas, you can add the image using the Image button in the rich content editor, then edit the other attributes with HTML as needed.
Image Width
Width determines how wide the image appears on the page (horizontally). If the image should fill the width of the page, use width=”100%” and the image will resize automatically.
Otherwise, you can use interface tools to resize the image. This method is helpful because many interface tools automatically maintain proportions for you.
Image Height
Height determines how tall the image is (vertically). If you’ve already specified that the width should span across the whole page (width=”100%”), then use an empty height value (height=""). This makes sure that the image proportions remain the same.
Otherwise, you can use interface tools to resize the image. This method is helpful because many interface tools automatically maintain proportions for you.
Alternative Text
Alternative text (alt text) is a short description of an image that’s provided when the image is not available for any reason. It’s most commonly used by screen readers to describe images to people who are blind or have low vision. However, it’s also used as an alternative if the image doesn’t load on the page. This is most common when someone is viewing the page with an unreliable internet connection.
The alt attribute tag should always be present on an image. If the image contains important information, text will appear between the quotes:
<image href=”sample_image1.jpg” width=”100%” height=”” alt=”A sample image with descriptive text for demonstration purposes.” />
If the image doesn’t contain any important information, the alt tag will be left empty to mark the image as decorative.
<image href=”sample_image2.jpg” width=”100%” height=”” alt=”” />
On some platforms, a decorative image will automatically be given an additional attribute that also indicates the image is decorative. This is not necessary to apply, but can be left in whenever the image is decorative. If the image is not decorative, you can remove this attribute and add in your alt text.
<image href=”sample_image2.jpg” width=”100%” height=”” alt=”” data-decorative=”true” />
For more information about alternative text, see Image Basics.
Finding Images on the Page
It can sometimes be difficult to find the image code once you’ve switched to the HTML editor. To help make this easier, try the following:
- In the Rich Content Editor, look for the image and find some unique text nearby.
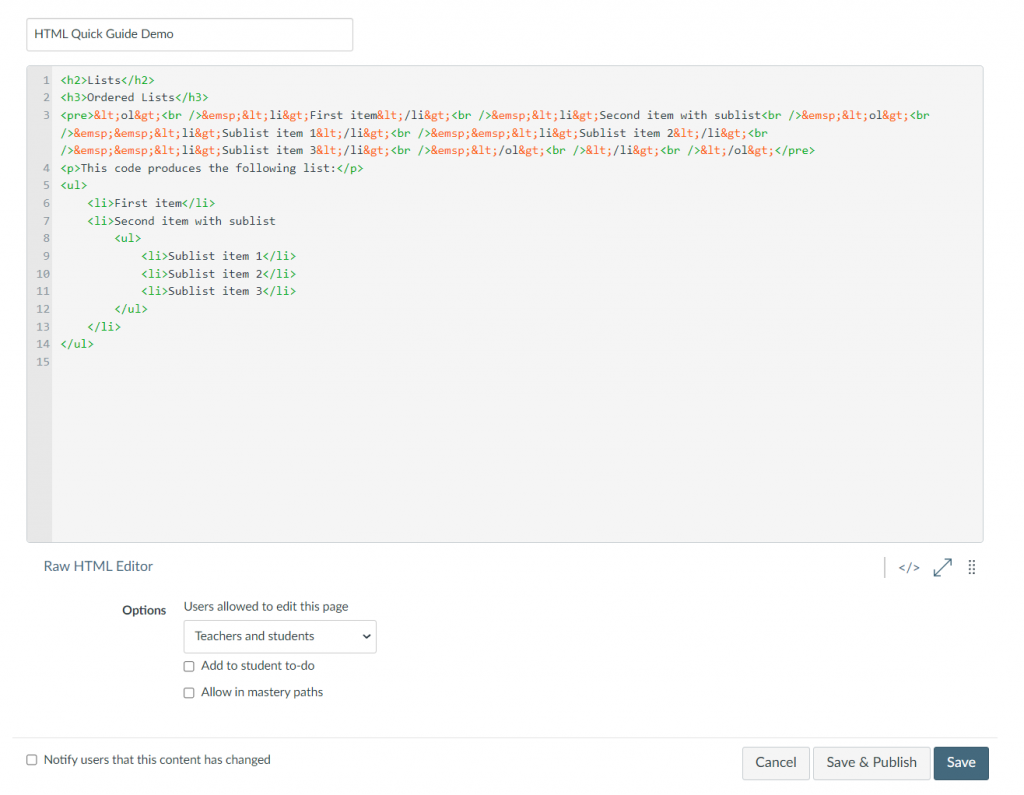
- Switch to the HTML Editor.
- Find the text that you noticed previously.
- Look for an
<img />tag nearby this text.
Working with Videos
Videos can be added to a course in one of two ways:
- In Canvas, videos are uploaded to Kaltura and embedded in the course page using the Rich Content Editor.
- In edX, videos are uploaded to the course directly and embedded in the course page using the interface.
To use the interface method, see Upload and share video in Canvas with Kaltura (IU Knowledge Base).
When working in the HTML editor, you will see an <iframe> tag where the video should be. This tag will include a lot of extra information that helps the video show properly and be the size that you specified when you inserted it into the page. Under normal circumstances, you do not need to edit any of the content contained in the <iframe> tag.
Working with Tables
Tables are used to format sets of information into rows and columns. They consist of a main opening and closing tag (<table> and </table>), and additional tags contained between them. The additional tags provide the structure of the table and can be customized according to your needs.
This guide describes the general details of how to make a table. For step-by-step resources for making accessible tables, see the resources linked at the end of this section.
An example table is shown below. The HTML for this table is available after the image description.
| First column header | Second column header |
|---|---|
| First row, first cell | First row, second cell |
| Second row, first cell | No data (filler text for cell intentionally left blank) |
A table always begins with a caption that provides a unique label to the whole table. Captions are indicated with the <caption> and </caption> tags.
The rest of the table is made up of horizontal rows that contain individual data cells.
- Rows are indicated with
<tr>and</tr>tags. Data cells are contained in between the tags. - Each individual cell is indicated with a
<td>and</td>tag. The contents of the cell should appear between these tags.
Typically, the first row is made up of headers that label the columns in the table. Headers act like labels for individual cells and provide key information for understanding the table. Headers are indicated with <th> and </th> tags. They also have a scope attribute that indicates how they label the cells that follow them. In most cases, headers will label columns, so the attribute will be scope=”col”. An example header is shown below.
<th scope=”col”>Example header</th>
Except for unusual circumstances, every row in the table should have the same number of cells. If you have blank cells, you can add filler text to make them clear to all users.
Below is the HTML for the above table.
<table><caption>Example table caption</caption><tr>
<th scope=”col”>First Column Header</th>
<th scope=”col”>Second Column Header</th>
</tr>
<tr>
<td>First row, first cell</td>
<td>First row, second cell</td>
</tr>
<tr>
<td>Second row, first cell</td>
<td>No data (filler text for cell intentionally left blank)</td>
</tr>
</table>
For more information and step-by-step instructions for making tables, see: