6 Headers & Body Text
Headers and body text make up the bulk of any webpage. Both headers and body text go within the <body> tag. As a digital writer, you may be writing content directly in a content management system (CMS), such as WordPress. Having a general understanding of how to structure your headers and body text with HTML can be a huge asset.
Headers
Headers refer to text that introduces a page or section. The text “Headers & Body Text” at the top of this page is a header. The text “Headers,” above, is a header that introduces this section, as is the text “Body text,” below.
Headers, like HTML elements, nest within each other. The title of a page is usually referred to as an “H1” (meaning “Header 1”) and has the largest size. All other headers nest under the H1. H2s usually introduce sections of copy, H3s refer to subsections under the H2s, and so on.
To code headers, you’ll use these tags:
- Header 1: <h1>Header text here</h1>
- Header 2: <h2>Header text here</h2>
- Header 3: <h3>Header text here</h3>
- Header 4: <h4>Header text here</h4>
You may occasionally use header designations past H4, and those are simply coded in the same way, with an H5 using the <h5> tag, and so on.
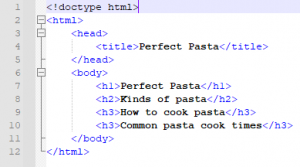
You can see header code in action in the image below:

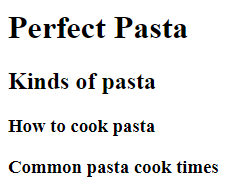
This is how those headers would render on a live page.

Note the size difference. Headers get smaller as the number designations get larger. “Perfect Pasta” is an H1, the title of our page. “Kinds of pasta” is an H2, and “How to cook pasta” and “Common pasta cook times” are both H3s.
Body Text
Headers don’t mean much if there’s no content underneath them. After all, users are coming to your page for the content! To add content, you need to code your body text.
Body text is incredibly easy to code. Before the body of your page, you’ll want to use the <body> tag. Then, each paragraph is set apart with the <p> element. Check out the sample paragraph coded below:

This is how that paragraph renders on a live page:

What if you want to split that paragraph into two? Remember that HTML ignores white space, so just tabbing the beginning of the second paragraph to a new line won’t work. Instead, you need to end the first paragraph with a closing </p> tag and open the second with a new <p>, like this:

Now, the paragraphs render separately on the live page:

Remember that HTML ignores white space. You wouldn’t need to tab the second paragraph down to a new line in order for it to render as it did; you could simply start the new <p> tag right after the closing </p> of the first paragraph. However, for organizational purposes, most coders tab to a new line when they start a new paragraph.
Bolding and italics
Digital writers know that audiences tend to like text to be broken up. Short paragraphs can help this, as can lists and tables, which we’ll talk about later. But there are other, much quicker tools to draw attention to certain parts of text: bolding and italics.
To bold a section of text, simply use the <strong> tag. Italics use the tag <em>. Simply encase the text you want to bold or italicize in this code. This is called an inline element, since it does not start on its own line and instead exists within another line of code. Check out the bolded and italicized words in the code, below:

I’ve wrapped “love pasta” in an <em> tag to italicize it and “perfect” in a <strong> tag to bold it. This is how it loads on a live page:

Sometimes though, you’ll want to break up your text even more. Let’s move on and talk about lists.
