
4 HTML Syntax
Like any language, HTML has syntax. This means that, in order for your code to be considered “well formed” (the HTML equivalent of grammatically correct), you must follow certain foundational rules. Failing to follow these rules means that a computer will not understand your HTML code. This could result in elements failing to render correctly, being able to see your HTML coding on the live webpage, or simply not being able to see the changes you wanted to make.
The first thing to know about HTML is that it is generally case-insensitive. This means that it usually doesn’t matter if you type in lowercase or all caps. However, using lowercase letters in your code is considered the best practice.
Nesting
HTML elements “nest” within each other. This creates “parent,” “child,” and “sibling” elements. Although HTML ignores white space (meaning you could write your code in one giant block and it would render perfectly fine), most coders indent elements on their own lines to show this nesting feature. For example:
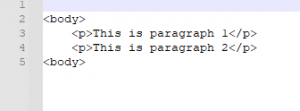
In the example above, the two middle elements—in this case, two paragraph elements—are nested within the body element. This means that the paragraph elements are children of the body element; the body is the parent element of the paragraphs. Because the paragraphs occur on the same level, they are siblings.
Structing your code like this can make it easier to read and navigate. If you need to change something in the future, it will be much easier to find than if you wrote one long block of code.
Tags
Each HTML element is denoted with what is called a tag. Opening tags are written in an “angle bracket element angle bracket” format. Closing tags are written as “angle bracket backslash element angle bracket” format.
For example, the <li> element, which is used to code lists, uses these tags:
- <li> is the opening tag. Note the angle bracket, “li” element, and angle bracket.
- </li> is the closing tag. Note that the format is the same as the opening element, with the addition of the backslash.
These tags let computers know where each element begins and ends.
Required elements
HTML has four required elements, so called because they must be included in every code. These required elements are:
- HTML
- Head
- Title
- Body
The HTML element
The HTML element is the first and last element in your code. It tells a computer that it is looking at HTML coding.
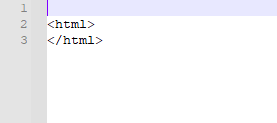
This element encloses everything within your HTML code.
The head element
The head element is a required child of the HTML element; you cannot have HTML code without a head element.
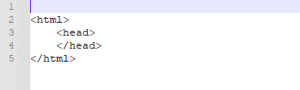
Although the text in your head element won’t show up on a webpage, it is important. It can help browsers understand how to read your code and can even boost your search engine optimization (SEO) efforts.
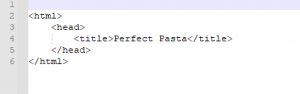
The title element
This is where the magic starts to happen! This is the title of your webpage. Below, you can see the title element nested within the head element, with both the opening and closing tags in place:
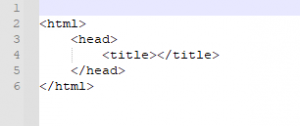
But right now, there’s no title. Let’s add one!
This title won’t actually show up on your webpage; that’s not the purpose of the title element. It will show up on a browser tab, though, as the name of your page, so it is important.

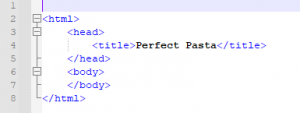
The body element
The body element is what surrounds the bulk of your page. You can see the body element below. We’ll put our webpage coding between the two body tags to create the body of our webpage in future chapters.
Doctype
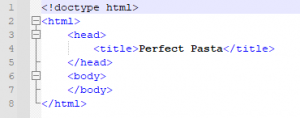
There’s one more thing that needs to be on every HTML document: the document type declaration, commonly called the “doctype.”
We’re learning HTML5, the newest and current standard version of HTML, but other versions do exist. You’ll need to make sure you tell the code what kind of HTML you are working with. The doctype designation for HTML5 is easy. Simply put <!doctype html> before your HTML element.
Now that we have the basic required elements in place, let’s start creating our site!