
Launch Premiere Pro and create a new project.
13 Adobe Text-Based Editing
Introduction
Adobe’s Text-Based Editing feature will allow you to quickly navigate your footage and analyze your edit points with greater speed and efficiency. When activated, a synchronized transcript of the video and audio are created, allowing you to search for key words or phrases then edit or rearrange within your sequence. Review the steps below to help incorporate this feature into your workflow.
How to Use Text-Based Editing in Premiere Pro
How to transcribe source media
(Content obtained from Adobe.com https://helpx.adobe.com/premiere-pro/using/text-based-editing.html)
Follow these steps if you want to transcribe all of your source footage.
-
-
While importing your media, enable Automatic transcription under Import settings.
-
You can select your Language, Speaker labeling options, and Transcription preferences for the selected import media.
-
Once your transcripts are ready, open the Text-Based Editing workspace to review your source transcripts.
How to transcribe individual source files
Transcription is required only for videos that include spoken dialogue. If you don’t need to transcribe all your source media, you can import the media normally and then transcribe specific files.
-
Open Text-Based Editing workspace. In the Project panel, double-click the clips you want to transcribe.
-
In the Text panel, click on the blue Transcribe button.
-
Select your language and whether you want Premiere Pro to separate speakers.
-
After the transcription is complete, the dialogue will appear in the Transcript window.
How to edit transcripts
Use the built-in spelling checker or search and replace feature to correct the spelling of uncommon words or names.
If there are multiple voices in a source file, select Speakers to add their names to the transcript.
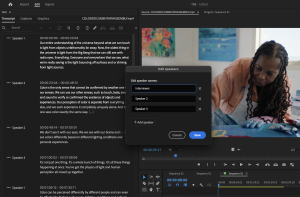
Use the Edit speakers feature to update the names of dialogue speakers in your transcripts.
How to add clips to the Timeline
Text-Based Editing allows you to perform three-point edits to build a sequence on the Timeline.
-
In the Transcript window, read through the text or use search to find the content you’d like to use.
-
Highlight the text in the transcript and use the Insert button to add it in the sequence.
-
Continue adding clips from source media until everything you want to use is on the Timeline.
Note: Just like three-point edits with source video, you can use the comma key (,) to add clips to the Timeline
How to edit a sequence
As you add clips to the Timeline, Premiere Pro creates a new sequence transcript. You can use this new document to edit your rough cut.
-
Select the Timeline panel to switch to the sequence transcript to continue editing.
-
In the sequence transcript, select the text and use copy or paste to move clips. Your text edits are automatically applied in the Timeline.
-
You can also cut or delete text to remove clips from the sequence. Premiere Pro automatically applies a Ripple Edit in the Sequence.
-
When you’re happy with your rough cut, switch to video editing tools for trimming, refining, pacing, color grading, audio sweetening, and adding titles or graphics to your cuts.

Throughout your workflow, you can use the sequence transcript as a navigation tool or to perform edits on your sequence. You can also use the list of keyboard commands for Text-Based Editing.

Multichannel audio support
Some audio files have different microphones recorded on separate channels. With multichannel audio support in Text-Based Editing, you can choose to re-transcribe an audio file using a specific channel or a mix of all channels. This feature works with audio files in a multichannel mono format.
With Channel selection, you can pick the microphone on which your audio was recorded or choose the Mix option if two different speakers were recording on two separate microphones.

Filler Word Detection with bulk delete
Text-Based Editing allows you to detect “uh” and “umm” filler words and bulk delete them in transcripts.
-
Select the icon in the Transcript panel.
-
Choose Text, Filler words, or Pauses to bulk delete.
-
You can then choose to delete single instances or bulk delete any searched text, filler, or pauses.
