P-4. Accuracy, Precision, and Errors
Physics Department of Douglas College; OpenStax; and Joey Wu
Summary
- Understand accuracy and precision in measurements;
- Describe the two types of errors in measurements.


Accuracy and Precision of a Measurement
Science is based on observation and experiment—that is, on measurements. Accuracy is how close a measurement is to the correct value for that measurement. For example, let us say that you are measuring the length of standard computer paper. The packaging in which you purchased the paper states that it is 11.0 inches long. You measure the length of the paper three times and obtain the following measurements: 11.1 in., 11.2 in., and 10.9 in. These measurements are quite accurate because they are very close to the correct value of 11.0 inches. In contrast, if you had obtained a measurement of 12 inches, your measurement would not be very accurate.
The precision of a measurement system is refers to how close the agreement is between repeated measurements (which are repeated under the same conditions). Consider the example of the paper measurements. The precision of the measurements refers to the spread of the measured values. One way to analyze the precision of the measurements would be to determine the range, or difference, between the lowest and the highest measured values. In that case, the lowest value was 10.9 in. and the highest value was 11.2 in. Thus, the measured values deviated from each other by at most 0.3 in. These measurements were relatively precise because they did not vary too much in value. However, if the measured values had been 10.9, 11.1, and 11.9, then the measurements would not be very precise because there would be significant variation from one measurement to another.
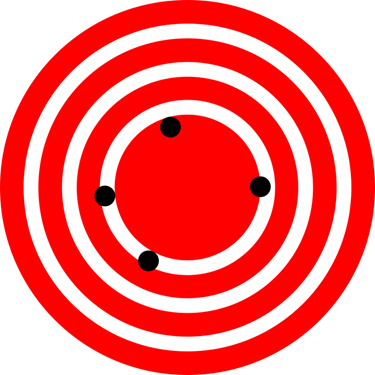
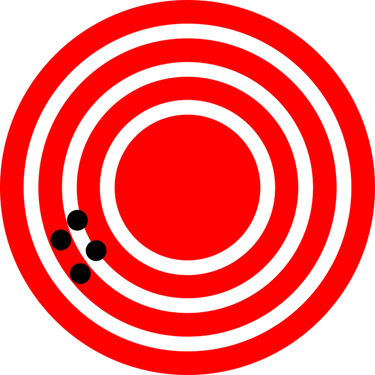
The measurements in the paper example are both accurate and precise, but in some cases, measurements are accurate but not precise, or they are precise but not accurate. Let us consider an example of a GPS system that is attempting to locate the position of a restaurant in a city. Think of the restaurant location as existing at the centre of a bull’s-eye target, and think of each GPS attempt to locate the restaurant as a black dot. In Figure 3 you can see that the GPS measurements are spread out far apart from each other, but they are all relatively close to the actual location of the restaurant at the centre of the target. This indicates a low precision, high accuracy measuring system. However, in Figure 4 the GPS measurements are concentrated quite closely to one another, but they are far away from the target location. This indicates a high precision, low accuracy measuring system.


Accuracy, Precision, and Uncertainty
The degree of accuracy and precision of a measuring system are related to the uncertainty in the measurements. Uncertainty is a quantitative measure of how much your measured values deviate from a standard or expected value. If your measurements are not very accurate or precise, then the uncertainty of your values will be very high. In more general terms, uncertainty can be thought of as a disclaimer for your measured values. For example, if someone asked you to provide the mileage on your car, you might say that it is 45,000 miles, plus or minus 500 miles. The plus or minus amount is the uncertainty in your value. That is, you are indicating that the actual mileage of your car might be as low as 44,500 miles or as high as 45,500 miles, or anywhere in between. All measurements contain some amount of uncertainty. In our example of measuring the length of the paper, we might say that the length of the paper is 11 in., plus or minus 0.2 in. The uncertainty in a measurement, A, is often denoted as δA (“delta A”), so the measurement result would be recorded as A ± δA. In our paper example, the length of the paper could be expressed as 11 in. ± 0.2.
The factors contributing to uncertainty in a measurement include:
- Limitations of the measuring device,
- The skill of the person making the measurement,
- Irregularities in the object being measured,
- Any other factors that affect the outcome (highly dependent on the situation).
In our example, such factors contributing to the uncertainty could be the following: the smallest division on the ruler is 0.1 in., the person using the ruler has bad eyesight, or one side of the paper is slightly longer than the other. At any rate, the uncertainty in a measurement must be based on a careful consideration of all the factors that might contribute and their possible effects.
MAKING CONNECTIONS: REAL-WORLD CONNECTIONS - FEVER OR CHILLS?
Uncertainty is a critical piece of information, both in physics and in many other real-world applications. Imagine you are caring for a sick child. You suspect the child has a fever, so you check his or her temperature with a thermometer. What if the uncertainty of the thermometer were 3.0 °C? If the child’s temperature reading was 37.0 °C (which is normal body temperature), the “true” temperature could be anywhere from a hypothermic 34.0 °C to a dangerously high 40.0 °C. A thermometer with an uncertainty of 3.0 °C would be useless.
Precision of Measurement Tools and Significant Figures
How well we can measure things depends on how good our measuring tools are. A good tool can measure very small differences. For example, a regular ruler can measure to the nearest millimeter. But a caliper can measure to 0.01 millimeter, which is much smaller. The caliper is more precise because it can measure tiny differences in length. Better tools let us measure more precisely and accurately.
When we write down measurements, we can only use as many digits as our tool can measure. If you use a regular ruler to measure a stick, you might get 36.7 cm. You can't say it's 36.71 cm because the ruler isn't that precise. The last digit (7 in this case) is usually an estimate by the person measuring.
We use something called "significant figures" to show how precise our measurement is. The rule is that the last digit we write down is the first one we're not totally sure about. To count significant figures, start from the left and count all the digits until the last one on the right. For example, 36.7 cm has three significant figures.
Significant figures tell us how precise the measuring tool was. They help us understand how sure we can be about a measurement.
Zeros
Special consideration is given to zeros when counting significant figures. The zeros in 0.053 are not significant, because they are only placekeepers that locate the decimal point. There are two significant figures in 0.053. The zeros in 10.053 are not placekeepers but are significant—this number has five significant figures. The zeros in 1300 may or may not be significant depending on the style of writing numbers. They could mean the number is known to the last digit, or they could be placekeepers. So 1300 could have two, three, or four significant figures. (To avoid this ambiguity, write 1300 in scientific notation.) Zeros are significant except when they serve only as placekeepers.
Check Your Understanding 1
2: Determine the number of significant figures in the following measurements:
a: 0.0009
b: 15,450.0
c: 6×10³
d: 87.990
e: 30.42
Significant Figures in this Text
In this text, most numbers are assumed to have three significant figures. Furthermore, consistent numbers of significant figures are used in all worked examples. You will note that an answer given to three digits is based on input good to at least three digits, for example. If the input has fewer significant figures, the answer will also have fewer significant figures. Care is also taken that the number of significant figures is reasonable for the situation posed. In some topics, particularly in optics, more accurate numbers are needed and more than three significant figures will be used. Finally, if a number is exact, such as the two in the formula for the circumference of a circle, c=2πr, it does not affect the number of significant figures in a calculation.
Check Your Understanding 2
1: Perform the following calculations and express your answer using the correct number of significant digits.
(a) A woman has two bags weighing 13.5 pounds and one bag with a weight of 10.2 pounds. What is the total weight of the bags?
(b) The force $$\vec{\text{F}}$$ on an object is equal to its mass m multiplied by its acceleration $$\vec{\text{a}}$$. If a wagon with mass 55 kg accelerates at a rate of 0.0255 m/s2, what is the force on the wagon? (The unit of force is called the newton, and it is expressed with the symbol N.)
PHET EXPLORATION: ESTIMATION
Explore size estimation in one, two, and three dimensions! Multiple levels of difficulty allow for progressive skill improvement.

Errors
Measurements aren't perfect. They can't exactly describe the real world. Good measurements are valid and reliable, but they always have some mistakes. These mistakes are called measurement errors. There are two types: systematic errors and random errors.
Random Errors
Random errors are unpredictable mistakes that don't always make your measurement too high or too low. Have you ever weighed yourself twice on a bathroom scale and gotten slightly different results? Maybe you were 0.1 pounds different each time. That's a random error. It might happen because you stood a little differently each time, or part of your foot was off the scale. If you weighed yourself many times on the same scale, you could figure out your true weight. The small mistakes would even out over time.
Every measurement can be affected by random things that happen in life. This means random errors are always there when we measure things. But if we measure many people, these random errors usually balance out.
Systematic Errors
Now let's talk about systematic errors. These are also called "measurement bias." Unlike random errors, systematic errors always make our measurements wrong in the same way. They usually happen because of a problem we can identify.
Let's use an example to understand this better:
Imagine you made a way to measure how tall people are. But your measuring tool only goes up to 6 feet tall. Now, let's say you use this tool at a college to measure students' heights. What would happen?
- You'd think the tallest person at the school was 6 feet tall.
- But there are probably students taller than 6 feet.
- Your tool would always say these tall students were 6 feet, even though they're actually taller.
This is a systematic error. It always makes the same mistake - it can't measure anyone over 6 feet tall. This might seem like a small problem. But what if you used these measurements to build a new school building? The tall students might hit their heads on the doorways!
So, systematic errors can cause big problems if we don't catch them. They're different from random errors because they always make our measurements wrong in the same way.
Summary
- Accuracy of a measured value refers to how close a measurement is to the correct value. The uncertainty in a measurement is an estimate of the amount by which the measurement result may differ from this value.
- Precision of measured values refers to how close the agreement is between repeated measurements.
- The precision of a measuring tool is related to the size of its measurement increments. The smaller the measurement increment, the more precise the tool.
- Significant figures express the precision of a measuring tool.
- Random errors are unpredictable mistakes that vary each time you measure, while systematic errors are consistent mistakes that always affect measurements in the same way due to a flaw in the measuring process or tool.
Conceptual Questions
1: What is the relationship between the accuracy and uncertainty of a measurement?
2: Prescriptions for vision correction are given in units called diopters (D). Determine the meaning of that unit. Obtain information (perhaps by calling an optometrist or performing an internet search) on the minimum uncertainty with which corrections in diopters are determined and the accuracy with which corrective lenses can be produced. Discuss the sources of uncertainties in both the prescription and accuracy in the manufacture of lenses.
Problems & Exercises
Express your answer to problems in this section to the correct number of significant figures and proper units.
1: Suppose that your bathroom scale reads your mass as 65 kg with a 3% uncertainty. What is the uncertainty in your mass (in kilograms)?
2: A good-quality measuring tape can be off by 0.50 cm over a distance of 20 m. What is its percent uncertainty?
3: (a) A car speedometer has a 5.0% uncertainty. What is the range of possible speeds when it reads 90 km/h? (b) Convert this range to miles per hour. (1 km = 0.6214 mi)
4: An infant’s pulse rate is measured to be 130 ± 5 beats/min. What is the percent uncertainty in this measurement?
5: (a) Suppose that a person has an average heart rate of 72.0 beats/min. How many beats does he or she have in 2.0 y? (b) In 2.00 y? (c) In 2.000 y?
Glossary
- accuracy
- the degree to which a measure value agrees with the correct value for that measurement
- precision
- the degree to which repeated measurements agree with each other
- significant figures
- express the precision of a measuring tool used to measure a value
- uncertainty
- a quantitative measure of how much your measured values deviate from a standard or expected value
-
- Random error
- the error that can be attributed to a set of unknown external factors that randomly influence some observations but not others.
- Systematic error
- Systematic error is an error that is introduced by factors that systematically affect all observations across an entire sample in a systematic manner.
- Source: https://uta.pressbooks.pub/advancedresearchmethodsinsw/chapter/10-7/
Solutions
Check Your Understanding 1
1: (a) 1; the zeros in this number are place keepers that indicate the decimal point
(b) 6; here, the zeros indicate that a measurement was made to the 0.1 decimal point, so the zeros are significant
(c) 1; the value 103 signifies the decimal place, not the number of measured values
(d) 5; the final zero indicates that a measurement was made to the 0.001 decimal point, so it is significant
(e) 4; any zeros located in between significant figures in a number are also significant
Check Your Understanding 2
1: (a) 37.2 pounds; Because the number of bags is an exact value, it is not considered in the significant figures.
(b) 1.4 N; Because the value 55 kg has only two significant figures, the final value must also contain two significant figures.
Problems & Exercises
1: 2 kg
3: (a) 85.5 to 94.5 km/h (b) 53.1 to 58.7 mi/h
5: (a) 7.6 x 10⁶ beats (b) 7.57 x 10^7 beats (c) 7.57 x 10^7\ beats

