
Stitching videos together
- Log in to https://playposit.iu.edu and click ADD NEW BULB.
- Select Kaltura. Locate and add your “Intro” scene.
- Click ADD VIDEO, locate “Scene 1,” and add it to the bulb.
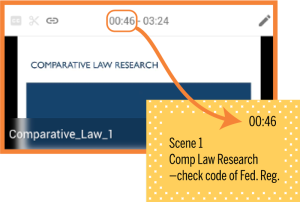
- Note the timecode above the video segments (see right). Return to your paper Choice Map; on the “Scene 1” post-it, write the starting timecode (e.g., 00:46).
- Add the remaining videos segments, and write down the starting timecode on the corresponding post-it notes.
Adding choices
Graded path
- Navigate to the end of the intro video in the PlayPosit timeline.
- Click ADD AN INTERACTION AT… and select MULTIPLE CHOICE.
- Enter your question (e.g., “What will you do next?”), and the possible answers. Indicate the correct answer by clicking the circle to its left.
- Click the gear icon next to the first answer, then ADD JUMP.
- Click and drag the green location pin along the timeline to the start of Scene 1 from your Choice Map (e.g., 00:46 from above).
- Click the gear icon for the next answer, ADD JUMP, and click and drag the location to the start of Scene 2. Do the same for the other answers.
- Click Advanced. Check the box for “Hide correct answer if not selected,” and then “Never show answer highlighting.”
- (Optional) Adjust other Advanced options (e.g., “Allow more than one attempt”) as appropriate.
- Click DONE to save the question.
- Navigate to the next decision point in the timeline, and repeat steps 3-9 for the rest of the video segments (e.g., at the end of Scene 1, you’ll have jumps to Scene 1.1 and 1.2).
- Click the REVIEW tab, then “Playback options”. Click the box next to “Allow learners to retake the bulb upon completion.”
- Click SAVE AND EXIT when you’re done.
Ungraded or multiple path
Ungraded paths
- Navigate to the end of the intro video in the PlayPosit timeline.
- Click ADD AN INTERACTION AT… and select PAUSE.
- Enter your decision prompt (e.g., “What will you do next?”). Under it, enter the answers that correspond to Scene 1, 2, and 3, one per line.
- Select the text for the first choice, and click the jump icon:

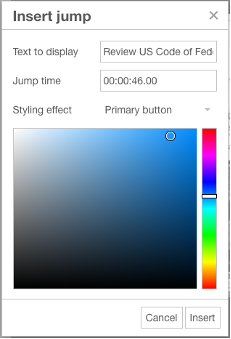
- Text to display: this is the text you selected above.
- Jump time: enter Scene 1’s timecode from your Choice map.
- Styling effect: Choose Primary button or one of the other button types and a color (optional).
- Click Insert. Repeat this for the other two choices.
- Below the choices, type Do not click “Continue” and right-align it.
- Click DONE to save the interaction.
- Navigate to the next decision point in the timeline, and repeat steps 7-10 for the rest of the video segments (e.g., at the end of Scene 1, you’ll have jumps to Scene 1.1 and 1.2).
- Click the REVIEW tab, then SAVE AND EXIT when you’re done.