
11 Measuring the Density of an Unknown Liquid
Purpose
- Measure different quantities and report the measurements using SI units.
- Familiarize yourself with the use of laboratory glassware and other measuring equipment.
Expected Learning Outcomes
- Report results of measurements and calculated values with the correct number of significant figures. (LO 3)
- Calculate the percent error for a particular measurement. (LO 4)
- Use various pieces of glassware to measure the volume of a liquid sample. (LO 3)
- Determine the densities of liquid samples. (LO 3, 4)
- Compare the accuracy associated with using different glassware for measuring volume. (LO 4)
Textbook Reference
Tro, Chemistry: Structures and Properties, 2nd Ed, Chapter E.2, E.3, and E.5
Introduction
Significant Figures
When we make measurements and perform calculations, you can display a lot of digits (or add zeros incessantly). However, in reality you can only be certain of the answer to a particular level.
Examples
There is no way that I would know the width of my desk to the nearest nanometer (10-9 m) – and I can’t really see why I’d want to do so either.
Therefore, it is necessary to express answers to reflect the degree to which you know a particular measurement. In Chemistry, the convention is that you know with certainty all digits that are marked on the measuring device. In addition, you can estimate, with some certainty, the quantity to an additional decimal place. All of these are considered significant figures. What this means is that in chemistry, 11 mL, 11.0 mL and 11.00 mL are all different volumes that convey different information. 11 mL means the volume is within a few milliliters of 11 mL. It may or may not actually be 11 mL, but it’s definitely more than 6 mL and definitely less than 16 mL. 11.0 mL means that this volume is pretty close to being exactly 11 milliliters. It might be a few tenths of a milliliter off, but it’s pretty darn close. 11.00 mL means that for all practical purposes, this volume is exactly 11 milliliters. It might be off by a few hundreths of a milliliter, but for the purposes of this class, we can consider it to be exactly 11 milliliters.
Examples
Measuring Volumes: Dealing with the Meniscus
For liquids in any container, there will typically be a curved surface rather than a flat surface.[1] The meniscus needs to be read such that the the level of liquid read is the bottom of the meniscus (the curved surface).
One particularly important feature of a buret is that the graduations go downwards. The 0 mL mark is at the top and the 50 mL mark is at the bottom. This enables us to report the volume delivered as
volume delivered = final volume – initial volume
Examples
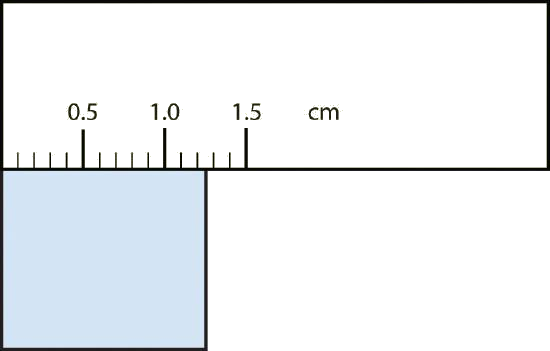
Practically speaking, to determine if a digit is significant on a piece of glassware, figure out whether changing that digit by 5 would create a perceptible change in your glassware. If it does, then that digit is significant, if it doesn’t, then that digit is not significant.
Ex: If you are measuring out a liquid and find that the bottom of the meniscus is a bit above the 11 mL mark and you estimate that the actual volume is approximately 11.1 mL, but you’re not sure if you should write down 11.1 mL or 11.11 mL, ask yourself if you could distinguish the volume if you added a 5 to the last digit. Can you distinguish between 11.1 mL and 11.6 mL? If yes, then the tenths place is significant and you should ask yourself if you could distinguish between 11.11 mL and 11.16 mL. If yes, then the hundredths place is significant. If you don’t think you could distinguish between those two volumes with whatever piece of glassware you’re using, then the hundredths place is not significant.
Generally speaking, whether a digit is significant on a piece of glassware will be based on when the next graduation (marking) is on that piece of glassware. If the next graduation is for 12 mL, then you should be able to tell the difference between 11.1 and 11.6, but you wouldn’t be able to tell the difference between 11.11 and 11.16, thus you would write down 11.1 mL. But if the next graduation is for 20 mL (weird, I know, but it’s hypothetical), then you would not be able to tell the difference between 11.1 and 11.6, so you would just write down 11 mL. But if there are graduations every 0.1 mL and you see that the meniscus is just above the 11.1 mL mark and well below the 11.2 mL mark, then you would definitely be able to tell the difference between 11.1 mL and 11.16 mL, thus you would write down 11.11 mL.
Accuracy and Precision
We use accuracy and precision to characterize the quality of measurements. It is important to realize that it is impossible to measure anything completely accurately or precisely; however, especially in analytical chemistry, it is very important that we try our best to be as accurate and precise as possible.
Accuracy
Accuracy refers to how close measurements compare to the true (accepted) value. To do this, we measure a quantity for which we know the accepted value. A common measure of the accuracy of the measurement is given by the percent error:[2]
% error 
Examples
If the true value for a measurement is 5.00 x 10² g and the measured value is 498.8 g, then the percent error is
% error 
Note that the percent error can be positive or negative. In this course, the sign for the percent error is often kept to indicate the possible direction of any systematic error.[3]
Precision
Precision refers to how close a set of measured results are to each other. A numerical measure of the precision of a measurement is given by its standard deviation, which, for a sample containing n values  , is given by

where  is the mean. The larger the standard deviation, the lower the precision. This is often easily calculated by typing in the numbers into Excel and having Excel solve for the standard deviation using the STDEV function by typing “=stdev([select relevant data])” into excel. Note that you can also use =stdev.s() if you want, but do NOT use =stdev.p().
Density
The density of a particular homogeneous substance (pure substance or mixture) is the mass per unit volume.

In many cases, for liquids, the density is measured in grams per milliliter (g/mL). In this case, the mass is measured in grams and the volume is measured in milliliters. An identical unit (more commonly used for solids) is grams per cubic centimeter}  . For gases, grams per liter (g/L) is more commonly used.
Examples
A cube has a volume of 14.2 mL and a mass of 62.0 g. Its density is therefore

Density is an intensive property – it doesn’t depend on the amount of substance present. Therefore, we will get the same value if we measure the density of teaspoon of water or a tanker truck full of water.
Procedures
- This virtual experiment will be performed using ChemCollective. Please read through this chapter on how to use ChemCollective before starting this lab.
- This lab uses the Identifying an Unknown Liquid from its Density virtual lab on ChemCollective, but you don’t actually need to identify the liquid, just measure its density using different pieces of glassware.
- You must ensure that (for this and all future experiments) all results are reported with correct significant figures and units.
- While you will be using virtual versions of the glassware and equipment listed below, you should still refer to the section Using Standard Laboratory Equipment for guidance on using the balance and volumetric glassware.
- When reading any scale, you should ensure that your eyes are directly parallel to the markings on the scale. Otherwise, you will encounter parallax error as explained in Using Standard Laboratory Equipment.
Special Equipment Needed
The following equipment will be needed.
Solutions:
- Compound A-1
Glassware:
- 250 mL beaker
- 100 mL graduated cylinder
- 10 mL volumetric pipet
- 50 mL Buret
- foam cup
- 250 mL Erlenmeyer flask
Tools:
- scale
The idea here is to measure out a certain volume of an unknown liquid using different instruments and determine its mass. From this information, we will be able to determine the density of the liquid measured using the different instruments. This means that any time you record a volume of water in this lab, you should be using the “Sig Fig” method of pouring the liquid, NOT the “Precise” or “Realistic” version. This also means that the volume you use to calculate the density is the volume you enter, NOT the volume it says was transferred.
Determining the Density of Compound A-1
- Add a flask of Compound A-1 (in “Solutions”), a 250 mL beaker (in Glassware), 3 Foam Cups (in Glassware under “other”), and a Scale (in Tools) to your workbench.
- Transfer all of compound A-1 (~150 mL) from the flask into the 250 mL beaker.
- Place the first foam cup on the scale and record the mass of the foam cup.
- Transfer 20 mL of compound A-1 from the beaker to the foam cup (make sure you use the “Sig Fig” method of pouring) and record the mass of the foam cup with 20 mL of compound A-1. (Remember that the volume you use to calculate the density is the volume you enter, NOT the volume it says was transferred.)
- Press the “Disconnect Foam Cup” button, right click on the foam cup, and select “Remove” to dispose of the foam cup (make sure you select “Remove”, not “Remove Solid” or “Remove Liquid”).
- Repeat steps 3-5 with the 2nd foam cup, then the 3rd foam cup.
- Remove everything from your workbench except for the scale.
- Repeat steps 1-7 replacing the 250 mL beaker with a 50 mL graduated cylinder.
- Transfer 40 mL of compound A-1 from the flask to the graduated cylinder instead of all of compound A-1 (remember to use the “Sig Figs” method when pouring).
- Read the volume of liquid in the graduated cylinder to the correct number of sig figs.
- Transfer 9.8 mL, 10.3 mL, and 9.6 mL of compound A-1 to the foam cups instead of 20 mL 3 times (remember to use the “Sig Figs” method of pouring).
- Read the volume of liquid in the graduated cylinder to the correct number of sig figs (right click on the graduated cylinder and select “Detail View”; you might want to use a straight edge to help determine where the bottom of the meniscus is). (Use the difference of the volumes read off the graduated cylinder to calculate the density instead of the volume you entered this time.)
- Repeat steps 1-7 replacing the 250 mL beaker with a 50 mL buret (in the “Other” section of the “Glassware” tab) and the 3 foam cups with three 250 mL Erlenmeyer flasks.
- Transfer 40 mL of compound A-1 from the flask to the buret (remember to use the “Sig Figs” method when pouring).
- Read the volume on the buret to the correct number of sig figs.
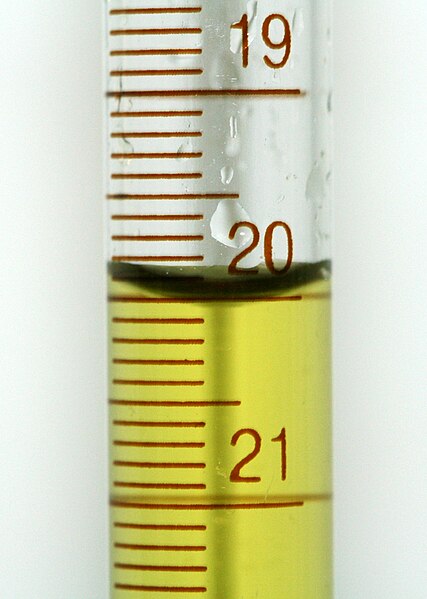
- Make sure you read the relevant section in Using Standard Laboratory Equipment for detailed instructions on the proper techniques for using a buret. It is especially important to remember that burets are graduated such that the zero mark is near the top and the 50 mL mark is near the bottom of the buret (as you saw in Laboratory Orientation). Therefore, you must read the buret from top to bottom instead of bottom to top like a graduated cylinder (e.g., a measurement just above the 19 mL line, for example, would be 18.9X mL, NOT 19.0X mL like on a graduated cylinder).
- Transfer 9.63 mL, 10.21 mL, and 9.98 mL of liquid to the flasks and read the volume of the buret again. (Use the difference of the volumes read off the buret to calculate the density instead of the volume you entered this time.)
- Repeat steps 1-7 replacing the 250 mL beaker with a 10 mL volumetric pipet (withdraw and dispense 10.00 mL of compound A-1).