
Using Standard Laboratory Equipment
While as wide a range of experiences as possible will be provided in the laboratory program, it is commonly the case that the same equipment will be used repeatedly. This section provides guidance on how these pieces of equipment will be used, particularly those found in your lab drawers.[1]
Significant Figures – A Reminder
In chemistry, it is vital that all results are reported to the correct number of significant figures. This means that
- For graduated, analog equipment (most glassware as well as equipment), recall that all certain digits, plus an uncertain digit, are considered significant figures. You should therefore record all graduated digits plus one more estimated digit.
Example
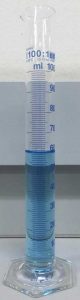
In the 100 mL graduated cylinder shown below, the graduations are every mL. Therefore, we estimate and report the volume to the nearest 0.1 mL. Given that the volume appears to be exactly 60 mL, I would report the volume as 60.0 mL to indicate the correct number of significant figures.
- For digital readouts, be sure to report every digit that is reported. There is no “estimated” digit to speak of.[2]
Electronic Balance
Electronic balances will be used routinely in the chemical laboratory. However, if not cared for properly, they will fail to give good experimental results after a while. It is important therefore to ensure that materials are not spilled onto it!
There are two main switches that you will find:
- The power switch switches the balance on.
- The tare button resets the readout to zero based on whatever is on the balance.
When taring a balance to a piece of glassware, be sure that no one else will use the same balance until you have completed weighing the substance using that piece of glassware. You may find it more convenient to tare on air, and then obtain the mass of the empty glassware. Afterwards, the mass of the chemical can be obtained by subtracting the mass of the empty glassware from the total mass of the glassware and chemical.
In the IU East chemistry laboratory, most balances report masses up to three decimal places. For most experiments (unless told specifically), it is vital that you report masses up to three decimal places. Given the lab benches available, slight fluctuations in the last digit are commonly found; this would work at this level. For the same reason, you must zero the balance each time you use it. It would help to not lean on the lab bench while weighing a sample.
For a typical balance, there will be an indicator (typically the letter “g”) denoting that the mass reading is stable. It is important that the reading is stable before taring or measuring the weight on a balance – both by looking for the indicator and by observing that the reading does not drift more than 0.005 g (which is the tolerance of the balance).
Taking Care of Electronic Balances
- Do not place chemicals directly on a balance. Instead, chemicals should be held on a piece of weighing paper, a beaker, or a watch glass.
- If you spill something on the balance, brush or otherwise remove the chemical from the balance as soon as possible. If you can’t clean it up (e.g. because the chemicals slipped under the balance), inform your instructor.
- Turn off the balance at the end of a lab period.
Volumetric Glassware
Volumetric glassware of various levels of accuracy are frequently found in the chemical laboratory.
Reading Volumetric Glassware
- They are always calibrated such that the calibration mark matches the bottom of the meniscus. You should therefore pay attention to that point and then estimate it accordingly.
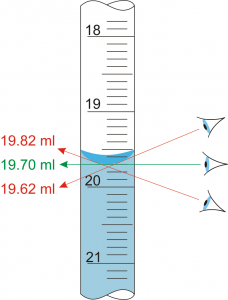
- When reading volumetric glassware, you need to view the glassware direct level to the bottom of the meniscus. If you look upwards or downwards towards the bottom of the meniscus, you will read the liquid level either too high or too low, thus attracting systematic error as shown in the example below.
Example
Consider this graduated cylinder. As shown by the lines on the figure, you aim to read the bottom of the meniscus. When doing so, make sure your line of sight is directly in front of the graduations; you should not be looking up or down on it.
How Volumetric Glassware are Calibrated
Some volumetric glassware (such as graduated cylinders) is designed to contain (TC) the stated volume. In other words, the glassware holds the stated volume. On the other hand, other volumetric glassware (e.g. burets) is designed to deliver (TD) the stated volume; if you measure out a particular volume and put it into a beaker, the stated volume would be added into the beaker. This is often marked near the top of the piece of glassware being used.
In the following section, we discuss the use of several pieces of volumetric glassware that you may not have seen before. There are various grades of volumetric glassware; in this section, we will cite the tolerance of class A volumetric glassware (taken from Harris, Quantitative Chemical Analysis) to give you a sense of how accurate the volumetric glassware is.
Volumetric Flask

A volumetric flask is used to prepare a solution with a given total volume. These flasks have a wide base and a narrower neck. On the neck, there is a graduation indicating where, if you fill the flask such that the bottom of the meniscus matches the fill line of the solution, the solution will contain the volume stated on the flask.
For a Class A volumetric flask (which matches most of the ones you use in lab), the tolerance is (for 50 mL volumetric flasks) 0.05 mL (and we therefore would report the volume as 50.00 mL)
The key to using a volumetric flask well is to mix the solution well and ensure that the final volume is correct. To do this, the best strategy is
- Put the solid (or other substance) you would like to dissolve
- Half-fill the flask with the solvent. Swirl carefully until the solution is mixed together.
- After the solution is mixed together, fill the flask with solvent until the water level gets close to the bottom of the narrow neck. Swirl the flask gently several times to mix the solution together.
- Use a dropper to add in solvent dropwise until the level reaches the bottom of the meniscus. If you overshoot, you will have to re-make your solution.
- To mix the entire solution well, cap the flask using the provided glass stopper or a small piece of Parafilm. Invert the solution about 20 times to ensure that the solution is completely mixed.
Buret

A buret is used to measure out a volume of liquid that is to be determined. This is important especially in titrations because we are trying to determine the volume of a solution that needs to be determined. For this reason, we typically attempt to measure out, dropwise, the volume of liquid delivered.
Burets are designed to be accurate to the nearest 0.05 mL. As seen in the photo here, the buret has a graduated top part coupled with a stopcock at the bottom. The stopcock is designed to be able to deliver liquid at a set of different rates (from not flowing, to one drop at a time, to a moderate flow). When the stopcock is horizontal, no fluid will flow; as you turn it to a vertical direction, the flow rate increases.
Reading a Buret
It is important to realize that a buret (and graduated pipets) are graduated from the top to the bottom. If you look at the buret, the top number is 0 mL while the bottom number is 50 mL. This needs to be taken into account when reading a buret.
Examples
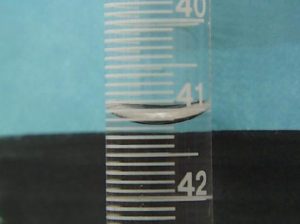
Consider the buret reading in the figure below. Since the volume is somewhat above the 41.2 mL graduation, I would probably report it as 41.17 mL.
Using a Buret
- Attach a buret clamp to the stand and clamp the buret to the stand. Make sure that the buret is clamped completely vertically and securely into the buret clamp.
- Place a “waste” beaker under the stopcock of the buret.
- Rinse the buret with deionized water, followed by a small volume of the reagent.
When rinsing, try and dispense the liquid around all the walls of the buret. Also, the buret can be cleaned more thoroughly by holding the buret approximately horizontally without spilling the liquid, and then rotating the buret to allow all of the surface to be rinsed. Ideally, the surface of the buret should have no beads of liquid; these indicate the presence of impurities on the surface of the buret. - Fill the buret to approximately (and typically; it really is a general rule of thumb) the 10 mL mark near the top. Look at the bottom of the buret.
- Check that there are absolutely no air bubbles in the buret. These are typically found near (or below) the stopcock. If one is observed, you should open the stopcock completely until the air bubble has been dislodged from the buret.
- Read the buret at this point. This is the initial reading for the buret. To help you with this, you may wish to use a piece of lined index card (or file paper) to use as a buret reading card. Line up the line with the bottom of the meniscus, and make sure the line is set horizontally. This will help you read the buret reading correctly.
- Replace the waste beaker with the container (e.g. Erlenmeyer flask) that you plan to deliver the liquid into.
- Turn the stopcock to start the flow as you wish. In most cases, it is best to use your dominant hand to control the stopcock, while using your other hand to hold/shake the sample.
- When you have delivered the correct volume of liquid, close off the stopcock and read the final volume of the buret following the guidelines above.
The volume of liquid delivered is therefore given by the difference between the final and initial volumes. Be sure to report volumes to the correct number of significant figures. For buret readings/volumes, this would be the volume to the hundredths place as explained above.
Examples
The initial volume in an experiment is 9.56 mL and the final volume is 20.03 mL. In this case, the volume delivered is [latex]20.03 - 9.56 = 10.47\mbox{ mL}[/latex].
Pipets
Pipets are designed to deliver a certain volume of liquid to your sample. There are two types of pipets commonly used in the chemistry laboratory:
- Volumetric pipets are designed to transfer specific volumes of liquids. They are typically calibrated to be accurate to the hundredths place. They consist of a tube with a bulb in the middle, with a calibration mark near the top.
- Graduated pipets are either disposable[3] or are made of glass, and are graduated similarly to a buret. While these allow measurement of a range of volumes, they are significantly less accurate than a volumetric pipet, and we tend to use them when we need to measure out a variety of different volumes.
In either case, the procedure for using the pipet would essentially be the same.
General Points on Using a Pipet
The exact directions on how to use a pipet depends on the type of pipet filler you are issued. Here are some general tips on how to use them.
- Before actually measuring out any liquid, it is important to rinse out the pipet, first using deionized water and then using a portion of the reagent that you are to measure. To do this, pipet up about half of the desired volume, and then remove the pipet filler and quickly place the pipet in a horizontal position. Rotate the pipet several times to ensure proper rinsing and then allow the liquid to drain through the pipet tip.
- In any event, one important point is to avoid air bubbles. These are commonly found when there is insufficient liquid in the original sample. Add more of the reagent to the original beaker, eject liquid until the air bubble has been dislodged, and then re-attempt. Seek your instructor’s help if needed.
- Quickly suck up enough liquid so that MOST (but not all) of the “bulb” in the middle of the volumetric pipet is filled with water. Then slowly suck up enough liquid so that the bottom of the mensicus it at the mark.
- After drawing up the liquid into a volumetric pipet, dry the tip off with a lint-free tissue (KimWipe) by holding the pipet vertical and gently wiping from top to bottom to remove the liquid on the outside of the pipet.
- When dispensing the liquid, place the tip of the pipet against the side of the container your are adding to so that there is less splashing and to aid in ensuring all of the liquid that is supposed to be delivered is drained out of the pipet.
- For volumetric pipets, a drop of liquid at the tip will not be dislodged. This is completely normal and pipets are calibrated such that this drop of liquid should not be dislodged. On no account should you attempt to “blow” or otherwise force this drop of liquid out of the pipet.
- A more thorough explanation of how to use volumetric pipets can be found in an analytical chemistry textbook or The Use of Volumetric Pipets with NIST Handbook 133.
Pipet Fillers
To use this, we will first fit onto the top of the pipet a pipet filler. This controls the flow of liquid in and out of the pipet.
Several different types of pipet fillers are used in the IU East General Chemistry laboratory. In industry and sometimes in higher level laboratory courses electric pipet fillers are often found; however, while those are faster and sometimes easier to use they can be harder to control.
Dial Type Pipet Fillers
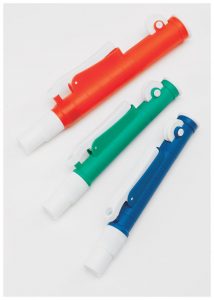
These are relatively simple to use; however, it is important to note that these are color-coded to match the volume of the pipet you are trying to fit. Sometimes intermediate sized pipets do not fit these fillers.
- Blue: 2 mL
- Green: 10 mL
- Red: 25 mL
To use this type of pipet filler:
- Fit the pipet filler on top of the pipet
- Depress the plastic plunger completely.
- When the pipet tip is submerged completely in the liquid, use the rotary dial to raise the plunger level. Fill the pipet up until the bottom of the meniscus matches the calibration mark on the pipet.
- Move the pipet so that it is on top of the container into which the liquid is to be dispensed, and depress the plunger.
Three-Valve Pipet Fillers
The other two types of pipet fillers are generally usable with all pipets regardless of size; however, their use is more complex. One type that is used has a rubber bulb and three buttons (rubber circles) labeled with letters.

To use this type of pipet filler
- Fit the pipet filler on top of the pipet.
- Depress button A and squeeze out the air from the rubber bulb.
- Place the pipet tip into the liquid to be measured, and then press the “S” button to suck the liquid into the pipet.
- Move the pipet into the receiving vessel and press the “E” button to release the liquid.
Single-Bulb Pipet Filler
The last type of pipet filler that is found looks like a larger version of a single bulb. To use this, squeeze out the air from the pipet bulb and place the bottom of the bulb firmly on top of the pipet. After this, place the pipet tip in the liquid sample and release the bulb slowly to allow the liquid to rise slowly until the bottom of the meniscus meets the graduation desired. At that point, quickly remove the pipet bulb and use your finger to block the top of the pipet. Move the pipet above the container into which you plan to dispense the liquid and release the finger.
Bunsen Burner
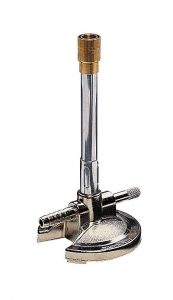
In the chemistry laboratory, you will often use a Bunsen burner to provide heat – either concentrated or intense – to provide heat to a sample. While hot plates are also provided (and we tend to use these where possible as they are easier to control and safer), in some cases hot plates are unsuitable as they do not provide the intensity of the heat that would be provided otherwise.
A Bunsen burner uses natural gas to provide a flame to heat up a substance. It will provide a fairly concentrated hot flame, or a relatively diffuse flame, as needed. This is controlled based on the amount of oxygen provided in the flame.
Key Safety Pointers
- Be sure to tie back long hair before you begin.
- Gas taps must be completely turned off at the end of lab.
How to Operate
The Bunsen burner has a significant advantage over the electric hot-plate, in that the flame can be significantly more controlled, both in terms of overall strength and intensity. To switch on the Bunsen flame, after connecting the Bunsen burner to the gas tap, use the lighter (provided in the wooden box on top of the shelf in WZ 218) to produce a flame. While the flame is in place, turn on the gas tap.
If no flame is found, re-ignite the lighter. If that doesn’t work, the most likely causes include:
- The gas supply is not properly connected to the burner
- The needle valve at the base of the Bunsen burner is completely shut.
Re-check the setup and attempt to relight the Bunsen burner. If you are still having trouble getting the Bunsen burner lit, please consult your instructor.
A Bunsen flame can be described based on both the color of the flame and the intensity of the inner cone. A yellow flame indicates that there is insufficient oxygen for complete combustion. While this is safer since it is less hot and more visible than a blue flame indicating complete combustion, it is significantly less hot and not as useful in the Chemistry laboratory. This can be changed by screwing and unscrewing the barrel of the Bunsen burner to open/close the air hole.
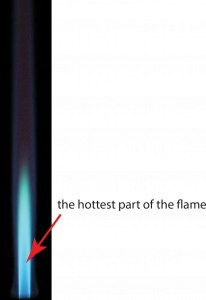
Another aspect to consider is the hottest part of the flame. Often, when we need to heat up a sample as intensely as possible, it is best to concentrate the flame (by opening/closing the gas valve near the base of the Bunsen burner) and then place the sample such that the sample is placed in the most intense part of the flame – the tip of the inner cone.
