
24 Qualitative Analysis of Cations
Purpose
To determine the identity of a mixture of unknown cations using qualitative analysis techniques.
Expected Learning Outcomes
- Follow a sequential protocol to identify an unknown.
- Make qualitative observations in a small-scale experiment.
- Use a centrifuge to separate solid and liquid components of a mixture.
Textbook Reference
The reactions here illustrate various phenomena from across the course, particularly from Tro, Chemistry: Structures and Properties, 2nd Ed., Ch. 18. A specific section on this can be found in Averill and Eldredge, General Chemistry: Principles, Patterns, and Applications, Ch. 17.5.
Introduction
For most of this couse, we have focused on quantitative measurements – determining results carefully to obtain some numerical result or another. However, as you would have done in the Chemical Equilibria: Le Châtelier’s Principle and its Application experiment, sometimes we can perform qualitative (descriptive) work to identify compounds through visual observations of physical and chemical changes.
Given the availability of spectroscopic and chromatographic techniques that can provide quantitative information on both the structure (and hence identity – especially for unknown compounds) and composition of the sample, why do we bother with qualitative testing? There are a few reasons for this.
Example
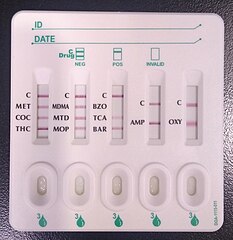
A classic example of its application would be field drug tests.
- Modern spectroscopic and chromatographic techniques often take significantly more time and resources (expensive equipment) to be used.
- Modern techniques often require technical expertise to be conducted properly. (Medical labs is a major employer of the department’s graduates!)
- Often a significantly larger amount of sample needs to be used for chromatography or spectroscopy.
In inorganic chemistry, there are a wide variety of cations and anions that can be tested using qualitative techniques. The cations and anions are tested separately as they dissociate when dissolved. However, for the cations in particular, there is a complex range of cations that can be tested. To simplify the scheme, we separate the cations into five groups that can be separated through a series of qualitative tests, where we take advantage of the difference between the solubilities with various common anions (as well as the difference in solubility of sulfides due to acidity) to quickly sort the cations into five different groups:[1]
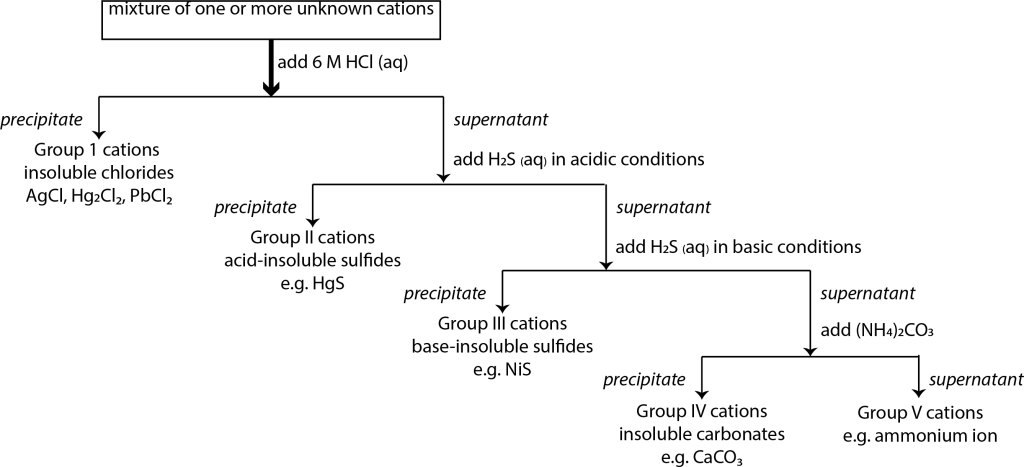
These tests must be completed sequentially; for instance, you can’t test for Group II before you test for Group I.
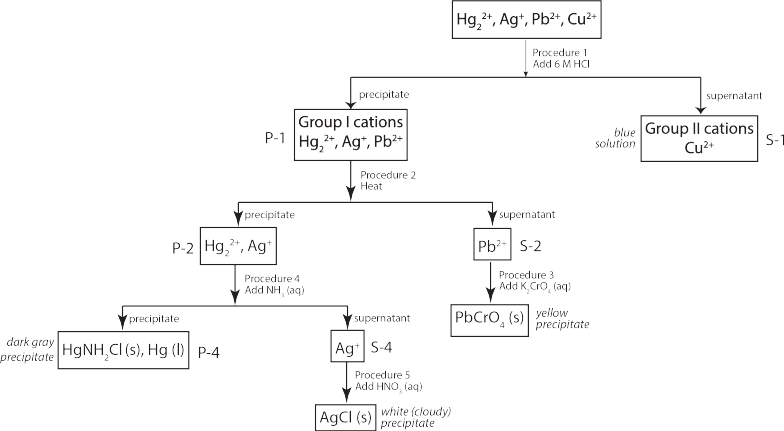
Focusing on the principles of qualitative analysis, we will mostly focus on the separation of Group I cations in this experiment. We will separate four different cations: the three Group I cations ([latex]\textrm{Ag}^+[/latex], [latex]\textrm{Hg}_2^{2+}[/latex] and [latex]\textrm{Pb}^{2+}[/latex]) and one of the Group II cations ([latex]\textrm{Cu}^{2+}[/latex].
You will be provided with two solutions:
- The known solution contains a mixture of all four cations.
- The unknown solution contains a number of the different cations studied in this experiment.
A scheme for separating these ions are described below and summarized on the flowchart below.
A number of different chemical principles from across the CHEM-C 106 Principles of Chemistry II course, including solubility equilibria and acid-base chemistry, are used to selectively precipitate out the different ions present. These are described in the procedures section below.
You will perform the experiment with the known solution and the unknown solution in parallel. Since both solutions will be studied at the same time and there are multiple steps, it is imperative that you label each centrifuge tube/test tube with your name and each step of the experiment carefully.
Procedure
Each student will work individually in this experiment, and will be assigned to study both the known solution as well as an unknown solution. This unknown solution will have a unique code number. You must record this code number and enter it correctly on the report form, as correct determination is a significant part of your grade for this experiment.
General Procedural Notes
Before the Experiment
- Review how to use the centrifuge from Using Laboratory Equipment.
During the Procedure
- Complete all steps for the known even if it is obvious that no additional ions will be observed in the unknown. Do both procedures simultaneously so that you can compare the results.
Performing the Procedure
- For this experiment, exact volumes are not important. Throughout this experiment, you may treat 20 drops as 1 mL of solution.
- Due to the small concentrations, it is important to minimize contamination and cross-contamination of chemicals. Therefore, be sure to keep lab benches and all other surfaces as clean as possible.
- If there are cracks on the stir rod that will harbor impurities, you may resolve this by fire polishing the rod. To do this, turn on a Bunsen flame and melt the end of the rod so that the part with the impurities liquefy, and then allow the rod to cool back down.
Keeping Track of Stuff
- Label test tubes properly for this experiment. If you don’t keep track of your test tubes carefully you will not get good results from this experiment.
- Keep track (using labeling tape) of stir-rods/spatulas used to stir different solutions.
Recording
- It may be helpful to fill in a copy of the flow chart in your lab notebook simultaneously so you can keep track of what is going on. For this purpose, you may print out a copy of the flow chart and stick/tape it into your lab notebook.
- In your notebook, record details about your observations – state, consistency and color are important – as well as inferences (based on your observations and comparing against the flowchart and discussion in the procedure.
Specific Processes
Mixing Solutions
When mixing solutions, you may choose to stir the contents of the test tube with a clean, thin glass rod or a clean thin spatula. Be careful to ensure that you do not poke out the bottom of the test tube.
Alternatively, you can gently agitate the body of the test tube so that the contents are shaken. Do not use your finger as a stopper and invert the tube, as you will then introduce impurities from your finger.
Washing Precipitates
We wash precipitates in order to ensure that all of the soluble component is dissolved into the solvent, in case the precipitate contains undissolved parts of the soluble component. To do this, after adding the relevant solvent, use a clean glass rod with no cracks near the end to break down the solute such that the pellet is broken down as much as possible.
Separating the Supernatant from the Precipitate
In qualitative analysis, it is important to separate the supernatant from the precipitate. A number of different techniques can be used to do this, assuming that the supernatant is essentially clear. If not, you may wish to use a centrifuge to ensure that the two components are well-separated.
When separating a supernatant from a precipitate, be sure to collect the supernatant even if it appears it will not be useful. If a mistake was made, problems can be recovered if the supernatant is saved.
There are two main approaches.
- You can use a transfer pipet to draw off as much of the supernatant as possible. Typically, you want to draw off as much of the supernatant as possible without getting any of the precipitate into the supernatant. When doing so, be sure to pipet out the liquid slowly, and to make sure the pipet tip is not directly on the surface of the precipitate. You will probably need to do this multiple times.
- You may choose to decant off the liquid from the centrifuge tube. In this case, you will need to carefully ensure that the precipitate is well-separated from the supernatant.
Procedure 0: Preparing the Sample
- Label a test tube with your name and the word “KNOWN”. Place about 1 mL of the mixed known solution into this test tube.
- Collect an unknown test tube from your instructor. Using a marker, label the test tube with your name and record the unknown number in your lab notebook.
- Observe and record the appearance of your known and unknown solutions.
Procedure 1: Selective Precipitation of Group I Cations
While most metal chlorides are soluble, there are three major exceptions: lead (II) ([latex]\textrm{Pb}^{2+}[/latex]), mercury (I) ([latex]\textrm{Hg}_2^{2+}[/latex] and silver ([latex]\textrm{Ag}^+[/latex]). In the qualitative analysis scheme, these are the Group I cations. Therefore, when we add hydrochloric acid to the four cations being studied, a precipitation reaction would occur with the three Group I cations, but not copper(II) ([latex]\textrm{Cu}^{2+}[/latex])
Examples
The net ionic equation for the reaction of hydrochloric acid supplying [latex]\textrm{Cl}^-[/latex] ions with lead (II) ions is
\begin{equation}
\textrm{Pb}^{2+}(aq)+2\textrm{Cl}^- (aq) \to \textrm{PbCl}_2(s)
\end{equation}
and lead (II) ions would therefore be found in the precipitate in the form of solid lead (II) chloride.
On the other hand, copper (II) would not react with hydrochloric acid, and would remain in the supernatant. We can use this approach to separate copper (II) ions from all other ions through selective precipitation where some components (but not others) are precipitated out into solid form. Due to its distinctive blue color, it can be detected readily after precipitation.
Lab Procedure
Separating Out the Cu2+ from Group I Cations
Complete this process separately for both the known and unknown samples.
- Between each pair, fill a 125 mL beaker with water and heat this beaker on the hot plate, and prepare a cold water bath by filling 125 mL beaker with crushed ice.
- Add three drops of 6 M HCl to each of the known and unknown test tubes and observe the formation of a precipitate.
- Place the test tubes in the water bath to heat the test tubes while stirring until the precipitate settles out.
- Remove the test tubes from the hot water bath using a test tube holder, and cool the test tubes in the prepared ice bath.
- Check for complete precipitation by adding an additional drop of 6 M HCl to each test tube.
- If any additional cloudiness was observed in step 8, repeat steps 5-8 until you are certain all Group I cations have precipitated out (i.e. no more precipitate is formed when additional HCl is added.
- For each sample, separate the supernatant (S-1) from the precipitate (P-1) by either decanting or by using a transfer pipet. Collect S-1 in a separate, labeled test tube. The original test tube now containing the precipitate P-1 should be re-labeled accordingly.
The precipitate will contain the Group I cations, while the supernatant would contain any copper(II) ions present.
Identifying Copper(II)
If copper (II) cations are present in the supernatant (S-1), the solution will be blue. On the other hand, the supernatant (S-1) will be colorless if no copper (II) ions are present.
However, the blue color can be relatively faint. To resolve this, one relatively easy step to take is to add ammonia to S-1. In this case, the tetraamminecopper (II) complex ion would be formed:
\begin{equation}
\textrm{Cu}^{2+}(aq) + 4\textrm{NH}_3 (aq) \rightleftharpoons [\textrm{Cu}(\textrm{NH}_3)_4]^{2+}(aq)
\end{equation}
As this complex ion absorbs orange light (with wavelengths between 600-620 nm) strongly, it has a significantly deeper blue color than the uncomplexed ion. For each of the two supernatant S-1 samples:
- Add about 15 drops of 6 M ammonia (ammonium hydroxide) to supernatant S-1 and report any changes.
No reaction would occur if there is no copper (II) present. On the other hand, if copper (II) is present, the blue color will turn into a significantly deeper blue (associated with [latex][\textrm{Cu}(\textrm{NH}_3)_4]^{2+}[/latex]
Procedure 2: Separation of Lead(II) Chloride
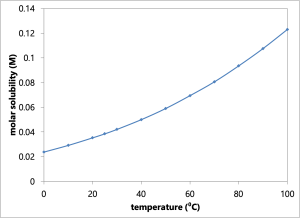
The solubility product constants [latex]K_\textrm{sp}[/latex] and molar solubilities of the three Group I cations are listed in the table below.[2] As one can see from this table, lead (II) chloride is significantly more soluble than the other Group I chlorides.
| Salt | Ksp | molar solubility (M) |
| Hg2Cl2 | 1.43 x 10⁻¹⁸ | 8 x 10⁻⁶ |
| AgCl | 1.77 x 10⁻¹⁰ | 1.3 x 10⁻⁵ |
| PbCl2 | 1.70 x 10⁻⁵ | 3.8 x 10⁻² |
In addition, there is a significant temperature dependence on the solubility of lead (II) chloride. One way of separating lead (II) chloride would be to attempt to redissolve lead (II) chloride in hot water, while keeping silver chloride and mercury (I) chloride in the precipitate.
Lab Procedure
Follow this procedure using precipitate P-1 for both the known and unknown samples.
- Add about ten drops of deionized water into precipitate P-1 (for both the known and the unknown).
- Heat the test tube in a hot water bath for at least five minutes, stirring with a spatula or glass rod continuously (carefully!).
- While the solution is hot, centrifuge the solution quickly and decant the supernatant into a separate test tube. Label the new tube as supernatant S-2. The precipitate from this procedure should be relabeled as precipitate P-2.
Procedure 3: Confirmation of Lead (II) Ions
To confirm the presence of [latex]\textrm{Pb}^{2+}[/latex] ions, we attempt to precipitate out lead(II) chromate by adding potassium chromate to the mixture
\begin{equation}
\textrm{Pb}^{2+} (aq) + \textrm{CrO}_4^{2-} \to \underbrace{\textrm{PbCrO}_4(s)}_{\textrm{yellow precipitate}}
\end{equation}
One potential problem with this procedure is that there is a delicate equilibrium between the chromate and dichromate ions.
\begin{equation}
2\textrm{H}^+ (aq) + \underbrace{\textrm{CrO}_4^{2-}}_\textrm{yellow} \rightleftharpoons \underbrace{\textrm{Cr}_2\textrm{O}_7^{2-}}_\textrm{orange} + \textrm{H}_2\textrm{O} (aq)
\end{equation}
Lead (II) precipitates in the presence of chromate ions, but not in the presence of dichromate ions. For this reason, it is important to ensure that the solution is basic. Ammonia (ammonium hydroxide) is added when necessary to remove [latex]\textrm{H}^+[/latex] ions, driving the equilibrium back towards the left.
Lab Procedure
Complete the following procedure for supernatant S-2 from both the known and unknown samples:
- While the supernatant S-2 from procedure 2 is still hot, add four drops of 0.5 M potassium chromate (\ce{K2CrO4}) to the solution.
- Check that the solution is now yellow. If the solution is orange, then you have potassium dichromate present. If this is the case, add 6 M ammonia (NH3, which may be labeled as ammonium hydroxide, NH4OH) one drop at a time into the solution, mixing as you go along, until the solution just turns yellow (so it turns back into potassium chromate).
- If lead (II) ions are present, there will be a yellow precipitate in the solution. However, the precipitate may not collect spontaneously at the bottom but form a suspension. If cloudiness is observed, centrifuge your test tube to separate out the precipitate from the supernatant.
Procedure 4: Separation and Identification of Mercury (I)
At this point, two cations may remain in precipitate P-2: mercury (I) ([latex]\textrm{Hg}_2^{2+}[/latex]) and silver (Ag+). While both are essentially insoluble in water, silver is known to form the diamminosilver complex ion ([latex][\textrm{Ag}(\textrm{NH}_3)_2]^+[/latex]) in the presence of ammonia. In this case, two equilibrium reactions occur in tandem:
\begin{align*}
\textrm{AgCl} (s) &\rightleftharpoons \textrm{Ag}^+ (aq) + \textrm{Cl}^- (aq) &K_\textrm{sp} &= 1.77\times 10^{-10} \\
\textrm{Ag}^+ (aq) + 2\textrm{NH}_3 (aq) &\rightleftharpoons [\textrm{Ag}(\textrm{NH}_3)_2]^+ (aq) &K_\textrm{f} &= 1.7\times 10^7
\end{align*}
The overall reaction is therefore
\begin{equation}
\textrm{AgCl}(s) + 2\textrm{NH}_3(aq) \rightleftharpoons [\textrm{Ag}(\textrm{NH}_3)_2]^+ (aq) + \textrm{Cl}^- (aq) \
\end{equation}
The equilibrium constant for this reaction is
\begin{eqnarray}
K_\textrm{C} &=& K_\textrm{sp} \times K_f \nonumber\\
&=& \left(1.77\times 10^{-10}\right) \times \left(1.7\times 10^7\right) \nonumber\\
&=& 3.0\times 10^{-3} \nonumber
\end{eqnarray}
Not that high – but significantly higher than that for silver alone. Given this, it can be shown that the molar solubility of silver in 6 M ammonia is approximately 0.13 M.[3] Therefore, in this case, silver will be separated into the supernatant.
On the other hand, mercury (I) chloride undergoes a disproportionation reaction where it is simultaneously oxidized to form HgNH2Cl (oxidation number of mercury changes from +1 to +2) and reduced to form liquid mercury.
\begin{equation}
\textrm{Hg}_2\textrm{Cl}_2 (s) + 2\textrm{NH}_3 (aq) \to \textrm{HgNH}_2\textrm{Cl} (s) + \textrm{Hg}(l) + \textrm{NH}_4^+ (aq) + \textrm{Cl}^- \label{403:rev_comples}
\end{equation}
The mixture of these products have a dark gray/black color.
Lab Procedure
Do the following to precipitate P-2 from both the known and unknown solutions:
- Add four drops of 6 M ammonia and two drops of deionized water to precipitate P-2. Thoroughly stir the mixture for one minute.
- If a gray/black precipitate is formed, then mercury (I) ions are present. In this case:
- Get a clean, dry test tube and label this test tube as “S-4“. Wash the precipitate and decant/separate the supernatant into this “S-4” test tube.
- Wash the precipitate you have left and add the supernatant from this washing to tube S-4.
- If a gray-black precipitate is not formed, then mercury (I) ions are not present. In this case, be sure no precipitate is found – spinning down the solution as necessary – and label this solution as supernatant S-4. (You will then have no tube P-4)
Procedure 5: Identification of Silver Ions
In solution S-4, there is either nothing present or there are silver ions present. In order to identify the presence of silver, we can \emph{reverse} the process of complex ion formation.
\begin{equation}
[\textrm{Ag}(\textrm{NH}_3)_2]^+ (aq) \rightleftharpoons \textrm{Ag}^+ (aq) + 2 \textrm{NH}_3 (aq) \label{403:rev_complex}
\end{equation}
In the presence of acid, we neutralize away the ammonia to drive the equilibrium above to the right. The Cl– ions will react with the Ag+ ions which would cause silver chloride (AgCl) to re-precipitate.
Lab Procedure
Do this for supernatant S-4 from both the known and the unknown:
- Add to solution S-4 drops of 6 M nitric acid until the solution turns blue litmus paper red. Stir the mixture thoroughly. The presence of a white precipitate confirms the presence of silver ions in the original solution.
Waste Disposal
Dispose of all solutions from this experiment in the dedicated waste container provided in the laboratory.
- While the overall scheme is well-known, the terminology may be somewhat different in various textbooks ↵
- As can be observed in the table, however, there are significant discrepancies between the molar solubilities reported and the latex]\textrm{K}_\textrm{sp}[/latex] values, due to reasons way too complex to explore in this course. ↵
- The calculation is not something covered in your text, but is discussed qualitatively in Tro, Chemistry - Structures and Properties, 2nd Ed., Ch. 17.7 (p. 780-781). A more explicit treatment of this calculation can be found in Averill and Eldredge, General Chemistry: Principles, Patterns, and Applications, Ch. 17.3. ↵
