
7 Molecular Geometry and Polarity
Purpose
To study the molecular geometry and polarity of a range of molecules.
Expected Learning Outcomes
After completing this experiment, you should be able to:
- Determine the Lewis structure, molecular geometry and polarity for molecules using Lewis structures.
- Sketch molecular geometries on paper with wedges and dashes to represent their 3D shape.
- Explain how π-bonding affects the ability of atoms to rotate about a bond.
- Relate molecular polarity to physical properties.
Textbook Reference
Tro, Chemistry: Structures and Properties, Ch. 5.
Introduction
Life would be very boring if we tried to live with elements alone. We have 92 naturally occurring (plus a number of artificially made) elements, and that’s it. The paucity of materials with which we can live with based on elements alone is beyond imagination. In reality, we have many different types of compounds, each with distinct structures.
There are different types of chemical bonding involved in making compounds. In this experiment, we focus on molecular compounds, which are held together by covalent bonds.[1]
Covalent bonds are formed when electrons are shared between the atoms in a molecule. Depending on the bonding pattern about each of the different central atoms in a molecule, each molecule will have a different 3D structure – the molecular geometry. The bonding pattern is the Lewis structure.
The molecular geometry has a direct impact on the compound’s physical properties and chemical reactivity. The molecular geometry of a species affects crystal structure, phase change behavior, energy and rates of chemical interactions, solubility, and virtually every other characteristic of that compound.
Before beginning to study the geometries of covalently-bonded groups, it is necessary to have a clear picture of which atoms are present and which atoms are bonded directly together in the grouping. The flow chart below gives a schematic view for how one can figure out the molecular geometry from the molecular formula:
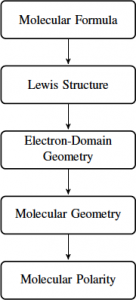
You cannot skip steps on this process.
Determining the Lewis Structure
While there are a number of different ways of determining the Lewis structure, the basic principles remain the same:
- All valence electrons must be found either in a bonding pair or in a non-bonding pair (lone pair).
- The starting number of valence electrons for an atom is equal to the group number.
- Most of the time, there will be a full valence shell of electrons around each atom. This is called the octet rule, because the final number of valence electrons around most atoms is eight. For this purpose, hydrogen is treated as an exception; hydrogen requires two valence electrons to fulfill the octet rule.
Another couple of useful guidelines are that, for many non-metal elements, the number of covalent bonds is equal to [latex](8-[\mbox{group number}))[/latex], as listed in the table below. The rest of the octet will be completed with lone pairs.
| Group | Common Elements | No. of Bonds | No. of Lone Pairs |
| H | 1 | 0 | |
| 4A | C, Si | 4 | 0 |
| 5A | N, P, As | 3 | 1 |
| 6A | O, S, Se | 2 | 2 |
| 7A | F, Cl, Br, I | 1 | 3 |
Every electron that is either in a lone pair on a given atom, or in a bonding pair where one end of that bonding pair is on that atom, is counted towards that atom for the purpose of the octet rule. Also, there are many exceptions to these rules, so only treat them as a starting point.
Exceptions to the Octet Rule
The octet rule is not a fundamental rule – it’s just that we try to draw Lewis structures that do not violate them (and that do not have large non-zero formal charges). The most fundamental rule is that all electrons must be accounted for. As explained in Tro, Chemistry: Structures and Properties, 2nd Ed, Ch. 5.5, there are three common reasons why the octet rule is violated:
- Radicals: There are an odd number of electrons.
- Incomplete octet: There is less than an octet of electrons around the central atom. This happens most frequently with beryllium (Group II), aluminum and boron (Group III) compounds.
- Expanded octet: In periods 3 and below, where the valence shell has d orbitals available, one can have greater than an octet about a central atom.
Determining Electron Geometries and Molecular Geometries
Based on the valence bond electron pair repulsion (VSEPR) theory, molecules have a particular geometry depending on the number and identities of electron groups[2] present around each central atom. To count the number of electron groups:
- Each non-bonding pair is a single electron group.
- Each set of bonds – whether it is triple, double or single – each counts as one electron group.
Examples
Formaldehyde has, around its central carbon atom, two single bonds (to hydrogen) and one double bonds (to oxygen):
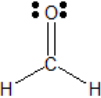
Each set of bonds would count as a single electron group, and therefore there are three electron groups about the central carbon atom.
Based on this, we can determine the electron geometry by comparing it with a set of standard geometries that are based on the idea that electron pairs repel each other and take on the geometry that minimizes their repulsion:
However, while lone pairs participate in electron pair repulsion, as they are not atoms they are typically not considered part of the molecular geometry itself. The shapes that arise when the lone pairs are ignored/hidden are listed in the table below:
In this experiment, you will build models that illustrate these different molecular geometries. Another way to visualize these is to use the PhET Molecular Shapes animation.
For molecules with multiple central atoms, you should determine the geometry about each individual central atom.
Examples
Consider the structure of propene:

- About carbon atoms 1 and 2, there are three electron groups about each of them, and all of them are bonding pairs. As a result, the geometry is trigonal planar
- About carbon atom 3 there are four single bonds – and hence there are four electron groups. As a result, it is tetrahedral.
Drawing Molecules
Clearly, molecules have a 3D shape. However, it is not practical to pass around 3D models all the time (or make computer generated models). We therefore need to find a way to represent molecular geometries in 3D on 2D paper (or plain computer screens).
To draw molecules showing the 3D structure:
- Place as many bonds as possible on the plane of the paper. These are represented by normal straight lines.
- To draw bonds that project outwards from the paper, you will need to draw a solid wedge coming out.
- Conversely, if the bond goes into the paper, draw a dashed/hashed wedge instead.
Examples of this can be seen in the tables above.
Molecular Polarity
Electronegativity and Bond Polarity
As you may have seen, depending on the difference in electronegativities of the different atoms in a bond, there would be a difference in the amount of electron density from a particular covalent bond that is placed on a particular atom.
Defining the electronegativity as the “ability of an atom to draw electron density from a covalent bond into itself” (Burdge and Overby, Chemistry: Atoms First), we can find bonds in a continuum from being pure covalent bonds to ionic bonds:
Depending on the difference in electronegativities in the two atoms involved, bonds can be classified as non-polar covalent, polar covalent or ionic as illustrated above. However, in practical terms it is important to have a “feel” for this.
Examples
Due to the negative charge of electrons, the chlorine atom would have a partial negative charge (δ-), and correspondingly the hydrogen atom would have a partial positive charge (δ+). From the physics, this gives rise to a bond dipole moment running from the partial positive charge to the partial negative charge.
From Bond Polarity to Molecular Polarity
So far, we’ve focused on one bond between two atoms. However, most molecules have more than two atoms
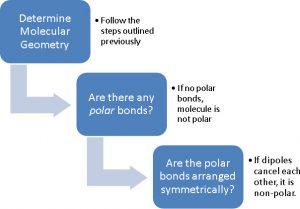
It’s clear that if a molecule has no polar bonds, there is no significant displacement in charge across the molecule, and therefore the molecule would not be polar. However, if one or more of the bonds are polar, the picture becomes more complex. Let’s take two different molecules – H2O (water) and CO2 (carbon dioxide) – and see how they can be different. In both cases, the bonds (H-O in the case of water and C=O in the case of carbon dioxide) are clearly polar – with the oxygen having the partial negative charge.
Water
In the case of water, you can see that in the vertical direction the partial positive charges (hydrogen atoms) are all closer to the bottom, while the partial negative charges (from the oxygen) closer to the top. In this case, due to the overall charge imbalance, the molecule is polar.
Carbon Dioxide
On the other hand, in carbon dioxide the negative charges are equidistant and directly opposite each other along the O=C=O axis. In this case, we find that the two bond dipoles mathematically cancel out when determining the molecular dipole – while internally there is charge imbalance (the O’s have partial negative charges and the C has a partial positive charge), they cancel each other out and thus we can’t say that any particular end of the molecule has an overall partial charge that is opposite to the other end. Therefore, if the molecule is symmetrical, then the molecule must be non-polar.
Summary
Application of Molecular Polarity to Intermolecular Forces
A particular application of molecular polarity is that, due to the opposing partial charges, opposite-charged poles on different molecules of the substance will attract each other. This is referred to as the dipole-dipole force.
Due to the presence of dipole-dipole forces, polar molecules have stronger intermolecular attraction with each other compared to non-polar molecules (provided that their molar masses are similar). This influences bulk properties of molecules such as melting and boiling points as well as its vapor pressure. This will be discussed in more detail in Tro, Chemistry – Structures and Properties, 2nd Ed, Chapter 11.
In addition, there are certain electrostatic properties associated with polar molecules which are absent with non-polar molecules. For example:
Examples
- Polar molecules will have attractive forces with opposite charges (and vice versa). This can be observed by running a liquid against a charged rod.
- Polar molecules tend to be more soluble in polar solvents, while non-polar molecules tend to be more soluble in non-polar solvents.
- Microwaves will react with polar molecules differently than non-polar molecules.
Procedures
Visualizing VSEPR Shapes
You will be provided with a number of balloons tied together in sets. Each balloon represents a distinct electron domain. The idea here is that the balloons will “repel” each other and form (reasonably) accurate cartoon representations of VSEPR shapes.
By looking at each combination of balloons or by putting together enough of the sets of balloons together to get the right number of electron domains, you can visualize each electron domain geometry. For each of these electron geometries:
- Sketch the shape of the VSEPR geometry formed. Include the color of the balloon used to model each electron domain.
- Give the name for the electron geometry.
- With help from the table of electron geometries above, label the angles between different electron groups. If the balloons are not in exactly the same position (i.e. the balloon arrangement always looks different when different balloons are held upwards), then be sure to point this out on your sketch.
- Give an example of a molecule that would have the same molecular geometry as the electron geometry you’re studying (hint: pick a molecule with no lone pairs above the central atom).
Unless otherwise stated, use the same-sized balloons for each electron domain.
- Take a set of two equivalent balloons and examine the geometry formed by these balloons.
- Take the set of three equivalent balloons and examine the geometry formed by these balloons.
- Take two sets of two equivalent balloons, and slide them together so that you have a set of four electron groups (balloons) about a central point.
- Take one set of two equivalent balloons and one set of three equivalent balloons, each of different colors, and slide them together to form a set of five electron domains about a central point.
- Take all three sets of two equivalent balloons, and hold them together.
- Take the set of unequal (one large and one small) balloons and a set of three balloons, and slide them together to form a set of five electron domains. Compare this geometry with that found in step 4.
Building VSEPR Models Using Model Kits
This is an exercise designed to allow you to gain experience in visualizing molecules as three-dimensional entities. A number of the consequences of three-dimensional structure will be explored at the same time as notation is developed to present three-dimensional structures in diagrams and drawings.
You will construct some “ball and stick” molecular models using a kit. The different balls and sticks typically represent different bonds and atoms, as listed below.

For this part, directions for each model to be built will be given on the report form. Remember the scheme for each molecule illustrated above; the steps to take for each structure studied, in general, includes (depending on what the question asked):
- Draw the Lewis structure for the molecule.
- Based on the Lewis structure, build the model for the structure. Redraw the Lewis structure with the correct 3D molecular geometry (i.e. accurate bond angles) for the molecule using solid wedges and dashed/hashed wedges as mentioned above. Include all lone pairs present on all atoms in the molecule. Hint: if the molecule doesn’t have 90-degree bond angles, then you shouldn’t draw a right angle between any bonds.
- Give the name for the molecular geometry in question about each atom.
- Determine if the molecule is polar or non-polar as discussed above.
- For molecules with trigonal bipyramidal electron geometries, it is vital that you put the bonds in the correct holes corresponding to the correct type of electron position!
- If there are double bonds, you must use the appropriate number of flexible bonds rather than treat this as a single bond.
- It is hard to distinguish between the phosphorus and nitrogen atoms; their colors are similar. Be sure to count the number of holes for these.
- It is expected that many students would find it hard to do all of these by themselves initially. While you are expected to make a good-faith effort to solve the problems by yourself first, please don’t hesitate to ask your instructor questions if you don’t understand something or you get stuck.
Molecular Polarity and Physical Properties
- In this part, you will need to wear goggles, lab coats, and other lab safety equipment as usual. However, lab notebook will not be required.
- Students will be rotated in to complete this part using common equipment.
We will observe some phenomena relating polarity of molecules and molecular properties.
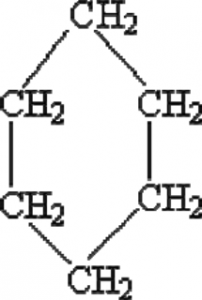
- Examine the structure of water and cyclohexane. Are these polar or non-polar molecules?
- In the fumehood there will be two burets set up that are filled with water and cyclohexane respectively. In addition, there will be a plastic rod and a piece of cloth. Rub the rod with the cloth briskly to build up significant charge. Start a slow stream of cyclohexane running out of the buret and place the electrically charged rod close to the stream of cyclohexane (without touching the cyclohexane itself). What happens to the stream of cyclohexane?
- Repeat step 2 using water instead.
- Your instructor will microwave a sample of water and then microwave a sample of cyclohexane. Is there any difference in the temperature of the samples after this?
Acknowledgments
This experiment is based on a similar experiment developed for Chemistry 105 at Fort Hays State University, Kansas.
