
20 Acid-Base Titration Curves
Purpose
To compare and contrast acid-base titration curves for different acid-base titrations.
Expected Learning Outcomes
- Obtain an acid-base titration curve.
- Analyze an acid-base titration curve.
- Select an appropriate indicator for use in a titration.
Textbook References
Tro, Chemistry: Structure and Properties, 2nd Ed., Ch. 17.4
Introduction
- The write-up here covers merely the very basics of what the lab entails; more details are covered in your textbook which you are expected to refer to.
- You will have done acid-base titrations before; however, the setup and approach is somewhat different since we want to now find the pH as the titrant is added to the analyte (rather than just finding the end point).
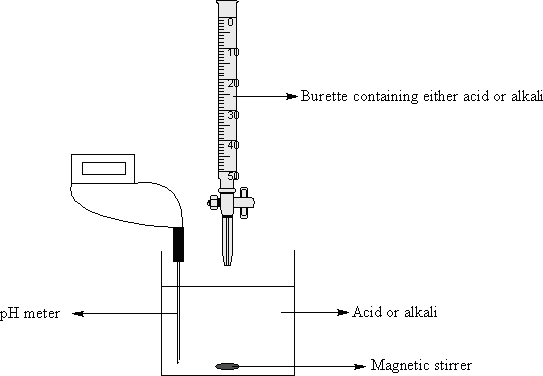
Acid-base titrations involve the dropwise addition of one solution-phase reagent (using a buret) into a carefully-measured amount of another reagent (for this purpose, in a beaker as you can’t put a pH probe into the opening of an Erlenmeyer flask):
There are three main classes of titrations that can be studied:
- Strong acid-strong base
- Weak acid-strong base
- Weak base-strong acid
In this experiment, you will examine the titration curves for strong acid-strong base and weak acid-strong base titrations. In each case, we are undergoing an acid-base neutralization reaction:
[latex]\ce{HA} (aq) + \ce{OH-} (aq) \to \ce{H2O} (l) + \ce{A-}(aq)[/latex]
Before proceeding, please review Analysis of Acids and Bases by Titration and review what the chemical significance of the equivalence point would be.
The following video outlines the key concepts associated with acid-base titration curves:
Types of Titration Curves
The two main types of titration curves are illustrated here:
Strong Acid-Strong Base Titrations
When titrating a strong acid, such as hydrochloric acid with sodium hydroxide, you are reacting the HCl directly with NaOH
\begin{equation}
\ce{HCl}(aq) + \ce{NaOH} (aq) \to \ce{H2O} (l) + \ce{NaCl} (aq) \label{411:SASB_eqn}
\end{equation}
In this case, there is a very sharp transition in pH at the equivalence point. Furthermore, as the salt formed in the neutralization reaction is neutral, the solution at the equivalence point is neutral (pH 7).
Weak Acid-Strong Base Titrations
An example of such a titration would be acetic acid (CH3COOH) with sodium hydroxide. In this case, the reaction is
\begin{equation}
\ce{CH3COOH} (aq) + \ce{NaOH} (aq) \to \ce{CH3COONa}(aq) + \ce{H2O}(l)
\end{equation}
or, if I were to write this in net ionic form
\begin{equation}
\ce{CH3COOH}(aq) + \ce{OH-} (aq) \to \ce{CH3COO-}(aq) + \ce{H2O}(l)
\end{equation}
Equivalence Point and Beyond
At the equivalence point, all of the CH3COOH is converted to CH3COO–, a weak base. Therefore, the solution is basic (pH > 7) at the equivalence point.
Beyond this point, as additional strong base (and hence OH–) is added, a sharp transition in the pH curve is observed similar to what you see beyond the equivalence point of a strong acid-strong base titration curve.
The Buffer Region
Before the equivalence point, you will find that there is a more gradual increase in pH than you would find for a strong acid-strong base titration curve. Furthermore, we find that for the middle part, there is a gradual increase in pH. The reason for this is that in this region some – but not all – of the CH3COOH is neutralized to form CH3COO– (its conjugate base). When there are appreciable amounts of both, we have a buffer solution which resists pH change (and hence we find a gradual change in pH).
Since it is a buffer solution in this region, we can use the Henderson-Hasselbalch equation to calculate the pH of the solution:
\begin{equation}
\textrm{pH} = \textrm{p}K_a + \log_{10}\frac{[\textrm{base}]}{[\textrm{acid}]}
\end{equation}
What is particularly important is the half-equivalence point, where half of the weak acid is reacted to form its conjugate base. In this situation, the number of moles of weak acid is equal to its conjugate base, and therefore [latex]\displaystyle \frac{[\textrm{base}]}{[\textrm{acid}]} = 1[/latex]. Substituting this back into the Henderson-Hasselbalch equation, this means that at the half-equivalence point [latex]\textrm{pH} = \textrm{p}K_a[/latex] and we can use this to find the Ka of the weak acid.
Examples
Looking at titration curve (b) above, the equivalence point is at 25.0 mL. Therefore, the half-equivalence point is where the volume of NaOH added is [latex]25.0\textrm{ mL} \div 2 = 12.5\textrm{ mL}[/latex].
From the titration curve, we find that the pH at this point is 4.9. Therefore, [latex]K_a = 10^{-4.9} = 1 \times 10^{-5}[/latex].[1]
Procedures
- It is important that you calibrate the pH probe at the beginning of the experiment following the instructions in Using Laboratory Equipment. You will also find directions on how to use the pH probe there.
- You will work in pairs in this experiment.
- Between each part of the experiment when you change the analyte, you must rinse all glassware except the buret carefully with deionized water. The pipet should then be rinsed with a sample of the analyte you’re going to use.
- Please refer back to Using Standard Laboratory Equipment on tips on using pipettes and burets for titrations.
- For each part of this experiment, you will need to use the standardized sodium hydroxide solution prepared in the Buffers, Indicators, and Solution Standardization experiment.[2]
- Set up your pH probe following the same procedure as you did at the beginning of the Buffers, Indicators, and Solution Standardization experiment.
Strong Acid-Strong Base Titration
In this part, you will titrate a sample of hydrochloric acid with the standardized solution of sodium hydroxide
- Rinse the buret with tap water, deionized water, and then a small portion of sodium hydroxide solution.
- Fill the buret with the standardized sodium hydroxide to about the 10.00 mL mark. Check to make sure there are no air bubbles in the buret. Read and record the volume reading of the sodium hydroxide. This will be your initial buret reading for this entire titration ([latex]V_i[/latex]).
- Using a volumetric pipet, pipet 10.00 mL of the 0.1 M hydrochloric acid solution and dispense this into a 50.00 mL volumetric flask. Dilute the solution to 50.00 mL and then pour the solution into a 125 mL beaker.
- Place a small stir bar into the beaker, and place the beaker on a stir plate. Stir the solution gently with the stirbar in the middle. Be sure that the solution is not heated!
- Place the pH probe into the solution and use a clamp to hold it in place, being sure not to have the bottom of the pH probe touch the stir bar or the bottom of the beaker.
- Position the buret such that it can deliver solution into the beaker.
- At the bottom left hand side of the interface, click on the button where it says “Mode: Time Based Rate: 2 samples/s”.
- Select “Event Based” under Mode and name the event (e.g. volume NaOH added with mL as units). Click on “Done”.[3]
- When the reading is stable, (a) measure the volume of the buret (this will be your [latex]V_i[/latex] for this entire titration curve), and (b) hit the “Keep” button and then enter 0 as the volume. This will record this data.
- Dispense about 1 mL of sodium hydroxide solution from your buret
- Read the buret to find [latex]V_f[/latex] for this reading, and calculate the overall volume of NaOH added ([latex]V_{\textrm{added}} = V_f - V_i[/latex]).
- When the reading is stable, hit the “Keep” button and then enter [latex]V_{\textrm{added}}[/latex] as the volume. This will record this data.
- Be sure to read the buret to the correct number of significant figures, and realize that [latex]V_i[/latex] will be the same throughout the curve, so [latex]V_{\textrm{added}}[/latex] will increase as NaOH is added.
- The volume of NaOH added in each increment is a suggestion and an approximation. Matching these volumes exactly is unnecessary. However, the volume must be recorded accurately to the correct number of significant figures.
- Repeat steps 11-13 until the pH begins increasing more rapidly.
- Continue repeating steps 11-13, but now deliver smaller volumes of NaOH – perhaps around 0.4 mL increments rather than 1 mL increments. Continue this until the pH levels off as NaOH is added.
- Save the data as a CSV file and make sure each member of your group has a copy of the file.
Monoprotic Weak Acid-Strong Base Titration
In this part, you will be given a solution of an unknown weak monoprotic acid to titrate. You will be attempting to find both the acid ionization constant and concentration for this acid.
Take an sample of the unknown weak acid and obtain the titration curve for this weak acid following the procedures you used in the previous part, being sure to record the unknown number for the sample.
Waste Disposal
All waste from this experiment should be rinsed down the drain with plenty of water.
Data Analysis
From your experiment, you will obtain a CSV file that contains the volume for each reading and the pH readings. This file can be opened using Microsoft Excel. Using Microsoft Excel, make an x-y scatter plot with pH on the y-axis and the volume on the x-axis. Join dots on this plot with lines.
The titration curve is the heart of the data analysis.
- Gridlines must be included on the plot. Otherwise, you will not be able to read off equivalence and half-equivalence points from the graph. The minimum spacing on the y-axis should be 0.4 pH units
The equivalence point, in each case, can be found where the pH changes dramatically as a function of volume on the titration curve.
As explained in the introduction section, the pH at the half-equivalence point, i.e. the point where the volume of OH– added is half that added at the equivalence point, is the pKa. You can then use this to find the Ka. There is an example on how to do this in the introduction section.
pH at the Equivalence Point
At the equivalence point, all of the acid has converted to its conjugate base. Therefore, we have (essentially) a solution of the conjugate base of the weak acid.
- Following the approach described previously in Analysis of Acids and Bases by Titration, find the molarity of the analyte.
- By performing a dilution calculation (where the initial volume is the volume of analyte and the final volume is the total volume of analyte and titrant added to reach the equivalence point), find the molarity of the conjugate base at the equivalence point.
- Using the Ka of your weak acid, find the Kb of its conjugate base using the formula [latex]K_W = 1.0\times 10^{-14} = K_a \times K_b[/latex]. The theoretical pH at that equivalence point can then be calculated following the standard approach for calculating the pH of a weak base . You can compare this with the pH you find for the equivalence point.
Examples
- When you take logs, only numbers after the decimal point are significant figures. Therefore, there is only one significant figure in this number. When you have your data, you should make sure you have finer gridpoints so you can estimate one more decimal place. ↵
- If you and your lab partner were both absent, please contact your lab instructor for help. ↵
- If you would like more accurate results, you may choose to click on Average sensor reading over 10 seconds. ↵
