
4 Crystals of Ionic Compounds
Purpose
To grow and observe of crystals of nickel(II) sulfate and copper(II) sulfate.
Expected Learning Outcomes
Grow and describe the appearance of crystals, and record experimental procedures and observations in the laboratory notebook.
Introduction
Most compounds are held together by either ionic or covalent bonds.
- Ionic bonds are formed through the complete transfer of one or more electrons to form a positively charged ion (cation – typically a metal[1] and a negatively charged ion (anion – typically formed from non-metals).
- Covalent bonds are formed by sharing electrons between different atoms, with the central electron being attracted to both nuclei. These are formed typically within nonmetal-only compounds, polyatomic ions, or between metalloids and non-metals.
In this experiment, we will form crystals of two compounds:
- Copper(II) sulfate (CuSO4)
- Nickel(II) sulfate (NiSO4)
which, as provided in the guidelines above, are both ionic crystals.
Crystalline Structure of Ionic Compounds
Due to the mutual attraction between cations and anions, cations will tend to be completely surrounded by anions, and vice versa. The result is the formation of a stable 3-D crystal lattice structure. The arrangement of cations and anions in a crystal, in turn, contribute to the overall shape of the crystal that is observed. For example, this is the structure of copper(II) sulfate.
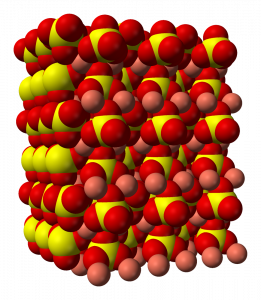
Because the shape of a crystal is governed by the arrangement of the ions in the crystalline lattice, this is an important characteristic used in distinguishing between different ionic solids.
It should be noted that other substances (such as metallic elements) form crystals. One particular example to note is that biomolecules, in the presence of certain solvents and/or solutions, can form (tiny) crystals. The X-ray diffraction patterns of these crystals can be studied and used to determine the 3-D structure of such biomacromolecules.
Describing What You Saw and What You Did
In science, a key part of the practice of science is to record and report what you have done to your peers. For example, a forensic scientist will need to be able to show his/her notes – or his/her tests will be essentially “not done”, and the suspect will be set free!
The standard of notes that will be expected is such that a good student (for example, your TA) is able to repeat your entire procedure without reference to these typed notes. They need to describe (a) what you did (including the amounts of reagents as well as you know it) and (b) what you observed. It need not be in full sentences, but it needs to be intelligible and legible. Crossings-out are okay.
In this experiment, as many of the steps depends on what you see and do, there is no fixed procedural section to write up in advance. Instead, you will write up the procedure as you go along, and the quality of your written procedure and observations will be graded accordingly, as well as the quality of your crystals as explained towards the end of this packet. There is therefore no report form for this experiment.
Procedures
This experiment spans over two weeks:
- During the first week for this experiment, you will prepare the two crystals and record your observations and how you did that. The crystals take about a week to fully form, so we will come back to this during another laboratory session.
- The next week you return to the laboratory, you will be asked to dry and observe your crystals, and then place them in vials for grading.
Special Equipment/Supplies Needed
These are listed on a “per pair” basis:
Week 1
Each pair will need:
- 3 extra small beakers
- 5 g copper(II) oxide
- 5 g nickel(II) oxide
- 25 mL of 3 M sulfuric acid.
The copper(II) oxide and nickel(II) oxide will be found in a weigh boat for the class near the balances. Ask your instructor if you need more.
Week 2
- 2 watch-glasses
- 2 vials
- Magnifying glass
- 1 chemical label
Week 1: Preparation of Crystals from Oxides
Each pair of students will prepare two crystals: copper(II) sulfate and nickel(II) sulfate. In each case, the procedure is exactly the same except that the starting chemical is slightly different.
You will prepare one crystal before the other; therefore, you will need to follow this overall procedure twice.
- Weigh out the solid reactant and place into a 50 mL beaker labeled with the compound, your names, your lab section, and the date. Weigh out about 5 g of the solid. Make sure that the balance area is clean after you are done with this.
- Slowly add (a few drops at a time) 3 M sulfuric acid into the beaker containing the metal oxide until there is approximately 25 mL of sulfuric acid in the beaker.[2]
- Place a hot plate in the fumehood, and place the beaker on the hot plate. Warm the solution gently such that the liquid simmers gently without boiling violently. Stir the solution continuously with a glass stir rod.
- When the volume of the solution has reduced to between about one-half to two-thirds of the original volume, turn off the heat.
- While the solution is still hot, decant the liquid contents of the hot beaker into another small, clean beaker labeled with the name of the compound formed, your names, your lab section and the date. To decant the solution, use a glass stir-rod as a “block” and pour the solution against the glass rod such that the liquid phase goes into the beaker, keeping any undissolved solids in the original beaker.
- Cover the beaker containing the decantate (liquid decanted from another container, without any solid phase) with a piece of paper towel on top and place in the designated tray provided for collecting the beakers. Have your instructor sign you out, but keep your carbon pages. You will submit your carbons next week.
Week 2: Observing Your Crystals
- Decant any supernatant liquid from your crystals and discard this liquid into the waste beaker.
- If no solid crystals were formed, you may need to boil your liquid off some more and allow the solution to cool down. Consult your instructor if this is necessary.
- Get a watch glass and place two pieces of paper towel on it.
- Spread out your crystals on the paper towel and allow the crystals to dry.
- Observe these crystals and describe them in your notebook. You will have access to a magnifying glass for this purpose.
- Relevant characteristics to describe in your notebook may include: apparent purity, color, crystal shape and size, as well as variability among samples of the salt.
- Obtain a clean, small vial that is big enough to fit the crystals you’ve got. Label the vial with your names, your section, the name (not formula) of the compound, and today’s date using the chemical label provided.
- Select a sample of clean, dry crystals and place them in the vial that you have labeled.
- Yes, yield counts – however, purity and uniformity count far more. Choose and pick out as many crystals as possible, by all means, but do that without sacrificing the purity or uniformity of the selected crystals.
- Turn in your crystals by placing the vials onto designated trays for grading. Submit your carbons for grading by your instructor.
Waste Management
All waste from this experiment should be poured into designated waste beakers provided for this purpose (for both weeks).
Experiment Grading
This experiment is graded differently from all other experiments, as there is no short report for this experiment. It is worth a total of 30 points, distributed as follows:
| Notebook Score – Week 1 | 20 |
| Notebook Score – Week 2 | 5 |
| Quality of Crystals | 5 |
| Total | 30 |
This score will be scaled to yield the same amount of credit as a regular short report. There will be no “notebook” score this week.
Your notebook will be graded based on how well the observations and procedures are recorded. Unlike previous weeks, it is possible that instructors may grade the carbon-copies outside of class and provide feedback through Canvas at their discretion. The notebook score will be given for each individual separately.
The quality of crystals will be determined for all CHEM-C 125 sections based on the following criteria, with decreasing emphasis down the list:
- Purity How pure is your crystal? Given the fact that the main impurity would be water, the main criterion for this part is how wet your crystals look.
- Uniformity How alike do your crystals look? The crystals should have the same color and shape, as the chemical substance is the same.
- Yield How much material did you produce? Note that the yield score is relatively low compared to the other criteria, and you should aim for higher purity and uniformity at the expense of yield.
Note that while large crystals are possible in this experiment, it is not required (nor sufficient) to getting full credit in this experiment.
Acknowledgment
This experiment is based on an experiment developed for Chemistry 105 and Chemistry 120L at Fort Hays State University, Kansas.
