
5 Melting Point Analysis of Recrystallized Dibenzalacetone
Purpose
To accurately measure the melting point of pure and impure dibenzalacetone crystals so that we can estimate the purity of our recrystallized dibenzalacetone sample.
Expected Learning Outcomes
Demonstrate the ability to determine melting point ranges of pure and impure compounds.
Use melting points to estimate the purity of a sample.
Introduction
Now that we have recrystallized our dibenzalacetone and let the crystals dry, we need to assess their purity. While we can get a rough idea of their purity based on their color, in most cases you will not be able to tell how pure something is just by looking at it. Plus, doing a melting point analysis will give us a much better idea of how pure our sample is. While there are many methods of determining the purity of a sample, melting point is one of the easiest and cheapest ways of determining purity for crystalline solids. This is because pure, crystalline solids have very sharp melting point ranges (usually 1-4 ºC) while impure crystals have a much lower and broader melting point compared to a pure sample of the same compound (generally 10-20 ºC lower than the pure substance and instead of a range of 1-4 ºC, it’s usually a range of 10-20 ºC). The reason for this comes back to the difference in the molecular structure of a pure crystal vs an impure crystal that we saw last week. Pure crystals have a perfectly structured, repeating pattern of molecules that are arranged so that each molecule attracts the molecules surrounding it as much as possible. But impurities in a crystal make the molecules around that impurity become disordered and thus each molecule in the crystal becomes less attracted to the molecules surrounding it than it would if they were packed together properly (see figure below, adapted from a figure by Flowers et al[1]).
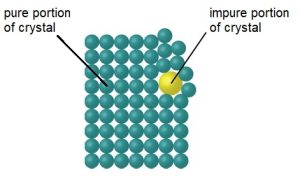
When all the molecules are packed together optimally in a regular pattern, they all require the same amount of energy to start sliding past each other and thus turn from a solid into a liquid. This means that every part of every crystal will melt at essentially the same temperature. But in a disordered, impure crystal, each pair of molecules is attracted to each other differently, thus some molecules need less energy (lower temperature) to be able to start sliding past each other while other molecules will need more energy (higher energy). This means that different parts of an impure crystal will start melting at different times, thus giving a broader and lower melting point.
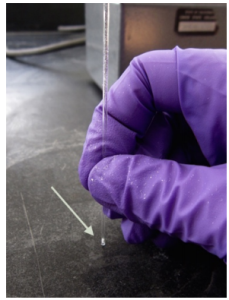
Practically speaking, the way you do a melting point is you place a small amount of your sample into a very small, thing glass tube know as a capillary tube that is open at one end and closed at the other (see figure below by Lisa Nichols[2]).
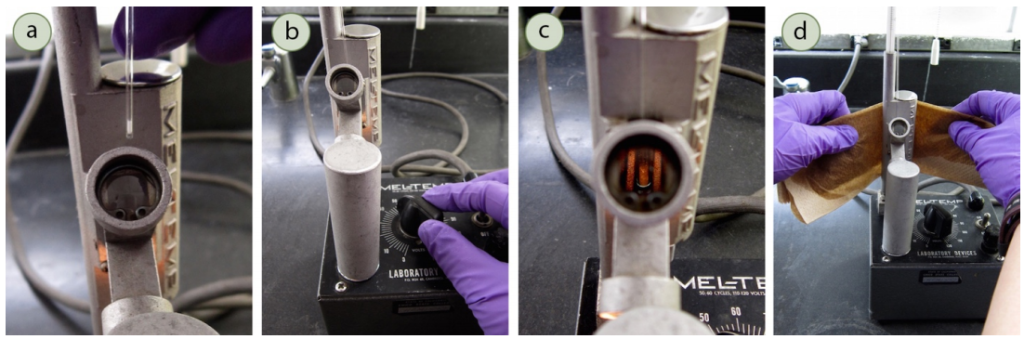
You then place this into a MelTemp apparatus that allows you to slowly and precisely increase the temperature while watching the sample in the capillary tube for any signs of melting (see figure below by Lisa Nichols).
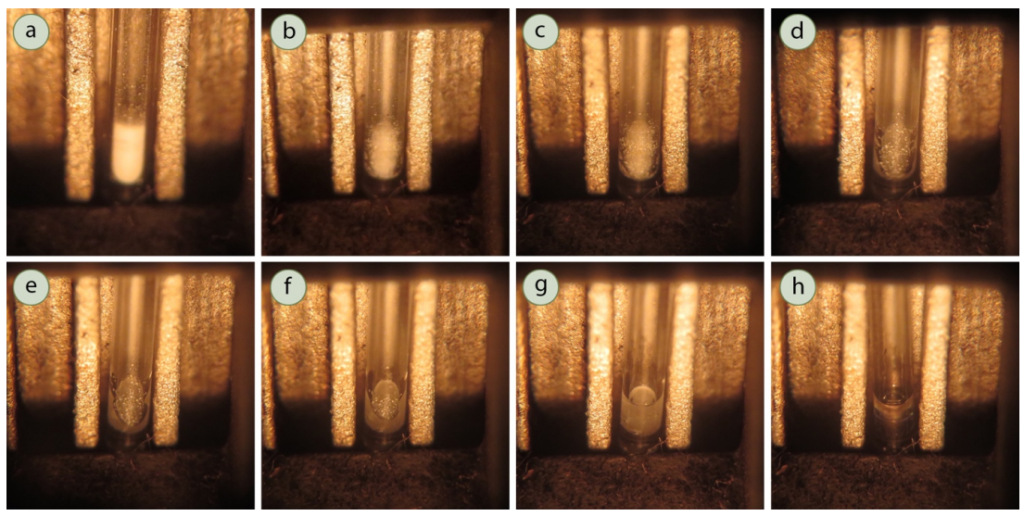
It is important to note that it is difficult to tell exactly when melting starts, but you are looking for the first sign of liquid. It is common for substances to “shrink” (i.e. pull away from the walls of the capillary tube) a few degrees before it starts melting. Do NOT count this as the start of melting (although it is a good thing to note in your notebook). You need to wait for the first drop of liquid to form for it to be considered the start of that sample’s melting point. You can see an example of a sample in a capillary tube well before melting, while shrinking, at the first sign of liquid, and at different stages of melting in the figure below.
For a more thorough discussion of the theory behind recrystallization, please see this section of Organic Chemistry Lab Techniques by Lisa Nichols (the textbook used in organic chemistry lab here at IU East).
Procedures
Special Equipment/Supplies Needed
These are listed on a “per pair” basis:
Each pair will need:
- 1 vial
- Magnifying glass
- 1 chemical label
Determine Mass of Recrystallized Product
- Transfer the filter paper with your product onto a tared balance with a weigh paper (by “tared”, I mean put the weigh paper on the balance and press the “on/off” button so that the balance reads 0.000 g with the weigh paper on it).
- You will need to carefully transfer the filter paper with your product from the Buchner funnel to the weigh paper using a spatula to get under the filter paper and peel it off the bottom of the Buchner funnel. You might also need to scrape some residue off of the Buchner funnel and onto the filter paper.
- Once you have the mass of the product + filter paper, bring it back to your lab bench and find the mass of your product by subtracting the mass of the filter paper that you found last week.
- Observe these crystals and describe them in your notebook. You will have access to a magnifying glass for this purpose.
- Relevant characteristics to describe in your notebook may include: apparent purity, color, crystal shape and size, as well as variability among the crystals.
Thermometer Calibration
Thermometers (especially old thermometers) are not always as accurate as we expect them to be. Because of this, we need to do a quick calibration of our thermometers to make sure that they are reasonably accurate and make any adjustments if they are no longer perfectly accurate. To do this, we need to use them to measure the temperature of samples where we know their temperature to see if our thermometer gives us the expected temperature. While you will do a very thorough version of this calibration next semester, for this lab we’re going to do a quick and easy calibration. Since we know that pure water boils at 100 °C and freezes at 0 °C, we can use boiling water and ice water as our samples of known temperature and do a 2-point calibration.
- Start your calibration by measuring room temperature (i.e. determine the temperature of the air by not touching your thermometer), which should be around 22 °C. If your thermometer is more than 3 °C away from 22 °C, get a different thermometer.
- Next recording the temperature of boiling water (there will be a beaker of boiling water provided for the class at the front of the room; make sure the bulb of your thermometer is only touching water, not glass), and ice water (a beaker of ice water will be provided for the class at the front of the room).
- SAFETY NOTE: wait for the thermometer to come back to approximately room temperature before placing it in either the boiling water or the ice water. If you don’t, the heat shock could cause the thermometer to shatter.
- Determine a correction for your thermometer (e.g., you might need to add/subtract 1.2 °C from your thermometer to make the readings accurate).
Melting Point Analysis of Dibenzalacetone
Using your calibrated thermometer, determine the melting point of commercial (pure) dibenzalacetone, dibenzalacetone contaminated with bromophenol blue (i.e., the left over starting material from last week), and your recrystallized sample. Note that the melting point range of pure dibenzalacetone is 110-111 °C.
- Weigh out ~0.01 g of each sample you want to take a melting point of on a of weigh paper.
- Obtain a clean, small vial that is big enough to fit the crystals you’ve got. Label the vial with your names, your section, the name of the compound (dibenzalacetone), and today’s date using the chemical label provided. Then place the rest of the recrystallized sample you collected into the labeled vial (i.e. add all but the ~0.01 g that you weighed out in the previous step) and turn in your crystals by placing the vials onto designated trays for grading.
- Crush your three ~0.01 g samples into a fine powder. There are several ways you can do this. I personally take a piece of weigh paper, put a small amount of sample in the middle, fold the paper over and use a stir rod/spatula to crush it, but most people put the sample on a watch glass or in a vial and crush it there.
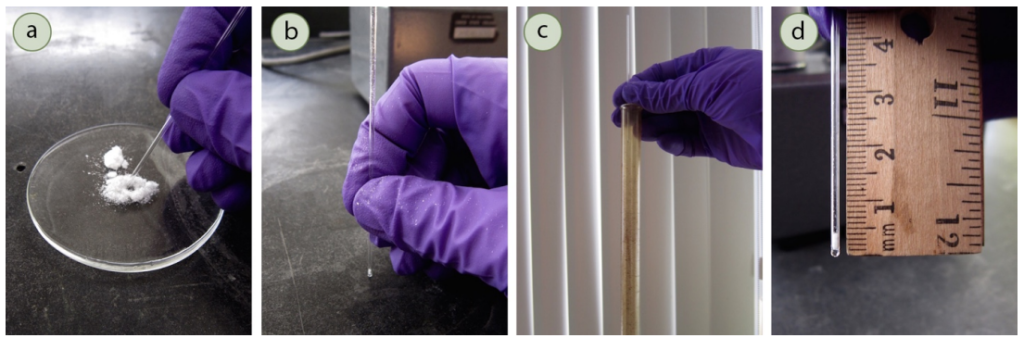
- Tap the open end of the melting point tube onto the pile of powdered sample until ~1 mm of sample is trapped in the top of the tube (see part a of the figure below by Lisa Nichols, but note that it is fine to have your sample on the weigh paper instead of on a watch glass like in the figure).
- Tap the closed end of the melting point tube on the lab bench to get the sample into the bottom of the melting point tube (see part b of the figure below by Lisa Nichols).
- Repeat steps 3 and 4 until you have 2-3 mm of sample at the bottom. Measure with a ruler (see part d of the figure below by Lisa Nichols).
- Drop the capillary tube down a long glass tube a few times to pack the sample down (see part c of the figure below by Lisa Nichols). If there is <1 mm of sample at the bottom of the tube at this point, throw away the melting point tube in the broken glass and start over with another tube.
- Repeat the process until you have 3 prepared melting point tubes: 1 with your recrystallized sample, 1 with the impure starting mixture, and 1 with pure dibenzalacetone.
- Do a quick melting point determination of the 3 samples by placing all 3 melting point tubes in the Mel-Temp and turning the Mel-Temp knob to ~70 V. This should cause the temperature to change at a rate of ~5 ºC/min at the temperatures your samples are expected to melt at (the rate of heating is what matters, not the setting on the knob). Record the temperature every minute and note at what temperature each sample starts to melt. As this is a rough estimate, recording to the nearest degree is fine.
- Once all 3 samples have melted, turn the Mel-Temp knob to 0 and let it cool to at least 20 ºC below the temperature where the first sample (lowest melting point) started melting. If you need to cool the Mel-Temp down quickly, you can wrap the heating part of the apparatus in damp paper towels.
- Prepare 3 new melting point tubes to do a careful melting point range analysis.
- Remove the used tubes from the Mel-Temp (observe them for any differences in behavior).
- Place the new melting point samples into the Mel-Temp and turn the knob so that you get an increase in temperature of ~1 ºC/min at the temperatures where you expect melting to take place (I recommend starting at 4 and adjusting as necessary). Anywhere you do not expect melting to happen, you can temporarily increase the rate of heating until you get ~15 ºC below the temperature where you expect melting to occur.
- Record the temperature every minute, being as precise as the thermometer allows you to be (i.e., estimate to 1 digit past the graduations). Make a note of exactly when each compound starts to shrink, when it starts to melt, and when it finishes melting, and what each sample looks like when it is at these points in the process. It’s not a bad idea to take a picture when this happens, but it’s not required.
- Once all 3 samples have melted, turn the Mel-Temp knob to 0 and let it cool to approximately room temperature. Observe what happens to each sample as they cool.
Waste Management
Used capillary tubes should be thrown in the BROKEN GLASS (do NOT put them in the normal trash). All other waste can be thrown in the normal trash. Remember that your product (apart from the portion that you crushed to do the melting point) should be submitted for grading, not thrown away.
- https://chem.libretexts.org/Courses/University_of_Kentucky/UK%3A_General_Chemistry/10%3A_Liquids_and_Solids/10.5%3A_The_Solid_State_of_Matter ↵
- https://chem.libretexts.org/Bookshelves/Organic_Chemistry/Organic_Chemistry_Lab_Techniques_(Nichols)/06%3A_Miscellaneous_Techniques/6.01%3A_Melting_Point/6.1A%3A_Overview_of_Melting_Point ↵
