
4 Recrystallization of Dibenzalacetone
Purpose
To create crystals of pure dibenzalacetone from a sample contaminated with bromophenol blue.
Expected Learning Outcomes
Purify solid compounds through recrystallization.
Accurately and thoroughly describe the appearance of crystals.
Record experimental procedures and observations in the laboratory notebook such that you can use them in the future the next time you have to perform a recrystallization.
Introduction
Most compounds are held together by either ionic or covalent bonds.
- Ionic bonds are formed through the complete transfer of one or more electrons to form a positively charged ion (cation - typically a metal[1] and a negatively charged ion (anion - typically formed from non-metals).
- Covalent bonds are formed by sharing electrons between different atoms, with the central electron being attracted to both nuclei. These are formed typically within nonmetal-only compounds, polyatomic ions, or between metalloids and non-metals.
In this experiment, we will remove bromophenol blue (a common acid/base indicator and tracking dye for gel electrophoresis) from a sample of dibenzalacetone (which used to be a common active ingredient in sun screens for reasons you will learn about in organic chemistry) by recrystallizing the contaminated sample. Recrystallization is a process where you dissolve an impure crystalline solid to release the impurities trapped inside the crystal matrix and then allow the desired compound to precipitate out as new, pure crystals while leaving the impurities dissolved in solution. If you have ever made rock candy, you have recrystallized sugar (sucrose). Recrystallization is a common method for purifying organic compounds, including pharmaceuticals (it's also one of the methods Walter White uses in Breaking Bad to purify crystal meth). If you take organic chemistry lab, you will learn about recrystallization in much greater detail.
Crystalline Structure of Compounds
Due to the mutual attraction between cations and anions, cations will tend to be completely surrounded by anions, and vice versa. The result is the formation of a stable 3-D crystal lattice structure. The arrangement of cations and anions in a crystal, in turn, contribute to the overall shape of the crystal that is observed. For example, this is the structure of copper(II) sulfate.
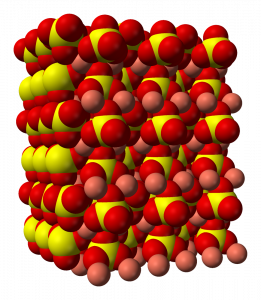
Because the shape of a crystal is governed by the arrangement of the ions in the crystalline lattice, this is an important characteristic used in distinguishing between different ionic solids.
But crystals are not exclusive to ionic compounds; other substances such as metallic elements and many covalent compounds form crystals. This is why table salt (an ionic compound) and table sugar (a covalent compound) look essentially the same (small white crystals), but they have such different chemical properties (including taste). One particular example to note of a covalent compound creating crystals is that biomolecules, which in the presence of certain solvents and/or solutions, can form (tiny) crystals. The X-ray diffraction patterns of these crystals can be studied and used to determine the 3-D structure of such biomacromolecules (if you take organic and/or biochemistry at IU East, you will use the data from these types of experiments to learn about the structure and function of different biomolecules).
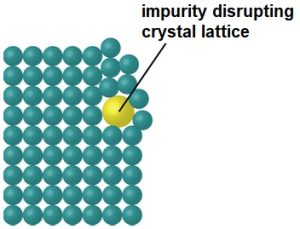
Regardless of what type of substance is creating the crystal, what's important for the formation of a crystal is that the different atoms/molecules/ions in the crystal attract each other. In ionic compounds, this attraction is from the electrostatic attraction between oppositely charged ions, while in covalent compounds, this attraction comes from a variety of intermolecular forces, mainly hydrogen bonding (you will learn about intermolecular forces more next semester and in organic chemistry). In a pure crystal, the molecules/ions will be arranged in such a way that maximizes these attractive forces, which will create the repeating structure you see in the crystal lattice structure of copper (II) sulfate above. However, if the crystal isn't pure, the impurities will disrupt this nice neat packing of the molecules and create a disordered structure around the impurity that means that the rest of the molecules can't pack together as closely (see figure below[2]) and will thus have weaker attractive forces than in a pure crystal.
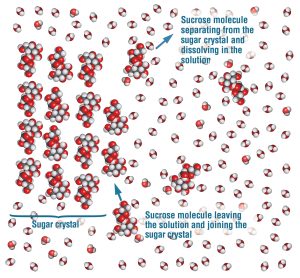
To remove such an impurity, we dissolve the crystal in the minimum amount of hot solvent (ethanol in our case, water in the example shown in the figure below) needed to fully dissolve the crystal (i.e., until no more solid crystal is visible) so that the impurity is no longer trapped inside the crystal but instead floating around in solution. The crystal is dissolved because the attractive forces between the solvent molecule (e.g., water) and the crystal molecule (e.g., sucrose) are stronger than the attractive forces between the crystal molecules. This makes the water surround the sucrose molecules so that the sucrose molecules only interact with the water molecules instead of with other sucrose molecules like they do when they are in a crystal (see figure below[3]). This is the definition of "dissolve", where the molecules in a solid become surrounded by solvent molecules and thus stop being part of a solid.
We need hot solvent because solids are generally more soluble in hot solvents than in cold solvents (e.g. it's a lot easier to dissolve sugar into hot tea than iced tea). We can then slowly cool the solvent down and the crystal will reform without the impurity. This means that on the macroscale (i.e., what we can observe with our eyes), it often looks like nothing happened during the course of a recrystallization. You will start with a solid crystal in a liquid solvent and you will end with a solid crystal in a liquid solvent. But on the molecular level, you have gone from an impure crystal to a pure crystal.
In our case, because we are removing bromophenol blue (which is actually red in its pure form) and forming pure dibenzalacetone crystals (which are yellow), you should see a significant difference between the starting crystal and the ending crystal, but be sure to observe more than just the difference in color between the starting material and the product. Since most of the time a recrystallization happens, you remove white impurities from a white compound, we also need an alternative way to determine if the impurities have actually been removed, which we will learn more about next week.
For a more thorough discussion of the theory behind recrystallization, please see this section of Organic Chemistry Lab Techniques by Lisa Nichols (the textbook used in organic chemistry lab here at IU East).
Describing What You Saw and What You Did
In science, a key part of the practice of science is to record and report what you have done to your peers. For example, a forensic scientist will need to be able to show his/her notes – or his/her tests will be essentially “not done”, and the suspect will be set free!
The standard of notes that will be expected is such that a good student (for example, an MSRC chemistry mentor) is able to repeat your entire procedure without reference to these typed notes. They need to describe (a) what you did (including the amounts of reagents as well as you know it) and (b) what you observed. It need not be in full sentences, but it needs to be intelligible and legible. Crossings-out are okay.
While keeping a good lab notebook is always important, it is particularly important for recrystallization as recrystallization is commonly used in the organic chemistry lab. So if you are planning on taking organic chemistry lab, you will need to do more recrystallizations in the future and it will be extremely helpful to have your own notes on how to do it.
Procedures
You will need to analyze your recrystallized product (dibenzalacetone) for next week's lab, so do NOT dispose of your product at the end of the lab. Keep it in your lab drawer.
The quality and yield of crystals will be determined for all CHEM-C 125 sections based on the following criteria, with decreasing emphasis down the list (see experiment 5 short report on Canvas for full rubric):
- Purity (5 pts) How pure is your crystal? This will be assessed both visually and via your melting point data.
- Uniformity (3 pts) How alike do your crystals look? The crystals should have the same color and shape, as the chemical substance is the same.
- Yield (2 pts) How much material did you produce? Note that the yield score is relatively low compared to the other criteria, and you should aim for higher purity and uniformity at the expense of yield.
Note that while large crystals are possible in this experiment, it is not required (nor sufficient) to getting full credit in this experiment, although they should be larger than the tiny crystals that you start with for you to get full credit.
Part 1: Recrystallization of Dibenzalacetone
Getting just the right amount of hot ethanol to dissolve the starting mixture is difficult and requires patience (although doing it too slowly can also be an issue).
- Setup a hot water bath by adding ~200 mL of tap water to a 250 mL beaker with a stir bar and a thermometer and placing this beaker on a hotplate clamped to a ring stand. Use a ring clamp to ensure the beaker doesn’t fall off the hot plate. (We are using tap water for this instead of distilled water since this water is just transferring heat to our test tube and will never come in direct contact with the sample.)
- Heat and gently stir the water until it is at ~70 C (the exact temperature isn't important, but it should be a little below the 83 C boiling point of ethanol). Turn the hotplate up to high (but keep the stirring fairly slow) until you start to see bubbles forming at the bottom of the beaker/on the stir bar, then turn the heat down to ~3 and adjust as necessary to stay at 70-80 °C. CAUTION: this beaker and the hotplate are HOT, do not touch them.
- Use a 50 mL beaker to measure and transfer ~10 mL of ethanol to a 50 mL Erlenmeyer flask and place this flask on a 2nd hotplate. Heat to boiling, then turn down the heat so that the ethanol is just below its boiling point.
- Weigh out ~1 g (write down exactly how much) of starting mixture and observe the crystals carefully. A magnifying glass and ruler will be provided to help you with this.
- Transfer the starting mixture to a LARGE test tube.
- Using a P1000 micropipet, transfer 0.5 mL (500 μL) of hot ethanol to the test tube.
- Place the test tube in the hot water bath using a test tube clamp and gently stir with a glass stir rod (try not to introduce air bubbles) for at least 2 minutes until no more solid will dissolve (be reasonably gentle while stirring, otherwise you can break the test tube). Write down what you observe.
- Repeat steps 6 and 7 until you have added the minimum amount of hot ethanol needed to fully dissolve all of the solid (meaning that the solution is no longer cloudy - hold the test tube up to the light to see if you can see if any solid particulates are still floating around). This will probably take ~5-8 mL of ethanol. If you can only see a few specks of solid floating around after stirring for 2 minutes, add 1 more aliquot of ethanol, stir for another 2 minutes in the hot water bath, then continue to step 9 even if not all of the specks have dissolved.
- Make sure that there is enough water in your hot water bath such that the level of the liquid in the test tube is below the level of the water in the hot water bath. If it isn't, use another beaker to SLOWLY transfer more tap water into the hot water bath.
- For this step to work, it is critical for the hot water bath to be between 70 and 80 °C. Too hot and the ethanol is likely to boil away too quickly. Too cool and it will take forever for the solid to dissolve and you will end up adding too much ethanol.
- Place the test tube into a test tube rack and let it slowly cool to room temperature until crystals stop forming (this will probably take around 10 minutes, but this is a rough estimate, use your own observations to determine exactly when they stop forming). Do NOT touch the test tube during this time except to check its temperature. Be sure to record how long it takes for crystals to start forming, how long it takes for crystals to stop forming (these observations are hard to get an exact time for, just do your best), and what the sample looks like after the crystals have stopped forming.
- If crystals haven't started forming after 10 minutes, place the test tube into an ice water bath (a large beaker filled with ice and just enough water that the level of the ice is the same as the level of the water, but the ice isn't floating) for 5 minutes.
- If no crystals are observed after 5 minutes in the ice water bath, add a single seed crystal of starting mixture to the test tube and let it sit in the ice bath for another 5 minutes.
- If you still can't see any crystals, remove the test tube in the ice water bath and let it warm up to room temperature, then put it back in the hot water bath (if you don't let it come to room temperature, it could shatter when you put it in the hot water bath) and let ~1/3 of the liquid evaporate, then repeat step 9.
- Once your crystals stop forming at room temperature, cool the test tube and solvent flask further by transferring them to an ice water bath for at least 5 minutes. This will decrease the solubility of the dibenzalacetone in the ethanol even more and thus cause more solid to precipitate out of solution, giving us a better yield. Observe the sample again at this point.
Part 2: Collecting the Product Crystals via Vacuum Filtration
- Create a vacuum filtration setup by clamping a side-arm flask to a ring stand using a ring clamp. Then attach the side arm of the side-arm flask to the side arm of an aspirator attached to a faucet using a thick rubber tube. Securely place a Buchner funnel in the top of the side-arm flask such that you get an airtight seal between them.
- Test for vacuum by turning on the faucet and placing your palm over the top of the Buchner funnel to see if you can feel the vacuum. If not, check your setup to make sure you have airtight seals everywhere. (What does your palm feel like when there is vacuum vs when there isn't?)
- Place ~10 mL of ethanol into a small beaker/Erlenmeyer flask and place it in your ice water bath to cool it down.
- Weigh a 55 mm diameter filter paper and then place it on the Buchner funnel with the concave face pointing down (there should be a slight bend to the filter paper if you look carefully, you want the side facing down where the edges of the filter paper are touching the surface of the Buchner funnel, but the middle is not; this will decrease the likelihood that any solid will be able to make its way around the filter paper instead of getting stuck on the filter paper).
- Turn on the faucet so that there is suction on the filter paper and “wet” the filter paper with a small amount (use a transfer pipet) of ice cold ethanol. (How do you know when the filter paper is fully "wetted"?)
- Dry off the outside of your test tube with your product and break up the solid product in it with a stir rod, then quickly pour it out onto the filter paper (keep the stir rod in the test tube while you pour it out), then use the stir rod to scrape out as much solid onto the filter paper as possible.
- Rinse out the test tube 2x with ~1 mL (use a transfer pipet) of ice cold ethanol and add each aliquot to the filter paper. This removes more product from the test tube and rinses away any contaminants that were dissolved in the mother liquor (the liquid that the crystals precipitated out of) while dissolving a minimum amount of our dibenzalacetone product (hence why the ethanol needs to be cold).
- Turn off the faucet to turn off the vacuum and add 1-2 mL of ice cold ethanol.
- Gently break up any chunks of solid on the filter paper to allow the solvent to access all parts of your product, then reapply the vacuum for ~5 minutes.
- Observe the crystals again using a magnifying glass and compare them to the crystals you started with.
- Discard the filtrate (the liquid in the side-arm flask).
- Let your product dry overnight in your lab drawer (keep it in the Buchner funnel, put the Buchner funnel in a beaker to keep it upright). To remove the Buchner funnel from the side-arm flask, grab the rubber adapter on the Buchner funnel and twist; do NOT pull straight up.
Waste Management
DO NOT DISCARD YOUR PRODUCT! Pipet tips should be disposed of in the broken glass (they can poke through normal trash bags). All other waste can be thrown out in the normal trash (if solid) or rinsed down the drain (if liquid) since dibenzalacetone and bromophenol blue will be in such small amounts and both are considered non-hazardous.
- With the important exception of [latex]\text{NH}_4^+[/latex], the ammonium ion. ↵
- https://chem.libretexts.org/Courses/University_of_Kentucky/UK%3A_General_Chemistry/10%3A_Liquids_and_Solids/10.5%3A_The_Solid_State_of_Matter ↵
- https://www.acs.org/education/resources/highschool/chemmatters/past-issues/archive-2014-2015/candymaking.htm ↵
