
During the semester
Accessibility and student accommodations in Canvas
There are many different types of accommodations students can need due to a disability. When you receive an email letting you know that a student in one of your classes needs accommodation, please reply promptly so needed arrangements can be made as quickly as possible. The sooner the accommodations can be made, the sooner your student can be successful in your class.
The email will tell you what specific accommodations are needed to help the student get the same information and have the same learning experiences as your other students. Some accommodations will require giving the Assistive Technology & Accessibility Centers staff information and materials such as your syllabus, reading list, video links, etc., and talking with a consultant about the specific needs of the individual stuhttps://atac.iu.edu/dent. Other accommodations may include things you can do yourself like being welcoming to an ASL interpreter or service dog, writing larger on a whiteboard, editing the captions on videos you make, or making sure the digital version of any handouts or reading material is accessible to a screen reader program.
The following are the most common accommodations needed in Canvas.
- Extra time on quizzes and exams
- Accessibility in Canvas assignments, pages, and syllabi
- Accessibility in documents
- Accessibility in videos (including editing and requesting captions)
For more on accessibility and some easy strategies to improve your course, visit the Improving the Accessibility of Your Canvas Course in Expand.
Extra time on quizzes and exams
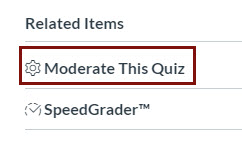 If you have timed quizzes or exams in Canvas, you may need to provide extra time for completion. If you have a student who needs extra time, you can make that adjustment in the Quizzes tool using the “Moderate This Quiz” button on the right side of the screen when you are viewing (not editing) the quiz. If you do not have a “Moderate This Quiz” button, check if the quiz is published. While the quiz does not need to be open to students (i.e. the Available From date can be in the future) it must be published to be able to activate the button.
Visit the Canvas Guide “Once I publish a timed quiz, how can I give my students extra time?” for detailed instructions on adding extra time.
Accessible Canvas assignments, pages, and syllabi
If students are using a screen-reader to read your Canvas site, the assignments, pages, and especially your syllabus need to be formatted so that the screen-reader can process the text properly for the student. The keys to creating accessible Canvas content are to:
- Format your headers using the built-in styles in Canvas instead of just making text large and bold.
- Format your bulleted and numbered lists using the built-in styles in Canvas instead of just typing an asterisk or a number and a space.
- Use the Indent button in the editing tools instead of typing spaces to indent text.
- Avoid using tables purely for page formatting. You can float images to the left or right by using the left and right align buttons in the text editor.
- Add alternative (descriptive) text to instructional images and mark non-instructional images as decorative.
- Don’t use URLs as link text, use meaningful text describing what the link is to instead. Also, don’t use “click here” as link text because that also doesn’t give any indication of the link destination.
- If an image serves as a link, the alternative text of the image serves as the link text, so make sure that it says where the link is going to.
Screen readers are not like audiobooks. Please take a few minutes and listen to someone using a screen-reader to experience how very different of an experience it really is. The following video shows Mary Stores of IU’s Assistive Technology & Accessibility Centers using a screen-reader to try to read parts of a Canvas site.
Please feel welcome to schedule a consultation with your campus teaching and learning center to learn more about making your Canvas site accessible and the tools available to help.
Accessible documents
If you are giving your students documents via Canvas, you’ll also want to check their accessibility.
Microsoft Word
The keys to creating an accessible Canvas site also apply to documents created in Word. There is a lovely tutorial on creating an accessible syllabus in Word that will get you started. Visit Creating an Accessible Syllabus using Microsoft Word in the IU Expand training catalog to access the tutorial.
PDF Files
To check the basic accessibility of a PDF file, try to highlight individual words in the document. If you can’t and if the page turns blue, what you have is a picture of the page which is not accessible to a screen reader. For detailed instructions on document accessibility, please visit Accessible PDF document resources.
If the document is a journal article, the best option is to use an existing digital copy of the article from one of the library databases. You can find out if we have the article by going to your campus or school library website and use their search tool to search for the article. If you have trouble finding it, you can always ask your subject matter librarian and they will be happy to help you.
If it is a scanned book chapter, first make sure your use falls within copyright rules. Your subject matter librarian or another librarian should be able to help you determine this. If it is within copyright usage, your subject matter librarian may be able to help you find an accessible digital version that your students can use.
If it is historical/archival material, search online to find out if a digital version exists through one of the many government departments and organizations digitizing original sources. This is also something your subject matter librarian can assist you with.
If it is a another type of material such as a handout, slide deck, or document, your best course of action is to find the original Word, Google Doc, PowerPoint, etc. file, make sure that version is accessible, and provide that instead of the PDF.
If you cannot find an accessible copy of the PDF you can use Adobe Acrobat DC (part of the Adobe Creative Cloud – not Adobe Reader) to improve accessibility by rotating pages, recognizing text, and checking reading order if needed. You can install the Adobe Creative Cloud suite at IUWare or use it virtually at IUanyWare.
Rotating pages
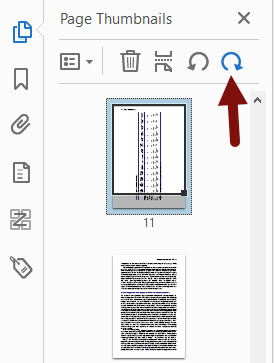
Rotating pages is not something that you may think of as an accessibility issue but screen readers cannot read text that is displayed vertically – not to mention it’s hard for everyone else to read as well. Even if your document has readable text, if it includes some pages in portrait view and some in landscape view it is important to rotate the landscape pages so they are right side up. To do this, open the PDF with Acrobat DC and use the Page Thumbnails tool.
- Open the Page Thumbnails tool by selecting the Page Thumbnails icon on the left side of your document
 or pressing your F4 key.
 - Find the thumbnail of the first page that needs to be rotated and select it.
- Select the clockwise or counterclockwise arrow to rotate the page as appropriate.
- Repeat for any other page that needs to be rotated.
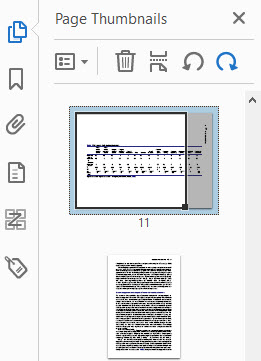
Even if the text of the article is already readable, you will need to recognize the text in the newly rotated pages by following the instructions below.
Recognizing text
Recognizing text with Acrobat is commonly referred to as OCR or Optical Character Recognition. Acrobat recognizes the shape of each letter and translates the image into text. One important thing to note is that the quality of the text recognition depends on the quality of the scan. Poorly scanned documents are unlikely to provide correct text. Using the best scan available improves your chances.
To recognize the text in a scanned document, open the PDF with Acrobat DC and use the “Enhance Scans” ![]() tool to recognize the text.
tool to recognize the text. 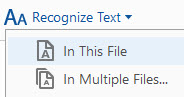
- Select the “Enhance Scans” button on the right
- Select “Recognize Text” at the top of the page and select “In This File.” Acrobat DC will then recognize the text on each page.
After the document is OCRd, review it to ensure the letters were recognized correctly. You can use the Edit PDF tool to correct any errors. Common errors include the letters r and n together being recognized as the letter m and the letters f and n together being recognized as the letter h on lower quality scans.
PowerPoint Files
The key to accessible PowerPoint files is to use the slide templates. This ensures that each slide has a title that is recognized by a screen-reader and a logical reading order. Visit the PowerPoint Accessibility Tutorial from SUNY Oswego for detailed instructions.
Accessible videos
If you have a student who requires captioning or video description on videos from a publisher, YouTube, Vimeo, or another third-party source, ATAC will work with you to get those videos captioned and described as needed.
If you have created your own videos (of you on camera talking or narrating PowerPoints), they are automatically mechanically captioned when you upload them to Kaltura. These captions are normally fairly good if you speak clearly but it is important to check and make sure they are accurate and not embarrassing.
Editing captions
The automatic mechanical captions do not appear immediately. They can take anywhere from 15 minutes to a couple of hours to show up after your video has finished processing depending on the length of the video.
- Log into Kaltura, select your name at the top right, and select
- Select the edit (
 ) icon to the right of the video you want to edit.
 - Select the Captions tab below the video

- Select the “Edit Captions” button.
- The caption editor will open. Select the caption you wish to edit and it will open as an editable text field. You can also use search and replace at the top of the captions page to edit consistently misidentified words.
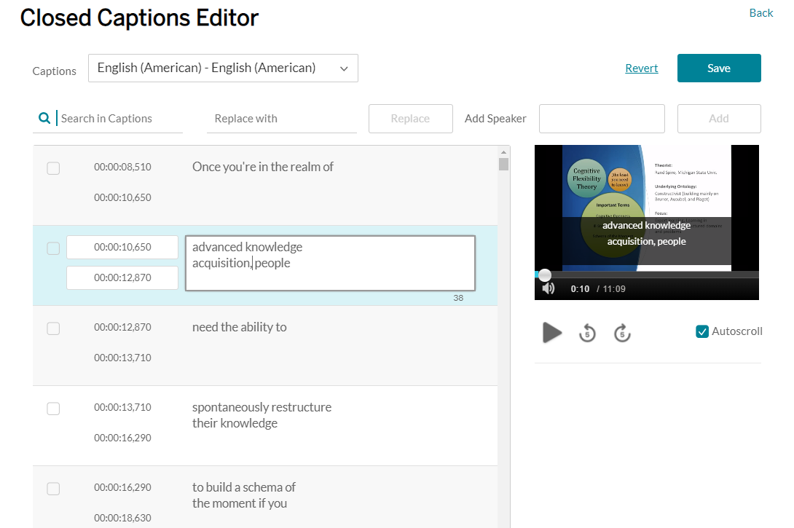
- When you are finished making edits, select .
Please feel welcome to schedule a consultation with your campus teaching and learning center to learn about ways to make your videos more accessible.
Requesting Captions
There are a couple of reasons you may need to manually request mechanical captions. For example, pulling a YouTube video into Kaltura will not trigger the automatic captioning process because nothing was uploaded. If your audio is not in English, the automatic mechanical captions will still try to be in English, so you’ll want to request mechanical captions in the appropriate language.
Manually requesting mechanical captions is both easy and free.
- Go to your video in Kaltura My Media (either in Canvas or Kaltura Mediaspace).
- Select Actions below the video and select “Caption and Enrich.”
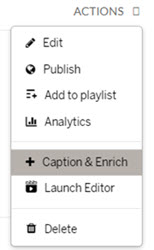
- Scroll down to “Order Captions & Enrichment Services.”
- Select “Service” as Mechanical. (Professional captioning will require you to provide an account number for the charge to be billed to your department.)
- Select the appropriate “Source Media Language.”
- Submit your request.
Your captions will appear shortly. You won’t get a notification so you will need to come back and check.
