
Getting started with the semester
Adding links, images, and video using the rich content editor tools
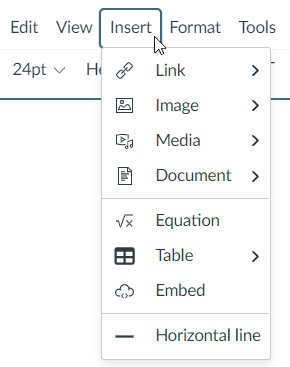
Your Module pages, Assignment instructions, Discussion posts, and Quiz questions don’t have to be plain text. You can add links, files, images, and videos to any or all of them. This eliminates the need to add additional documents and videos as separate module items, or attachments, which are easily overlooked by students. You can add all of these things, and more, by using the “Insert” tab at the top of the Rich Content Editor toolbar.
Internal and external links
You can use the “Link” option in the Insert tab at the top of the Rich Content Editor toolbar to add links to either an item in Canvas (Course Link) or to an external website (External Link).
For an External Link to a website outside of Canvas,
- Place your cursor in the text box where you would like to place the link.
- Select the Insert tab, then “Link,” and then “External Link.”
- Type the name of the link in the “Text” field and paste the URL of the website into the “Link” field like this:
- Text: IU Indianapolis Homepage
- Link: https://indianapolis.iu.edu/
- Choose Done and the link will appear where your cursor was placed.
You always want to make sure the text in the Text field clearly describes where the link is going.
To create a Course Link to a Canvas item such as the Syllabus tool, an assignment, a quiz, a page, a module, etc.,
- Place your cursor where you would like to place the link.
- Select the Insert tab, then “Link,” and then “Course Link.”
- A list of all the types of Canvas items will appear to the right. Select the dropdown arrow to the left of the type of item you’re trying to link. Note that the Syllabus tool is listed in the Course Navigation section.
- Select the item you would like to link and the link will appear where your cursor was placed.
Linking to documents and other files
Selecting the Insert tab and then choosing “Document” allows you to easily insert a link to a file, either already in your Canvas files or one that you need to upload from your computer. Even though the menu says “Document” you can also insert links to spreadsheets, presentations, and other file types the same way.
Please make sure your file links are the title of the document or a clear description of the document you are linking and not just a file name. For example, the following two links go to the same document. Which one is easier to recognize for what it is? It’s a small thing but it improves course usability for your students.
To insert a link to a file that is already in the Canvas Files tool,
- Type the name of the document you are linking.
- Highlight the text with your cursor.
- Select the Insert tab, then “Document,” and then “Course Documents.” A list of all files in the Canvas Files tool will appear to the right.
- Find your file by either searching on the file name or browsing the folders in Course Files.
- Select the file to add the link to the text you have highlighted. The text will flash yellow and an underline will be added below the text.
To insert a link to a file that you need to upload,
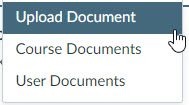
- Type the name of the document you are linking.
- Highlight the text with your cursor.
- Select the Insert tab, then “Document,” and then “Upload Document.”
- Either drag and drop the document file onto the picture of a rocket ship or select “Upload File” to browse for the file on your device.
- Select the “Submit” button to add the link to the document name you have highlighted. The text will flash yellow and an underline will be added below the text.
Once uploaded, your document can be found in the Canvas Files tool in the “Uploaded Documents” folder.
If you would like Canvas to automatically open a preview of the document, select the link you just created, then select “Link Options.” In Link Options you can choose “Preview Inline” and check the box next to “Expand preview by default.”
Images
 To insert an image, you will use the “Image” option on the Insert tab. Selecting the word “Image” will give you the option to insert an image either already in your Canvas files or one that you need to upload from your computer.
To embed an image that is already in the Canvas Files tool,
- Place your cursor where you would like the image to go.
- Select the Insert tab then on “Image” and then “Course Images.”
- Find your image file by either searching on the file name or browsing the thumbnails.
- Select the image thumbnail to embed it into the Canvas rich text editor.
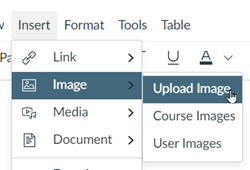
To insert a link to a file that you need to upload,
- Place your cursor where you would like the image to go.
- Select the Insert tab then on “Image” then “Upload Image.”
- Either drag and drop the image file onto the “Upload File” space or select the rocket ship image in that space to select the image file on your device.
- Select “Submit” to add the link to the document name you have highlighted.
If your image is larger than you would like it to be, you can grab the edge of the image with your mouse and shrink it to fit.
Alt Text
Once you have embedded an image into a Canvas page, assignment, etc., you need to set the Alt Text. To do this, select the image and choose “Image Options.” There you can add a description of the image into the “Alt Text” textbox or check the “Decorative Image” checkbox if the image has no instructional purpose.
Free images
As a member of the Indiana University community, you have free access to the Adobe Stock library to use in your courses. To browse the library, go to Adobe at IU and log in with your IU user ID followed by @iu.edu and choose “work or school account.” This will prompt you to log in with IU Login and Duo if you are not already logged in. You can then select the link to Adobe Stock and begin browsing.
If you already have images that are not from the publisher of your textbook or that you did not create, please review the Fair Use Checklist (pdf file). Note that images for sale on stock photo sites are under copyright and not available for free use. If you suspect that the image you have is a stock photo, you can check by uploading your image to TinEye Reverse Image Search, which will usually be able to trace the image to its original source.
“Floating” Images on a Page
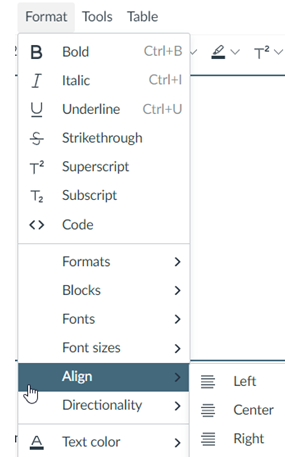 Sometimes, when you add an image to a page, you will want it to sit to the right or left side of the page and allow text to wrap around it (like the images on this page). To do this you will use the “Format” tab above the Rich Content Editor and choose the Align option to align the image to either the left or the right of the page.
When you do this, you may notice that your text wraps very closely around the image and becomes hard to read. To put some white space around your image you can edit the image in PowerPoint to add a white border. The video below walks you through that process.
Video
You can add video directly into the rich content editor from either Kaltura or YouTube. If you are using videos you have created, please use Kaltura and not the Insert Media options in the rich content editor. The Insert Media option in the rich content editor uploads your video to a random Amazon web server and you have no control over the file once it is there. Using Kaltura allows you to control viewing permissions, edit the video, edit captions, delete the video, and more.
Kaltura
To embed a video you already have in Kaltura:
- Select the Embed Kaltura Video button (
 ) in the text editor toolbar.
 - Find your video on your video list.
- Select the blue “Select” button to the right of the video to embed at a medium size or choose the drop-down arrow to the right to choose Large. Do not choose the small option, as it disables some player controls.
To create a video to add into the rich content editor, visit the resources for creating videos using Kaltura, Zoom, and PowerPoint at the end of this book.
Make sure you have checked the captions in Kaltura on any videos you have made before adding them to your page.
YouTube
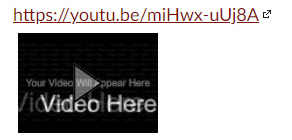
While you can embed video from YouTube by pasting the URL of the video page into your Canvas page, assignment, discussion, etc., the video is small and not very attractive. Once you save your page, students will see the video like the image to the right. (Note that this is an image only. The link is not clickable.)
We recommend adding your YouTube video through Kaltura. This way they will be larger and match any other Kaltura videos, allow you to add chapter bookmarks to the video, and be able to be captioned with editable captions. To do this:
-
- Select the Embed Kaltura Video button () in the Rich Content Editor toolbar.
- Select “Add New” and select “YouTube.”
- Paste the YouTube link into the box provided and select “Preview.”
- Once the video loads, you will have a link to go “Back to Browse and Embed” at the top-right Choose that link and you’ll find your new video at the top of your Kaltura video list.
- Choose the blue “Select” button to the right of the video to embed at a medium size, or select the drop-down arrow to choose Large. Do not use the small option, as it disables some player controls.
- Select the Embed Kaltura Video button (
