
During the semester
Creating Zoom breakout rooms in advance
You can create and name a set of breakout rooms for a specific Zoom meeting room in advance. You can also pre-assign students to those breakout rooms. You can create up to 50 breakout rooms and assign up to a total of 200 participants. These rooms and assignments will be present every time you use that Zoom meeting room. You can change the rooms and the students by following the instructions to create breakout rooms manually or automatically again at any point in the future.
Students can self-select into breakout rooms by default. If you are assigning students to breakout rooms, note that everyone has to be logged in to Zoom to be automatically moved to their assigned breakout room. Following a link from Canvas does not mean that you’re logged in to Zoom. We recommend that everyone use the Zoom desktop or mobile app where they are already logged in, Alternatively, students can go to zoom.iu.edu and log in before following the Zoom link. Students that arrive in your Zoom meeting room without being logged will need to be manually added to the proper breakout room.
Turn on Breakout Rooms in Zoom
- Go to zoom.iu.edu and log in.
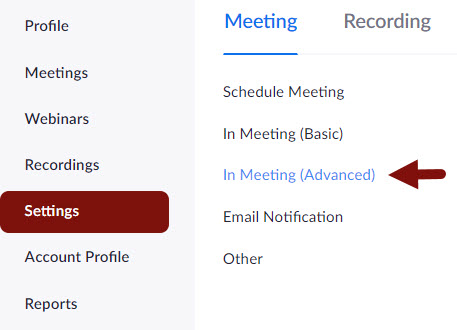
- Go to Settings on the left navigation.
- Select “In Meeting (Advanced)” on the left.
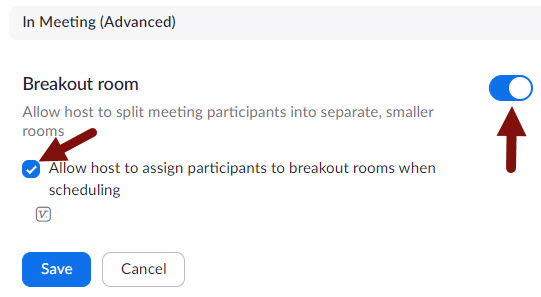
- Turn on the switch to allow breakout rooms (if not already enabled).
- Select the box next to “Allow host to assign participants to breakout rooms when scheduling” and save your changes.
- Choose “Meetings” from the far left navigation list.
- Select the “Edit” button to the right of the name of the meeting to which you would like to add the breakout rooms.
- Scroll down and select “Options” for additional options.
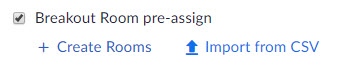
- Check the box next to “Breakout Room pre-assign.”
Create Breakout Rooms manually
If you need a small number of breakout rooms for a small number of students, you can do this manually. You can choose to only create your breakout rooms, or you can create breakout rooms and assign students to them.
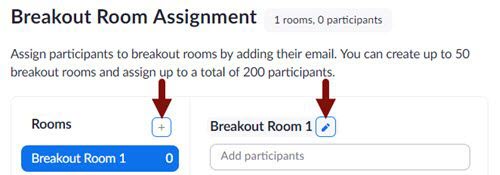
- Select + Create Rooms.”
- Select the plus sign (+) to the right of “Rooms” to create a new room.
- Mouse over the new room’s name and select the edit pencil icon to the right to edit the name.
- If you are adding students to rooms, add students to each room by typing in their IU User ID and “@iu.edu” (for example, abcd@iu.edu or xyz1@iu.edu). Do not use a campus email address (i.e. abcd@indiana.edu or xyz1@iuk.edu) as Zoom will not recognize them.
- Select Save to close that window
- Select Save again to save the changes to your meeting room.
Create Breakout Rooms automatically
If you have a large number of students, it is easier to create rooms and add students by uploading the information. This is a 3-part process as you will need to get the list of your students’ @iu.edu email addresses from Canvas, paste them into a spreadsheet template that Zoom provides and add the room assignments, and upload that file to Zoom.
Get student email addresses
To add students to breakout rooms, you need a list of their email addresses. You can download this information in the Canvas Photo Roster tool.
- Go to the people tool.
- Select the Photo Roster button at the top right of the page and let the photo roster fully load.
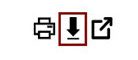
- Once the page has loaded you will find a download button next to the title “IU Photo Roster” between the “print” button and the “open in new window” button.
- Select the download button, check the box next to “Email addresses”, and select the
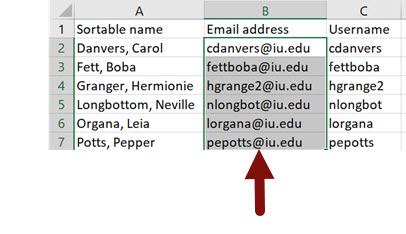
“Submit” button to get a .csv file with your students’ IU email addresses. - Open the .csv file in Excel, Google Sheets, or any other spreadsheet program. Your students will be listed in alphabetical order.
Edit the Breakout Room file template
Once you have your roster, go back to the Zoom meeting settings.
- Choose “Import from CSV”
- Download the file template by selecting the “download” link at the top of the window that pops open
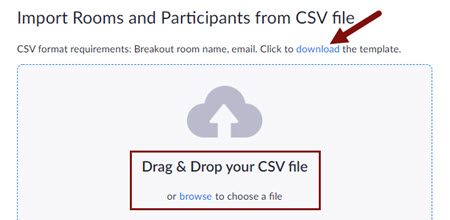
- Open the template file in Excel, Google Sheets, or another spreadsheet program. The template has only two columns, one for the name of the breakout room and one for the students’ email addresses.
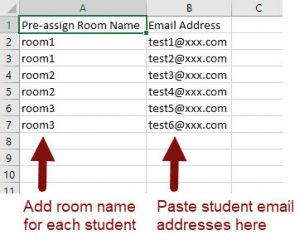
- Go to your roster file. Highlight and copy the column containing your students’ email addresses
- Paste that column into the “Email Address” column on the template
- Type or paste in the name of the breakout room each student is assigned to in the “Breakout Room pre-assign” column. You must have a breakout room name next to each student’s email address for the student to be assigned to a group.
- Save the edited file as a CSV file.
- On Excel, save the file as a CSV file. Don’t let Excel change it to an .xlsx file.
- On Google Sheets, download as a “comma-separated values (.csv, current sheet)” file.
Upload your template file
- Return to the CSV upload window on the Zoom website.
- Browse to find your file and upload it (or drag it onto the window). Your rooms and participants should then be populated in the Breakout Room Assignment window.
- Save your new Breakout Room Assignments.
- Select the save button again to save the changes to your meeting room.
Turn on Breakout Rooms in your Meeting
- When your Zoom meeting room is open and your students are there, select the “Breakout Rooms” button at the bottom of the Zoom window. If the Breakout Rooms button is not there it will be in the three dot Options menu to the right.

- This will display the breakout rooms list. All students who are present and logged in will show up in their assigned breakout room. If your rooms do not look right, select “Recreate” at the bottom of the breakout room window and choose “Recover to pre-assigned rooms.”
- Assign any other students to the appropriate breakout room by selecting “Assign” to the right of the breakout room name (these would be people who entered your meeting room not logged in).
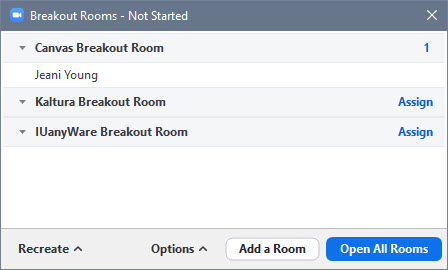
- Select “Open All Rooms” and students who are assigned to a breakout room will have a message pop up asking them to join the breakout room.
