
Working with video (Kaltura, Canvas, Zoom, and PowerPoint)
Recording an individual or group presentation with PowerPoint 365 or 2019
These instructions are for Office 365 or Office 2019 for Windows. You can download Office 365 from IUWare for free. Office 2019 is available on all computer lab Windows computers and via IUAnyWare. (Review instructions on setting up and using IUAnyWare.)
If you are using a Mac
If you are using the latest version of Office 365, you can export a presentation narrated in Slide Show as a video file which can then be submitted as a previously recorded video. Note that when you export your presentation as a video, any narrated audio that was recorded in Slide Show will play, but other embedded media files will not play.
You can also record audio onto slides in Keynote and export them to a QuickTime .mov file which can then be submitted as a previously recorded video.
Video Walkthrough
The following video contains captions that you can turn on using the CC button at the bottom right of the video player.
Instructions
The following steps presume you have Office 365 or 2019 on a Windows computer.
- Activate the Recording tab on the Ribbon if it is not already there
- The Recording tab does not appear on the Ribbon in PowerPoint 365 or 2019 by default so you may need to enable it. Go to File > Options and choose “Customize Ribbon.”
- On the right side list of Main Tabs scroll down to Recording, check the box next to it, and select “OK.”
- Record your presentation
- Open your PowerPoint file, go to the Recording tab, and select “Record Slide Show” on the ribbon to start recording.
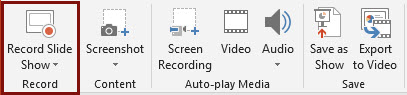
- Check and make sure your microphone and webcam (if using) are recording properly by selecting the small microphone and video camera icons at the bottom right of the recording screen.
- Select the red “Record” button at the top left to start. You can stop after each slide and review your recording or you can continue through the whole presentation. If you continue, make sure to pause between slides. The 1-2 seconds of silence allows PowerPoint to tell what audio goes with what slide.
- When you are done, select the “X” at the top right to finish.
- Open your PowerPoint file, go to the Recording tab, and select “Record Slide Show” on the ribbon to start recording.
- Export your presentation as a video file
- When all the slides have been recorded, go to the Recording tab and select “Export to video” on the ribbon.
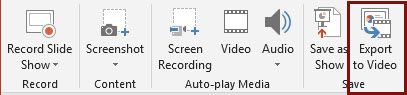
- Select the quality you would like the video to be (1080p (the default) is fine) and leave “Use Recorded Timings and Narrations” selected.
- Select “Create video” and tell PowerPoint where to save your video file. The small black status bar at the bottom of PowerPoint will show you the progress of your export. Do not do anything else in PowerPoint while a video is processing or it will cancel the job.
- Once the video has been processed, you are ready to upload your video to Kaltura and submit. Visit submitting a previously recorded video for instructions.
- When all the slides have been recorded, go to the Recording tab and select “Export to video” on the ribbon.
Group Recording with PowerPoint
If your group prefers to record the individual sections independently and at least one person has Office 365 or 2019 or can access it at a computer lab, you can compile your separate recordings in PowerPoint. Each person in the group would
- begin with a copy of the master PowerPoint file,
- delete the slides that they are not responsible for recording,
- record their audio and/or video on their slides only, and
- send the file with their recorded slides to the group member responsible for putting together the slide deck.
The person putting the slides together would add the other members’ slides into their PowerPoint file and export it to video.
Recording tips
- Team members using Powerpoint for Mac or an older version of PowerPoint for Windows can record audio onto their slides by using the “Audio” option on the “Add” tab on the Ribbon. To do this,
- open your PowerPoint file in the version of PowerPoint that you have
- go to the Insert tab,
- select the Audio button and choose “Record audio”
- Starting from the same PowerPoint file is very helpful for the person who is compiling the recorded slides.
- After your video is created, the person who will submit the assignment for the group will upload the video file to their Kaltura account.
Submit Your Assignment
Visit Upload a previously recorded video for instructions on adding your video to Kaltura. Then, based on your instructor’s instructions, submit your video in one of the two following ways.
- Submit your video by embedding it in a text box in an Assignment or Discussion.
- Submit your video by adding it to the Kaltura: Media Gallery for your course
Verify the Automatic Captions on Your Video
All video uploaded to Kaltura is automatically mechanically captioned using speech-to-text technology. If you’ve ever used speech-to-text, you know it’s never 100% accurate so you need to check your captions and edit as needed to make sure they are correct and not saying anything embarrassing. The mechanical captions appear fairly quickly on short videos once they’re uploaded. You can check them either in Kaltura: My Media if it is available in your course, or at Kaltura Mediaspace. Instructions on checking and editing your captions are at Accessible Videos in this book.
Note on Video Processing
When a video is first uploaded to Kaltura you will have a “media is being processed” animation where you expect your video to be.
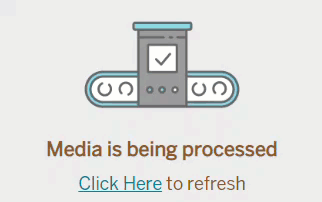
Please be patient. Processing time depends on the length of the video and the number of other videos Kaltura is processing. It will appear once it has completed processing, though you may need to refresh your page. You can embed a video that is still processing in Kaltura.
