
Canvas accessibility for instructors
Accessible content in Canvas tools
This section refers to the text, images, and links you add to standard Canvas tools using the Rich Content Editor (RCE). This includes instructional content in pages, assignment instructions, discussion prompts, your course home page, quiz instructions and questions, and your syllabus if you added it directly to Canvas (as opposed to linking a Word doc or PDF).
You can learn more about the following accessibility practices in the brief training course from the Assistive Technology & Accessibility Centers (ATAC) on Improving the Accessibility of Your Canvas Course in the IU Expand training catalog.
When you review your content for accessibility, check the following items as they apply to your course. (The links go to their respective section on this page.)
This may look like a lot but there are tools in Canvas to help you identify the items that need updating.
Headings
If you have text that includes sections or subsections, such as Purpose, Task, and Criteria in assignment instructions, use the built-in heading styles instead of just making the text bigger and bold. Built-in heading styles create a functional navigation structure for your page. Students using screen reader technology use the headings like an outline to easily move through the page.
You can set text as a heading by highlighting the text and selecting the correct heading level from the text style dropdown at the top left of the RCE toolbar. It will say “paragraph” by default.
Tips for headings in Canvas:
- Your page, assignment, discussion, etc. title is a level 1 heading. The headings you add in the Rich Content Editor (RCE) should begin with a level 2 heading.
- Make sure you don’t skip heading levels. As with an outline, the structure doesn’t make sense if you skip from a level 2 heading to a level 4 then back to a level 3.
- If you want to style a particular level of headings, like making all level 3 headings italicized or indenting them, you can add italics and indents after you set the heading as a level 3. Unlike Word, you can’t change the heading styles globally in Canvas.
Bulleted and numbered lists
If you include bulleted or numbered lists in your text, use the built-in list styles to format them. Properly formatted lists like the one below are read aloud as “List of two items. Item 1, [the text of item 1]. Item 2 [the text of item 2].” This helps students be sure they aren’t missing anything and provides the same structure that students viewing the page have.
Tips for lists in Canvas:
- If you don’t see the bulleted and numbered list icon at the top of the RCE in edit view, select the “more” menu (three vertical dots) at the right side of the RCE toolbar and the icon will display in a new row.
- If you like more space between your list items, you can highlight the list and select “paragraph” from the text style dropdown at the left of the RCE toolbar. It will display “paragraph” as the default but selecting it again will add space between list items.
Links
If you include links to files, webpages, videos, etc., use plain text that describe the link’s destination or function. For example, using descriptive text such as “Kahn Academy Photosynthesis” or “the IU Indianapolis home page” instead of the URL or “Click here” lets students know where they are going. “Learn more about photosynthesis from this Kahn Academy video on YouTube” is even better as it tells them not only where they are going, but also the format of the resource and what they are expected to do.
Tips for links in Canvas:
- To add a link, type the descriptive text for the link first. Highlight the text and select the link icon on the toolbar or select the Insert tab at the top of the RCE and choose Link. Then you can choose whether you are linking to something inside or outside of Canvas.
- For links to other websites, a panel will slide out from the right and you can paste the URL into the URL field to add the link.
- For links to other Canvas items such as modules, pages, assignments, or discussions, a panel will slide out from the right showing these tools as well as main Canvas navigation items like Syllabus. You can select the Canvas item you want to link from that panel.
- For links to files within Canvas, use the insert document icon or select the Insert tab at the top and choose document. If the file is already in your course files, choose course files and browse for the file. Naming your files with meaningful names really helps in this situation. Select the file to create the link. If the file isn’t in Canvas, you can choose upload and upload the file from your computer or device.
Images
If you include images, it is important to add descriptions to each image or, if the image is purely for decoration, mark it as decorative. You use alternative text (called alt text) to explain the information the picture contains, not necessarily what it looks like.
Simple images can be described by adding alt text in the Canvas image options. If your image description is long or detailed, consider adding it to the surrounding text or using an expandable details widget to place the description below the image where all students can benefit.
When writing alt text, imagine you are describing the image to someone over the phone. Would the other person be able to understand the important parts or the point of the image from your description?
Tips for images in Canvas:
- To add a short description to an image, in edit view select the image and choose image options. A panel will slide out on the right and you can add your description in the alt text field at the top.
- To mark an image as decorative, select the image and choose image options. A panel will slide out on the right where you can check the checkbox provided to mark it as decorative.
- For a complex image such as a diagram or chart, you can either describe the image in text near the image or add a long description in an expandable details widget. This does require pasting in a small bit of HTML code into the HTML editor in Canvas.
Ally provides an AI tool to generate alt text which you can access by selecting the gauge icon on the bottom left of the image. This can provide a starting point for alt text that conveys the information provided in the image. The Auto-generate description button is just below the space where you would enter alt text.
![]()
Color
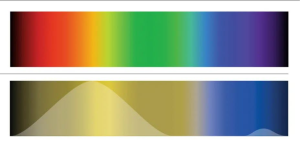
1 in 12 men and 1 in 200 women are colorblind and even more are colorweak. This image shows that the two colors that are the most distinct are yellow and blue.
If you use color to identify something as belonging to a category or group, include an additional way for students to get that information if they cannot see the color. For example, only making text red text to show that something is important doesn’t highlight that information to your students with color blindness.
Also, make sure the color contrast between the text and the background is strong enough to be easily read by people who have low vision, colorblindness, or who could be viewing your site outside. Dark text should always go on a light background and light text should always go on a dark background.
Tips for using color in Canvas:
- To indicate something is important add the word “important” to the beginning of the text or add an icon indicating importance, such as an exclamation mark, with “important” as the alt text for the icon.
- If you have different colored lines or bars in a chart or graph, add another visual indicator to each line. For example, one line may be blue and dashed, another green and dotted, and another orange and solid.
- If you are using a browser that displays Canvas in dark mode, some of the tools you can use to to identify color contrast issues may show issues that only exist in dark mode. For example, the default color of links in Canvas does not provide a strong enough contrast in dark mode but students viewing Canvas without a dark mode browser extension will not have difficulty viewing the links.
Tables
Use tables only for tabular data and not for page formatting. An example of using a table for tabular data would be a table displaying letter grades, points required to earn that grade, and the percentage range for the grade in 3 columns with a header row identifying each column’s contents. An example of using a table for page formatting is a one-row table with your contact information in one cell and your office hours information in another cell to mimic a 2-column layout.
Avoid merging or splitting cells or leaving blank cells in a table. Merged and split cells, as well as blank cells, can cause screen readers to lose their place in the table or give the impression that there is no further data. For example, in a table showing the class schedule, if there is no homework due on a given day, put “no homework” or “n/a” in the homework column instead of leaving it blank. Instead of merging cells to add a title to a table, place the title above the table or add a table caption
Tips for using tables in Canvas:
- To add a heading row, in edit view,
- put your cursor in one of the cells in the top row and select the Table tab.
- On that tab, select row and then row properties.
- Change the row type from body to header.
- Use the caption function in Canvas to add a title to your table by
- putting your cursor in one of the cells,
- selecting the table tab at the top of the RCE,
- choosing table properties, and
- checking the box next to “Show caption.”
Non-English content
For text-to-speech technology to work correctly, it needs to know the language being used. If you exclusively use English your content in other languages needs to be marked in a way that the text-to-speech tools know which language you are using. If, for example, you leave Spanish content unmarked, the tools will try to read Spanish using English pronunciations.
If you need to select a language for text in Canvas the ATAC recommend using the Language Markup Bookmarklet. Note that changing the language in course settings will change the Canvas interface to the selected language but not the content.
Math content
For math equations to be accessible it needs to be in a digital form that can be read with a screen reader, just like with text. You can do this easily in Canvas using MathML and MathJax to produce a navigable and scalable math object.
For instructions for both instructional content and quiz questions, visit the KB article: Create accessible math in Pressbooks and Canvas
Getting Help
If you need help updating your course, please feel free to reach out to your campus teaching and learning centers. Centers are staffed with instructional technology experts who can provide advice and guidance about basic accessibility and universal design for learning.
You can also reach out to the Assistive Technology and Accessibility Centers (ATAC). They can provide training and guidance on how to create accessible materials and are familiar with most learning technology platforms. For questions about digital accessibility, contact the ATAC at atac@iu.edu.
The text box where you can enter text, images, or other content and the formatting tools above the text box. Formatting tools include both a set of tabs (edit, view, insert, format, tools, and table) and one or more rows of icons. If you do not see the icon you are looking for, select the "more" icon which is normally on the right side of the RCE and appears as 3 vertical dots.