
Canvas accessibility for instructors
Accessible files in Canvas
After you have run TidyUp and the Ally Course Accessibility Report, you can identify documents stored in the Canvas Files tool that can be updated.
The same low (red), medium (orange), and high (green) gauge icons that appear next to images and files in other locations are also shown in the Files tool in the Accessibility column. If you have documents shared in Modules or Pages via a link from OneDrive, Teams, or another site, you will find the Ally accessibility icons next to the link.

When you select the icon, Ally will open and identify the accessibility issues for the file. If more than one issue exists there will be an “All issues” link next to the accessibility score which will show you all the issues Ally found.
A note on Math content
To ensure that any instances of math are presented as accessible math in Microsoft files, visit the Microsoft support article: Write an equation or formula. The video shows MS Word but the instructions also apply to PowerPoint, OneNote, and Outlook.
This page focuses mainly on Microsoft products. If you prefer videos, check out Microsoft’s accessibility video training.
Word documents
Running the accessibility checker in Microsoft Word is the best way to review and update the document. To do this,
- Open the document in Word,
- Go to the Review tab, and
- Select Check Accessibility on the ribbon.
The accessibility checker will open in a sidebar on the right displaying the issues. Selecting each issue will provide instructions for updating it.
You can also learn how to set up a Word document to be accessible from the beginning in the brief training course from ATAC on Creating an Accessible Syllabus using Microsoft Word.
Headings
Headings provide the structure of the document. In a Word document, they are a bit different than in the Canvas RCE. In Word,
- The title of the document should be a Heading 1.
- Main headings should each be a Heading 2.
- Sub-headings to the main headings are Heading 3.
- Sub-sub-headings would be Heading 4 if you need them.
Always make sure you don’t skip heading levels. The structure doesn’t make sense if you skip from a level 2 heading to a level 4 then back to a level 3.
While the Word accessibility checker will catch most issues, it will not check for proper order of headings. Heading order needs to be checked manually.
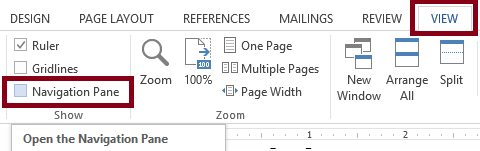
To make this easier, you can turn on the Navigation Pane which lets you check headings without scrolling through the entire document. You can turn on the Navigation Pane in the View tab and a panel will slide out from the left displaying only your headings as an outline.
If there are headings that are not at the correct level, select the heading to be jumped to the point in the document and change the heading in the styles area of the Home tab.
Tables
Directions for accessible tables in Word are available in the Knowledge Base article Create accessible tables in Microsoft Word
PowerPoint slides
PowerPoint also has a built-in Accessibility Checker. You can find it on the Review tab of the ribbon. Selecting Check Accessibility will open a panel similar to the Accessibility Checker in Word and will help you update your slides.
Slide titles are headings
PowerPoint does not allow the use of more than one heading level on a slide. The slide title is the only heading. This makes it critical to start with a preset formats for each slide. The standard slide format includes a slide title and a text box. If you start with a blank slide and add a text box to use as a slide title, that title will not be recognized by screen reader tools and there is no way to set that added text box as a slide title.
In addition to using pre-formatted slide titles, all slides need their own unique title describing what is on the slide. Using the same title for multiple slides or using the same title with “continued” or a number (i.e., Theories 1, Theories 2, etc.) doesn’t provide enough information about what is on the slide for the titles to be useful for navigation.
A helpful way to write slide titles is to have the title be the main point you want students to take away from that single slide. If you find that there are two or three main points, don’t hesitate to break that slide into two or three slides.
Reading order
A new thing the Accessibility Checker will prompt you to check is the reading order on the slide. As it’s common to add additional images and text boxes to slides, it’s important to make sure all of the parts of the slide are read aloud in the proper order.
The Accessibility Checker will open a panel on the right where you can re-order parts of the slide. You can also remove items like decorative lines and images from the reading order.
Tips for accessible PowerPoint files
- To add alt text to the entire SmartArt graphic or chart, select the border of the SmartArt graphic or chart, not an individual shape or piece.
- If you have video embedded in a slide, that video won’t be accessible when played from the PowerPoint file. Add a link to the original video on the slide.
- Tables, especially fixed-width tables, are difficult to read on mobile devices or when using the Magnifier tool. Describing the table in the notes field allows everyone access to the information in the table.
You can learn more about these accessibility practices in the article Make your PowerPoint presentations accessible to people with disabilities from Microsoft. Visit the PowerPoint Accessibility Tutorial from SUNY Oswego for detailed instructions.
Excel spreadsheets
Excel has the same built-in accessibility checker you see in Word and PowerPoint on the Review tab of the ribbon. Some of the items to check for in Excel are the same as in other Microsoft tools, such as table headings, meaningful link text, alt text on images, and color contrast. In addition, there are a few items particular to Excel.
Worksheet names
The accessibility checker in Excel will prompt you to name each worksheet with a meaningful name. Worksheet names should indicate the content of the sheet. Excel workbooks can contain multiple worksheets; they appear as tabs along the bottom of the Excel window beginning on the left. They will be titled Sheet 1, Sheet 2, etc. by default. Those names should be updated as you add content to the sheet.
Named cells and ranges
One thing the accessibility checker will not catch is when it will be helpful to name cells and ranges. Named cells and ranges can act as headers in that they allow easy navigation to important parts of the spreadsheet. An example of a useful named range would be if you have a spreadsheet with data in the first several columns with notes or formulas either at the bottom or on the right. If the range is named, students can easily jump to those notes without going through the entire sheet to find them.
You can learn more about these accessibility practices in the IU KB document Create accessible spreadsheets using Microsoft Excel. Microsoft’s article Make your Excel documents accessible to people with disabilities also includes instructions.
PDFs
PDFs can cause a lot of difficulty for students using technology for reading. Whether they are using complex screen reader technology or simple text-to-speech reading tools, most PDF files were not created to be compatible with these technologies. This is especially true if you have scans of book pages or articles. For more information, visit the Accessible PDF document resources from ATAC.
Articles
If you have PDFs of articles, your best option is to search your campus library databases for the article. If it is in one of the databases, you will likely have access to the article in an accessible format – preferably a webpage. By sharing the link to the article webpage from the database, you can both provide an accessible copy to your students and make sure you’re using a properly licensed source. You can add direct links from EBSCO and ProQuest databases using the instructions in the following IU KB articles.
If an article is not in your campus library or if you are looking for a book chapter, check with your subject matter librarian for assistance. For more about linking to library resources, visit:
IU Bloomington: Linking to Library Resources
IU Indianapolis: How do I link to Library Resources in Canvas?
Other campuses: Contact your campus teaching and learning center.
For help linking to database content, contact your campus library.
Personal, department, and school PDFs
If you have PDFs that you or someone in your department made from a Word document, your best option is to find the file that was used to create the PDF. How challenging this is may depend on how old the document is and if the person who made it still works with you. If you have the original, you can revise it as you would any other Word document and provide your students with the Microsoft Word version.
If you cannot find the original, you can use Ally in Canvas to generate an HTML version of the document which you can convert into an accessible Word document or use Adobe Acrobat Pro (part of the Adobe Creative Cloud suite) to save the PDF as a Word document and update the accessibility. Note that these options may not work if the document has been scanned from a paper copy.
Getting Help
If you need help updating your course, please feel free to reach out to your campus teaching and learning centers. Centers are staffed with instructional technology experts who can provide advice and guidance about basic accessibility and universal design for learning.
You can also reach out to the Assistive Technology and Accessibility Centers (ATAC). They can provide training and guidance on how to create accessible materials and are familiar with most learning technology platforms. For questions about digital accessibility, contact the ATAC at atac@iu.edu.